
Cheat A Fuller A-Line Bob With Tape-In Extensions—Here’s How

Cheat A Fuller A-Line Bob With Tape-In Extensions—Here’s How
Adding tape-in extensions to an A-line bob—and keeping it short? Yep, it’s a thing, and it’s an easy way to bring in more dollars! But adding extensions to short hair for fullness is different than adding for length, so we went live on Facebook with hairtalk® Extensions Master Educator Tucker Cinalli (@tuckerjstyle) to learn his techniques and how to avoid three common mistakes hairdressers make when installing extensions. Check it out below!

Products Used
How much do hair extensions cost? And how much should you charge? Click here!
Mistake #1: Waiting To Cut The Extensions
Cutting the extensions all at once at the end of the application (when working on a bob) is a major no-no and will complicate the haircut.
Solution: Cut as you work! When cutting the hair after each row (or every two rows), following the guide becomes much easier. Plus, it eliminates having to cut too much hair all at once and creates a really clean line a lot faster.
More Cutting Tips:
- Texturize off most of the length before creating the sharp A-line.
- Once the weight is removed, then go in with shears and point-cut the hair deeply to create the A-line.
- “I always point-cut,” says Tucker. “It creates movement in the ends and keeps the look from getting too extension-like.”
Mistake #2: Stopping The Application Too Low
You know that when adding extensions for length, you generally stop applying just under the occipital or in the crown area—the same rules don’t apply when installing tape-ins on short bob cuts.
Solution: Apply the tape-ins higher up on the head. “You want to create a really dramatic point in the front (to create that desired A-line!), so you need to have the extensions coming from where the bangs would start,” says Tucker.
More Application Tips:
- Use the hairtalk® Petites and Minis when working higher up on the head—these tape-ins are more flexible and can be placed more intricately while still being seamless.
- Use the hairtalk® Plus strands at the front hairline—they mimic hair growing from the scalp and are always undetectable.
- Apply tape-ins in a bricklay pattern, leaving a finger-sized space between each row.
- Start the application on the sides because for an A-line end result, the sides are most important. Remember that the goal isn’t to add length in the nape, it’s to blend the sides together and color match the hair.
Mistake #3: Using Only One Extension Color
Here’s what happens: You color match the hair, then use that one color for the entire application! What you’re missing? Dimension!
Solution: Use at least two, sometimes three or four, colors when applying tape-in extensions (even on short hair!). It makes the hair look more natural (and expensive!), says Tucker.
More Color Tips:
- Use two different colors on the same section. For this look, Tucker applies hairtalk® color 25 under the section and places hairtalk® color 613 with an 18 root on top of the section.
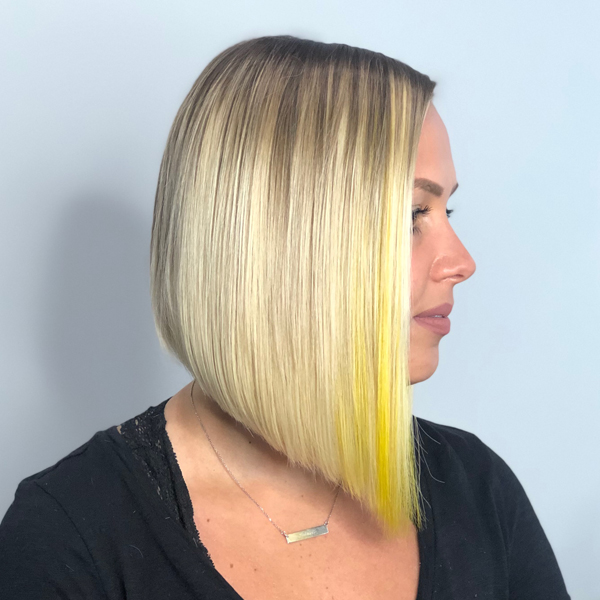
- Add in fashion colors! Clients might be unaware that they can get fashion shades without the commitment—offer placing in one or two strands of hairtalk® Pops of Color for a fun bonus color. (Tucker used neon yellow on his model!)
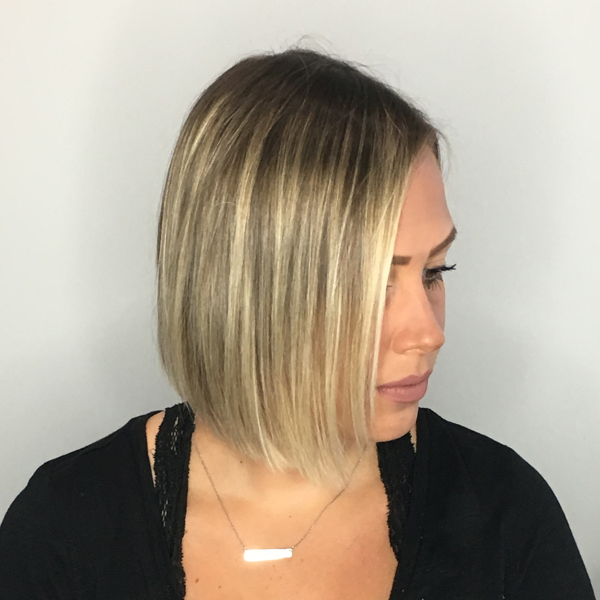
Check out the transformation shots below! 💥⚡️

Watch The Video How-To Below

Want even MORE extension education? Check out this OMG hair transformation with extensions!

More from
Hairtalk
-
Facebook Lives
Create A Bronde Balayage Without The Bleach: Here’s How!
-
Extension Application
TRIPLE YOUR PROFIT PER HOUR: HAIRDRESSERS, LISTEN UP!
-
Manufacturer
Beauty Industry Group Announces Leadership Changes
-
Hair Extensions
How To Book And Price Multi-Method Extensions Services
-
Hair Extensions
hairtalk® Launches Keratin Extensions
-
Business
How To Choose The Best Type Of Extensions For Every Client
-
Hair Extensions
Pro Tape-In Extensions
-
Business
Get Certified in 3 Extension Installation Methods With This Online Course
-
Facebook Lives
Timesaving Technique: Instant Beaded Row™ Extension Installation
-
Hair Extensions
Instant Beaded Row™
-
Bobs
4 Tips To Build A Full Bob With Extensions
-
BTC Events
BTC “On Tour” New York City 2020
-
Hair
Transformation: Blunt Blonde Bob With Extensions
-
WATCH: Double Hand Tied Weft Extension Application Technique
-
Hair Extensions
Double Hand Tied Weft
-
BTC Events
BTC “On Tour” Nashville—Here’s How We Closed Out Our 2019 Tour
-
BTC Events
BTC “On Tour” Nashville
-
BTC University
4 Tips To Give Clients Better, Blonder Extensions
-
Hair Extensions
Give Your Clients This Guide For At-Home Extension Care
-
Brushes/Combs
Extension Brush
-
Hair Extensions
6 Mistakes That Can Ruin A Tape-In Extension Application
-
Hair Extensions
How To Properly Prep The Hair For Extensions
-
Bobs/Lobs
Watch: Lob Styling Using Extensions
-
Best of 2018
The Extension Education You Need Before 2018 Ends

