Create A Bronde Balayage Without The Bleach: Here’s How!
Create A Dimensional Balayage Without Lightening The Hair
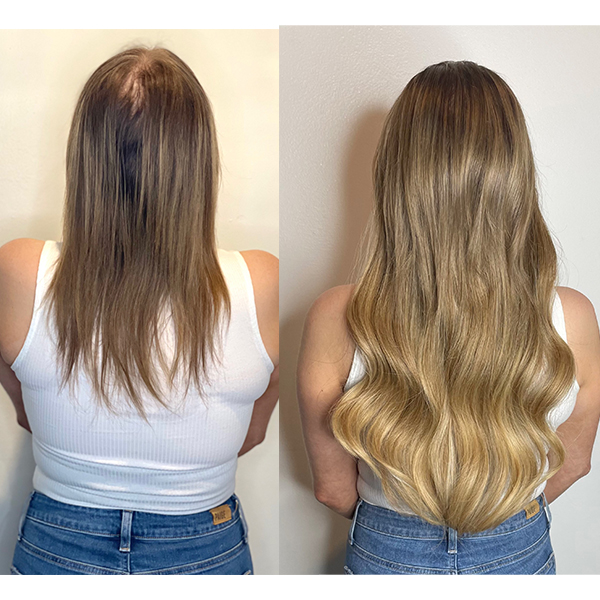
Picture this: Your client just requested a dimensional bronde—but their hair needs a break from the bleach. Here’s a pro secret…offer them a bright transformation (with added fullness and extra length) with extensions.
hairtalk® Senior Multimethod Master Educator and Director of Development Jaqueline Figueroa (@hairplaylv) is here to show you how to give your client a beautiful, blended balayage look—no lightener required! Keep reading to learn how to determine what extension length to use, create a seamless perimeter and avoid bulky, heavy ends.
Check out the before and after below!


1. Struggling to create blend around the hairline? Read this
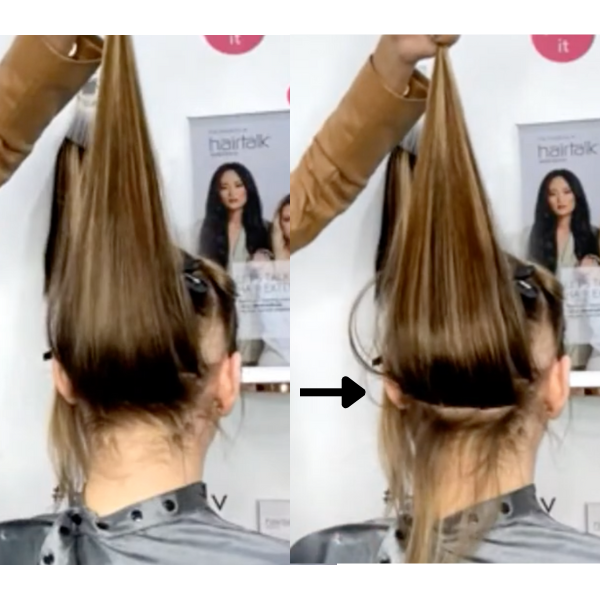
Jacqui starts her application at the bottom of the nape by applying a full row of hairtalk® 17/4/8 COLORMELTS™ tape-in extensions. Here’s why:
Using a colormelt versus the original extensions will erase lines of demarcation that may appear from your client’s natural hair. COLORMELTS™ tape-in extensions are made up of 20 percent root color, 25 percent of hybrid color and 50 percent of dominant pigment to create a seamless blend.
Tape-in extensions also provide flexibility when sleeping and styling because of the flat installation leaving the bulk behind.
Check out the transformation below to see how Jaqui fills in the hairline:


Are you ready to triple your profit? Click here to learn how!
2. Why you should texturize extensions BEFORE the application
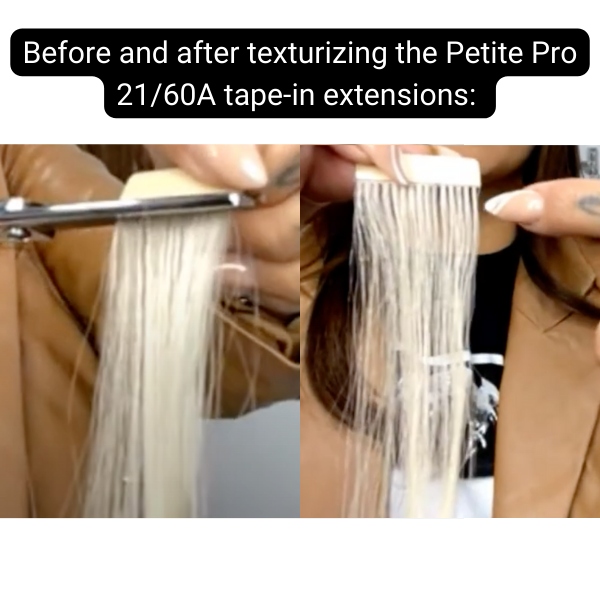
To create a soft transition when placing highlights, Jacqui texturizes the Petite Pro 21/60A tape-in extensions by running her texturizer through the extension once to take out 30 percent of the density.
“This is not done to every single piece,” Jacqui explains, “This is only done to create dimension.” She will apply texturized extensions in two places: At the nape to create pops of blonde and above the ear to soften the blend when the client pulls their hair back. Without this technique, the extension will appear like a sliced foil versus a soft, hand-painted balayage.


3. How to avoid bulky extension ends on fine-haired clients
Your fine-haired clients want their extension transformations to be impactful (hello, fullness)—but still maintain a natural look. If your client’s starting canvas is especially short or fine, Jacqui recommends using two different lengths throughout the head to create a wispier finish, avoiding a heavy look.
Pro Tip: It’s common to find breakage around the hairline. To help create a seamless blend for finer areas, Jacqui starts with a Petite Pro 17/4/8 CM first, adding the blonde Petite Pro 21/60A extension directly on top to create brightness without obvious chunks.
Ready to add extensions to your menu? Click here to learn how to get certified!
This content is sponsored.
More from
Hairtalk
-
Extension Application
TRIPLE YOUR PROFIT PER HOUR: HAIRDRESSERS, LISTEN UP!
-
Manufacturer
Beauty Industry Group Announces Leadership Changes
-
Hair Extensions
How To Book And Price Multi-Method Extensions Services
-
Hair Extensions
hairtalk® Launches Keratin Extensions
-
Business
How To Choose The Best Type Of Extensions For Every Client
-
Hair Extensions
Pro Tape-In Extensions
-
Business
Get Certified in 3 Extension Installation Methods With This Online Course
-
Facebook Lives
Timesaving Technique: Instant Beaded Row™ Extension Installation
-
Hair Extensions
Instant Beaded Row™
-
Bobs
4 Tips To Build A Full Bob With Extensions
-
BTC Events
BTC “On Tour” New York City 2020
-
Hair
Transformation: Blunt Blonde Bob With Extensions
-
WATCH: Double Hand Tied Weft Extension Application Technique
-
Hair Extensions
Double Hand Tied Weft
-
BTC Events
BTC “On Tour” Nashville—Here’s How We Closed Out Our 2019 Tour
-
BTC Events
BTC “On Tour” Nashville
-
BTC University
4 Tips To Give Clients Better, Blonder Extensions
-
Hair Extensions
Give Your Clients This Guide For At-Home Extension Care
-
Brushes/Combs
Extension Brush
-
Hair Extensions
6 Mistakes That Can Ruin A Tape-In Extension Application
-
Hair Extensions
How To Properly Prep The Hair For Extensions
-
Bobs/Lobs
Watch: Lob Styling Using Extensions
-
Best of 2018
The Extension Education You Need Before 2018 Ends
-
Hair Extensions
How-To Video: Color Conversion With Tape-In Extensions


