
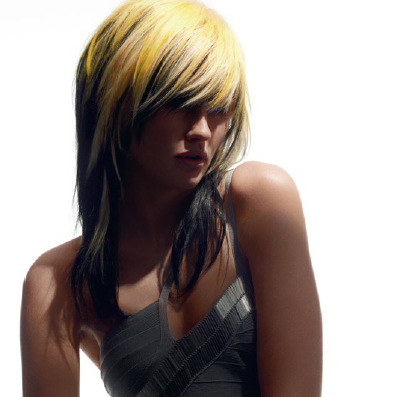
Redken Acid Rain by Kristina Russell

Advertisement
Advertisement
Advertisement
Redken Acid Rain by Kristina Russell
HOW-TO STEPS 
-
 1
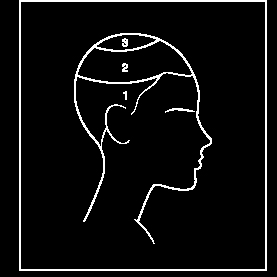
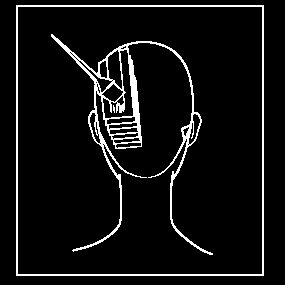
1Take a circular parting through the crown from approximately 2” in front of the high point of the head to just above the parietal ridge. Isolate with a clip. This is Section 3.
-
2
Take a curved parting running from the right recession area to the left recession area. Isolate the section. This is Section 2. The remaining hair is Section 1.
-
 3
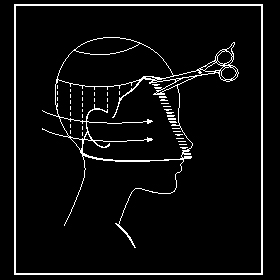
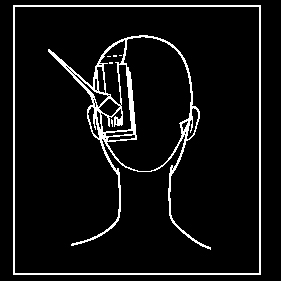
3In Section 1, create a stationary guide by taking vertical partings and over-direct the hair forward at 90°. Place fingers diagonally and cut from shorter at the top to longer at the bottom. This will achieve a disconnected “under layer” through the sides to narrow the bulk of the shape.
-
 4
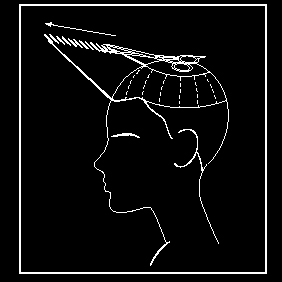
4In Section 2, take ¼” radial sections that pivot from the high point of the head and elevate 45°. Place fingers diagonally, and cut from shorter through the top to longer toward the bottom. Continue around the section with no over-direction. Pro Tip: Use your creativity and work visually to leave the lengths shorter through the fringe area and longer through the sides and back.
-
 5
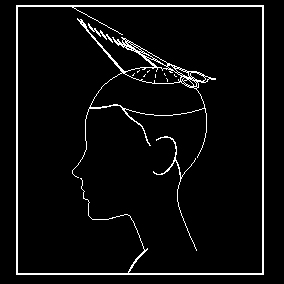
5Repeat Step 2 in Section 3.
-
 6
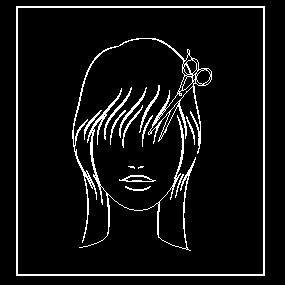
6To reduce bulk and create negative space in the fringe and face framing area, comb hair in its natural falling position and pinch and talk the shears.
-
 7
7Highlight
Formula 1
– 1 part (20 g) Blonde Icing Power Lift
– 1 part (20 g) 40 volume Blonde Icing Conditioning
Cream Developer
BASE
Formula 2
– 1 oz. (30 ml) 2N Color Fusion
– 1 oz. (30 ml) 10 volume Pro-oxide Cream Developer
Glaze
Formula 3
– ½ oz. (15 ml) Yellow Kicker Shades EQ
– ½ oz. (15 ml) 09G Vanilla Crème Shades EQ
– 1 oz. (30 ml) Shades EQ Processing Solution
Formula 4
– 1 oz. (30 ml) 09G Vanilla Crème Shades EQ
-1 oz. (30 ml) Shades EQ Processing Solution -
 8
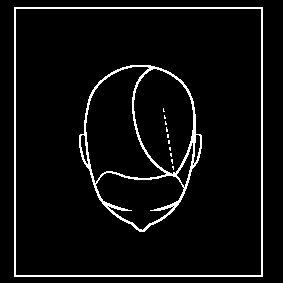
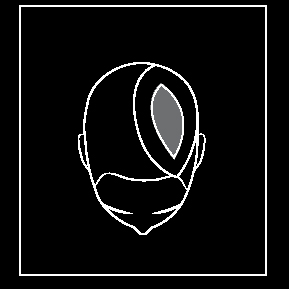
8Create an oval-shaped section that surrounds a side part. Clip the section out of the way. Isolate the rest of the hair with an elastic.
-
 9
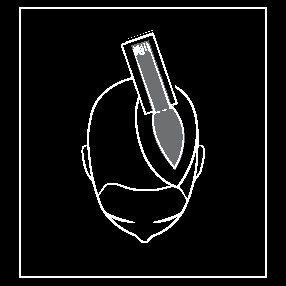
9Start in the back, take slices, and apply Formula 1 from scalp to ends. For faster, more
even lift, apply using back-to-back foils. Complete the section.Pro Tip: To create the asymmetrical look seen in the photograph, apply Formula 1 to a small triangle section behind the ear opposite the part.
-
 10
10Remove the elastic and apply Formula 2 from scalp to ends on the hair surrounding the foils. Direct the hair away from the face for a neat application. Complete the section and process at room temperature for 35-45 minutes. Rinse the outside section completely before removing the foils and rinsing the top section. Shampoo with Extreme. Dry the hair before Step 3.
-
 11
11Work with the same sections as in Step 1. This time, create a second oval that is narrower, shorter in length and sits in the center of the first. See diagram.
-
 12
12Begin with the smallest oval. Standing in the back, take slices and apply Formula 3 from scalp to ends using back-to-back foils. Apply Formula 4 to the blonde hair surrounding this section. Process at room temperature for 20 minutes. Rinse the outside section completely before rinsing the inside. Isolate the inside section and rinse quickly. Shampoo with Color Extend. Follow with Redken Chemistry.
-
13
Mist rootful 06 root lifting spray on the roots. Layer wool shake 08 gel-slush texturizer and fabricate 03 heat-active texturizer throughout the ends. Blow-dry hair using a Denman™ type brush to create volume through the top area. Once dry, flat iron the ends. Finish by misting with workforce 09 flexible volumizing spray.
YOU MIGHT LIKE THIS
-
Hair Color
Redken Bold Ambition by Gary Russell
-
Hair Color
Redken Goldrush Inlaid Brunette How-To
-
Hair
Updo How-Tos from the Redken Artistic Team
-
Hair
Redken Urban Unity by Carmody Homan
-
Hair
Redken Big Bang by Leah Freeman
TRENDING NOW!
-
BTC Hair Trend Report
The Biggest Haircut Trends of 2024
-
Copper
What Is The "Cowboy Copper" Hair Trend? Here's What It Really Means...
-
Uncategorized
TikTok's Viral "Scandinavian Hairline" Is Actually Not New...
-
Business
3 Reasons Why Today's Highlights Are So Expensive
-
BTC Hair Trend Report
Quiet Luxury Blonde: The "Old Money" Trend Explained
-
Blonde
Toning: 5 Fast Purple Shampoo Ideas For Blondes, Silver & Gray
-
Blonde
3 Purple Toning Tips For Clear, Bright Blondes
-
Bobs
How to Avoid a Bulky Bob: 4 Techniques To Try

