
Foil Bleeds & Uneven Blends? Use These 3 Foil Placement Techniques

Watch The Live Demo: 3 Foil Placement Techniques From @cassandraplatinum
You’ve learned traditional foil placement techniques in beauty school—why not add some fresh and creative approaches to your color arsenal? We’re dishing out three different placement tips that will help you maximize impact around the hairline, work more efficiently and a foil folding technique to prevent bleeds and slipping.
Redken Brand Ambassador, blonder and corrective color specialist Cassandra McGlaughin (@cassandraplatinum) is teaching it all in this demo from Redken Symposium 2019. Get the tips, check the timestamps and watch the entire video below!
Products Used
Watch The Live Demo Below!
1. Hairline Foil Placement (0:05)
Start babylights with a horizontal foil at the hairline. Instead of working in a traditional foil placement method, working directly on top of the previous foil, shift from one side to the other for a more rounded placement. This will help you achieve better coverage at the recessions and make sure the corners aren’t cut off.
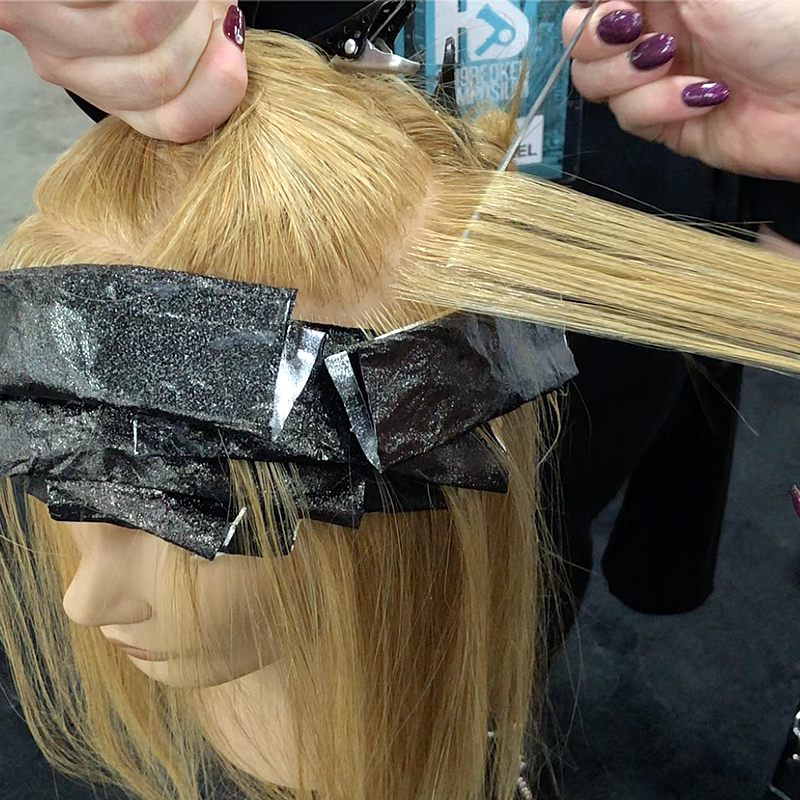
2. Work In Alternating Triangles For Maximum Impact (1:02)
Opposed to working off of a Mohawk section, Cassandra suggests this on both sides—start from the bottom and work all the way up on a horizontal diagonal section. Alternate weaving front and back triangular sections, continuing to square off the side section as you move up the head with the same pattern.
This will help you maximize impact and coverage by using less foils. “Each foil is doing the work of three foils because of where it’s covering,” shares Cassandra.
3. Foil Folding Tip To Prevent Bleeds & Slipping (3:30)
To prevent foils from slipping and bleeding, use this folding technique to create a secure low-profile foil that hugs the round of the head. Follow these steps:
- Take a triangular section and weave off the top.
- Fold the foil 3/4 of the way up, then fold all the way up.
- Create a third “light” fold and press onto the corners, not the bottom of the foil where the product is.
- Adjust the lip underneath with a tail comb.
More from
Redken
-
Celebrity
11 Questions With Celebrity Colorist Tracey Cunningham
-
Blonde
Lived-In Blonde With Warm Vivid Pops
-
Glossing/ Toning
How To Achieve “Glass Hair”: Smart Hacks From Hairdressers
-
Monthly Product Launch List
The Best Hair Launches Of March 2024
-
Blonde
The Biggest Hair Color Trends of 2024
-
Brunette
Caramel Chocolate Brunette With Gray Coverage
-
Awards Shows
The Best Celebrity Hair Colors & Formulas From The 2024 Golden Globes
-
Blonde
Guide To Gray: 5 Tips To Blend or Cover Stubborn Grays
-
News
How Maui Hairdressers Are Rebuilding Post-Lahaina Fires
-
Blonde
Blonde Ribboned Root Smudge
-
Balayage
Warm Glow Lived-In Blonde Balayage
-
BTC Hair Trend Report
Quiet Luxury Blonde: The “Old Money” Trend Explained
-
Blonde
Dear Colorists, Do You Enforce A Healthy Hair Policy?
-
BTC Hair Trend Report
Your Guide To Fall & Winter 2023’s Hair Color Trends
-
Blonde
Muted Honey Blonde
-
Industry News
Redken’s Safe Space Course Creates A More Inclusive Salon Experience
-
Haircare
ACIDIC BONDING CONCENTRATE 5-MINUTE LIQUID MASK
-
BTC Events
AI, Mental Health & Social Media: 7 Business Tips You Can’t Live Without
-
Copper
What Is The “Cowboy Copper” Hair Trend? Here’s What It Really Means…
-
Celebrity
Margot Robbie’s ’60s-Inspired Ponytail at the “Barbie” Premiere
-
Additive
4 Tricky Hair Color Scenarios & What You Should Do!
-
Gray Coverage
These 8 Steps Will Soften & Cover Grays In Just A Few Minutes
-
Hair Color
WWYD: How To Stop Your 6N From Turning Orange
-
Glossing/ Toning
Coral Crush

