
30-Minute Foil Placement: 5 Key Tips From Gina Bianca

Express Blonding Service: 30-Minute Foil Placement
At a time when double booking isn’t an option, express services are the key to getting more clients in and out of your chair. And Gina Bianca (@iamginabianca) is going to help you pick up the pace when blonding with her 30-minute foil placement, a technique that creates high impact results with less foils.
Gina shared this technique during Joico’s #HairJoi Digital Show, an ALL-DAY Facebook Live that featured free education from BTC Founder and Creative Director Mary Rector and Joico artists including @larisadoll, @omgartistry, @richardmannah and @stylistricardosantiago. Watch Gina’s whole technique in the video below (she starts at 4:51:05 😉), then keep scrolling to get five of the key tips she shared!
1. Sectioning Is Super Important
Since the goal of this technique is to achieve brightness and dimension with just a few strategically placed foils, the secret to success lies in how you section. Here’s how Gina sections the hair:
- A Mohawk section
- A triangle section in back
- The side sections, which are divided from the back of the Mohawk section to behind the ears.
- The money pieces, which are directly in front of the side sections.
Note: The side sections are the only two sections that won’t be foiled.
2. Where & How To Start The Application
Starting in the back triangle section, Gina worked with larger subsections. Why? “The size of your initial section is going to determine how much depth is left behind,” she shared. She also switched up the type of weave on each subsection to create dimension:
- First subsection: V-shaped weave for a balayage and babylights look
- Second subsection: W-shaped weave for more dimension.
- Third subsection: Same as the first one.
- Fourth subsection: A standard weave.
Tap the slideshow below to visually see how each weave looks:
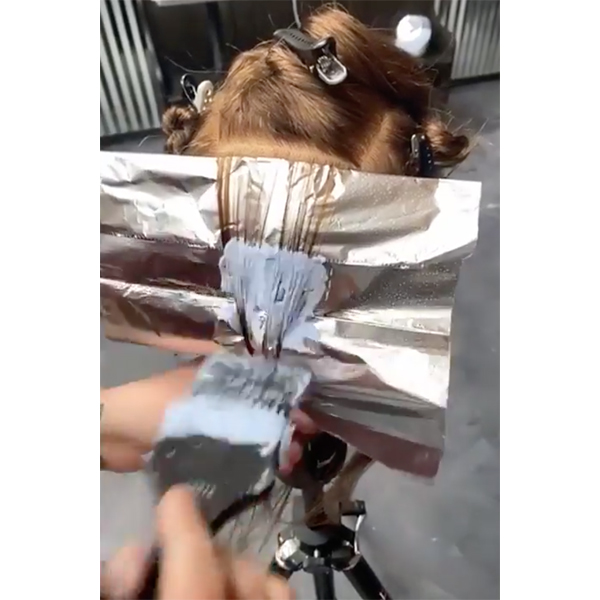
3. How To Avoid Bleeding
Nervous about bleeding? Gina recommends feathering the lightener as you get closer to the root. However, feathering can result in warmth so if that’s not the desired tone, instead, tease, fully saturate the section and then color melt as opposed to feathering.
Note: If pulling warmth has always been an issue for you, know that it’s not you. Gina says it’s probably a saturation thing.
4. If Foiling Takes Forever…
You’re probably not using enough product. “Use the product and use a lot of it,” advises Gina. When you saturate the middle of the section with enough product, not only will the ends stick better when incorporated with the rest of the hair in the foil BUT the foils will also have more hold.
5. What To Do If They Need Gray Coverage, Too
It’ll depend on the guest but Gina says you can do one of two things:
- If the goal is to have highlights all the way up to her scalp, apply the foils following this technique with color in between each one OR
- Start with the roots, let them process, rinse and dry the hair and then do the 30-minute foil placement technique.
Gina’s Formulas:
- Formula A: Joico Blonde Life Powder Lightener + 30-Volume Joico LumiShine Developer (1:1½)
- Formula B: Joico LumiShine Demi-Permanent Liquid 10N + 10NG + 9NA + 5-Volume LumiShine Developer
Products Used
Check out the before & after below!
Want more education from Joico? CLICK HERE to visit their On Demand Education page!
More from
Joico
-
Balayage
One Step, Three-Layer Multidimensional Balayage
-
Balayage
Sunset Copper Balayage
-
Monthly Product Launch List
The Best Hair Launches Of March 2024
-
Hair Color
Blonde Life® SilverLight™ Lightening Powder
-
Bond Building
Defy Damage® IN A FLASH™
-
Da’Vine Joy Randolph’s Glamour Waves
-
Celebrity
Zendaya’s Classic Volume Bob
-
Celebrity
The Best Beauty Looks At The 2024 Oscars
-
Blonde
Building The Perfect “Summer Blonde”
-
Gray
Make Gray Hair Look & Feel Younger: 3 Tips Every Stylist Should Try
-
Haircare
KBOND20 Defy Damage Power Masque
-
BTC Events
BTC “On Tour” Nashville Recap: Everything You Missed
-
Monthly Product Launch List
The Best Hair & Beauty Launches Of November 2023
-
Haircare
Inner Joi™ Strengthen Shampoo
-
Conditioners
Inner Joi™ Strengthen Conditioner
-
Haircare
Inner Joi™ Strengthen Masque
-
Haircare
Joico Launches Vegan, Naturally-Derived Haircare Line, Inner Joi™
-
Blonde
How To Create A Natural Shadow Root Through Teasing
-
Blonde
“Fake” A Full Foil In 3 Steps: Here’s How
-
BTC Hair Trend Report
Your Guide To Fall & Winter 2023’s Hair Color Trends
-
Blonde
Honey Blonde Curls: 3 Strategic Placement Tips To Create Brightness
-
Hair Color
Bold Color Trends You Need To Know For 2024
-
BTC Events
AI, Mental Health & Social Media: 7 Business Tips You Can’t Live Without
-
Manufacturer
Joico Announces Jeannetta Walker-Rodgers as Global Technical Director

