Last updated: May 30, 2017
Timbered Waves from Aveda
VIEW ALL PHOTOS
VIEW SLIDESHOW
GET THE HOW-TO

Show Steps
1
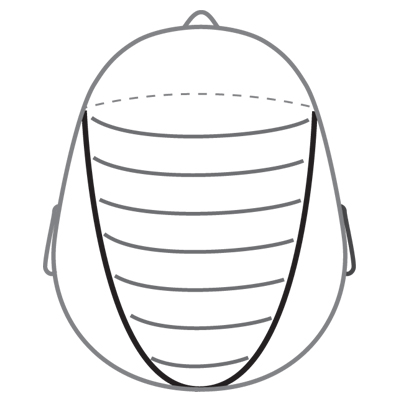
Create a triangular section as illustrated. Beginning in the back, take a vertical subsection. Cut the section on the inside of the fingers, creating a line that follows the natural curve of the head. Using a graduated technique, cut the hair to the desired length. Take the next section on a slight diagonal, and overdirect it to the previous section.
Show Steps
2
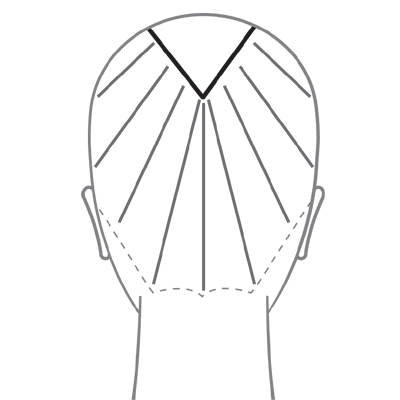
Work from the center back to the recession point. As work progresses toward the sides, elevate each subsection slightly, removing more weight through the parietal ridge but leaving the hair soft at the hairline. Continue in this manner until this area is complete. Rotate the hand position, and repeat on the opposite side.
Show Steps
3
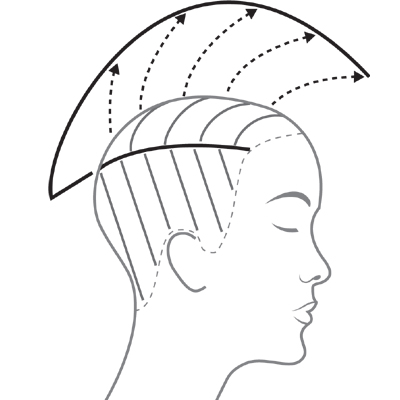
In the front, create a new guide by creating curved, horizontal subsections. Direct the first subsection downward onto the face with slight elevation. Angle the fingertips away from the face to create maximum length in the center of the fringe, and cut a curved line that tapers toward the sides of the head but remains disconnected. Continue taking curved, horizontal subsections, overdirecting them to the previous sections and elevating each one a bit higher as work progresses toward the back of the head. (When using a higher elevation through the top of the head, work on top of the fingers. When using a lower elevation through the sides, work on the inside of the fingers.) Rotate the hand position and repeat on the opposite side. Connect both sides through the top of the head, and round off any corners. Blow-dry and the refine the haircut using a twist-cut technique through the top and sides.

Timbered Waves from Aveda
Curly girls need special attention when cutting—the technique must control unwanted bulk while encouraging natural curl formation. This look, from the Aveda Heart Lands Collection for Autumn/Winter, creates a versatile shape that’s flattering and feminine, and makes the most of a naturally-curly texture.
Who did it
Creative Direction: Antoinette Beenders
Cut and Style: Ricardo Dinis, Aveda Artistic Director, Hair Cutting
Haircolor: Ian Michael Black, Aveda Artistic Director, Hair Color
Photography: Jenny Hands
Makeup: Janell Geason, Aveda Artistic Director, Makeup
Wardrobe: Damian Foxe
website: www.aveda.com
On Paper Keyword: HeartAveda
Subscribe to behindthechair.com
On Paper Magazine! SUBSCRIBE NOW
HOW-TO STEPS 
-
1
Create a triangular section as illustrated. Beginning in the back, take a vertical subsection. Cut the section on the inside of the fingers, creating a line that follows the natural curve of the head. Using a graduated technique, cut the hair to the desired length. Take the next section on a slight diagonal, and overdirect it to the previous section.
-
2
Work from the center back to the recession point. As work progresses toward the sides, elevate each subsection slightly, removing more weight through the parietal ridge but leaving the hair soft at the hairline. Continue in this manner until this area is complete. Rotate the hand position, and repeat on the opposite side.
-
3
In the front, create a new guide by creating curved, horizontal subsections. Direct the first subsection downward onto the face with slight elevation. Angle the fingertips away from the face to create maximum length in the center of the fringe, and cut a curved line that tapers toward the sides of the head but remains disconnected. Continue taking curved, horizontal subsections, overdirecting them to the previous sections and elevating each one a bit higher as work progresses toward the back of the head. (When using a higher elevation through the top of the head, work on top of the fingers. When using a lower elevation through the sides, work on the inside of the fingers.) Rotate the hand position and repeat on the opposite side. Connect both sides through the top of the head, and round off any corners. Blow-dry and the refine the haircut using a twist-cut technique through the top and sides.
-


