
3 Tips For Adding Natural Depth To Copper Highlights
Do This To Add Natural Highlights & Lowlights To Red Hair
Red hair is one of spring’s biggest hair color trends, so we had Joico Master Artist Brandon Corbitt (@brandoncorbitthair) demo how to get rich copper tones with natural depth! Keep scrolling for his expert advice on creating a lived-in shadow root, adding dimensional highlights and lowlights without teasing and avoiding lines of demarcation.
Don’t forget to watch the full video tutorial above, plus check out the finished look and grab the formulas!
Want more education from Joico? Click here for more hair color tutorials!
1. Placement Hack For Applying The Base
To create natural depth in the client’s hair, Brandon prefers to apply the base color at an angle in alternating sections instead of traditional back-to-back horizontal partings. This allows him to create a dimensional, lived-in shadow root that appears like it’s growing out of the scalp.
Here’s how he does it:
- Section off an angled part at the root and apply the base formula.
- Elevate the section and drag the formula down, then flip it over and saturate the other side.
- Continue using alternating sections until you finish the applying the base.
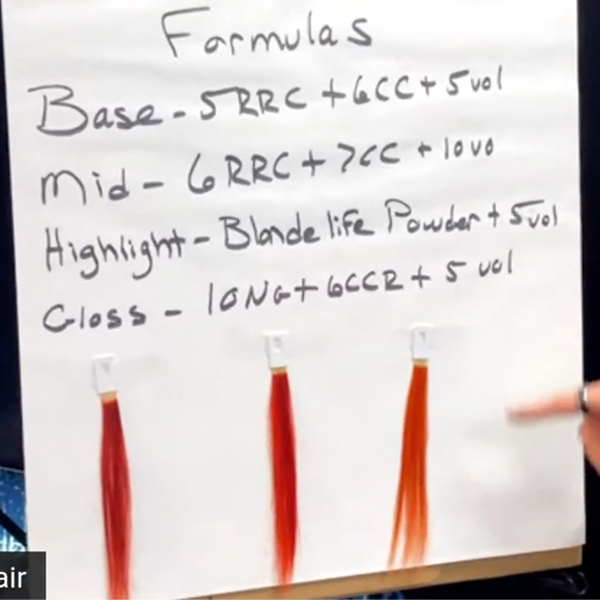
Here Are The Formula’s Brandon Used With Swatches!
2. Use A Circle Weave To Avoid Teasing
If you’re not a fan of backcombing the hair when foiling, try using a circle weave instead. This achieves a similar look with less work. Foiling along the curvature of the client’s head allows you to contour the highlights and lowlights to the client’s head shape. Here’s how it works:
- Start foiling at the nape by taking out a circular section.
- Next, use a tail comb to weave out the hair in a circular motion (instead of an up and down motion) to create an organic look with natural depth and lowlights.
- This technique will allow you to work more efficiently, no backcombing necessary!
Check Out The Before & After!

3. Blend Out Lightener As You Apply
A common mistake beginner stylists make when highlighting is not blending out the lightener as it’s placed on the hair. Lightener starts working immediately—especially the Joico Blonde Life™ Lightening Powder Brandon uses—so instead of placing the lightener and then blending, feather it out as you apply it for a seamless blend.
RELATED: Transitioning Blonde To Red With These Time-Saving Tricks
This content is sponsored.
More from
Joico
-
Balayage
One Step, Three-Layer Multidimensional Balayage
-
Balayage
Sunset Copper Balayage
-
Monthly Product Launch List
The Best Hair Launches Of March 2024
-
Hair Color
Blonde Life® SilverLight™ Lightening Powder
-
Bond Building
Defy Damage® IN A FLASH™
-
Da’Vine Joy Randolph’s Glamour Waves
-
Celebrity
Zendaya’s Classic Volume Bob
-
Celebrity
The Best Beauty Looks At The 2024 Oscars
-
Blonde
Building The Perfect “Summer Blonde”
-
Gray
Make Gray Hair Look & Feel Younger: 3 Tips Every Stylist Should Try
-
Haircare
KBOND20 Defy Damage Power Masque
-
BTC Events
BTC “On Tour” Nashville Recap: Everything You Missed
-
Monthly Product Launch List
The Best Hair & Beauty Launches Of November 2023
-
Haircare
Inner Joi™ Strengthen Shampoo
-
Conditioners
Inner Joi™ Strengthen Conditioner
-
Haircare
Inner Joi™ Strengthen Masque
-
Haircare
Joico Launches Vegan, Naturally-Derived Haircare Line, Inner Joi™
-
Blonde
How To Create A Natural Shadow Root Through Teasing
-
Blonde
“Fake” A Full Foil In 3 Steps: Here’s How
-
BTC Hair Trend Report
Your Guide To Fall & Winter 2023’s Hair Color Trends
-
Blonde
Honey Blonde Curls: 3 Strategic Placement Tips To Create Brightness
-
Hair Color
Bold Color Trends You Need To Know For 2024
-
BTC Events
AI, Mental Health & Social Media: 7 Business Tips You Can’t Live Without
-
Manufacturer
Joico Announces Jeannetta Walker-Rodgers as Global Technical Director

