On Paper Exclusive: Joico’s Less Is More


Using the original guide, continue cutting ¼-inch vertical sections to the ear on each side. Over-direct several of the final side parting to maintain length.


Advertisement


Color Formula A:
VeroLight + 10-Volume (3%) Veroxide (gold foil)
Color Formula B:
Vero K-Pak Color 9B + 10-Volume (3%) Veroxide (purple foil)
Color Formula C:
Vero K-PAK Color ½ 8G + ½ 8RG with 10-Volume (3%) (copper foil)
Color Formula D:
Vero K-Pak Color ½ 5N + ½ 5A with 10-Volume (3%) Veroxide


Advertisement


In the fringe section, leave a horizontal slice parting unfoiled, then apply Formula A to three back-to-back horizontal slice partings. Process this color to level 9 yellow and remove.


Advertisement


On Paper Exclusive: Joico’s Less Is More
BTC On Paper Magazine Exclusive: Issue #1- Change
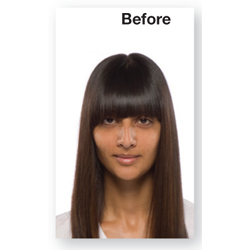
Representing the “minimum” aspect of Joico’s Minimum/Maximum collection, here is a simply constructed shape inspired by the timeless elegance of fashion’s Calvin Klein and Giorgio Armani. A face-framing color design provides just the right amount of understated enhancement…plus a sunny touch of whimsy. Subscribe today!
Check out Joico’s “Alison” Minimum/Maximum Color How-To!
Keyword: educationjoico
HOW-TO STEPS 
-
 1
1 -
 2
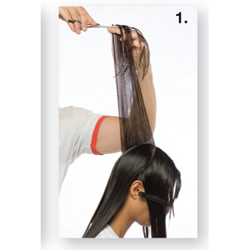
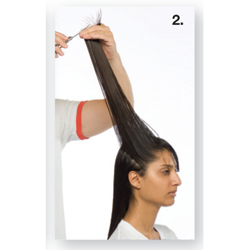
2Create a horseshoe-shaped parting ear to ear. Lift a ¼-inch vertical section at the top and create the guide.
-
 3
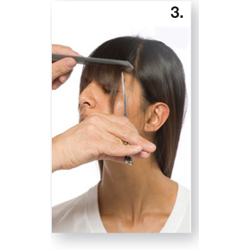
3Using the original guide, continue cutting ¼-inch vertical sections to the ear on each side. Over-direct several of the final side parting to maintain length.
-
 4
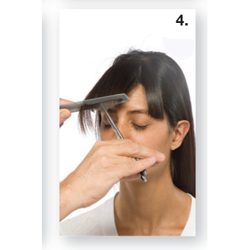
4Dry hair with a Denman brush and cut a slightly curved fringe.
-
 5
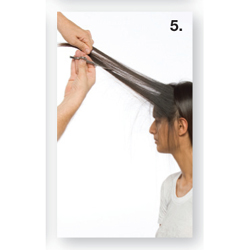
5Elevate subsections to create a solid, beveled line.
-
 6
6Remove excess weight and refine the perimeter by elevating loose partings with the hands and cutting freehand.
-

 7
7Color Formula A:
VeroLight + 10-Volume (3%) Veroxide (gold foil)Color Formula B:
Vero K-Pak Color 9B + 10-Volume (3%) Veroxide (purple foil)Color Formula C:
Vero K-PAK Color ½ 8G + ½ 8RG with 10-Volume (3%) (copper foil)Color Formula D:
Vero K-Pak Color ½ 5N + ½ 5A with 10-Volume (3%) Veroxide -
 8
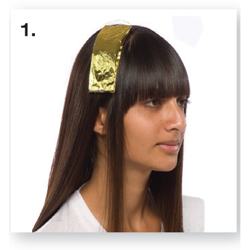
8Isolate a ¾-inch vertical-diagonal slice at the perimeter. Create an adjacent vertical-diagonal slice and apply Formula A from ?-inch off of the scalp to ends and secure with foil.
-
 9
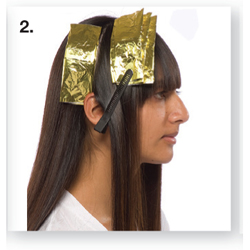
9Apply Formula A to two more back-to-back slices, skip the next slice and apply Formula A to the next slice.
-
 10
10Apply the same formula to two more back-to-back slices and repeat the entire pattern on the other side.
-
 11
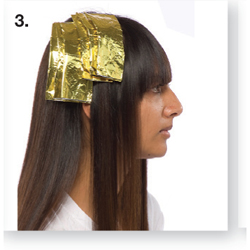
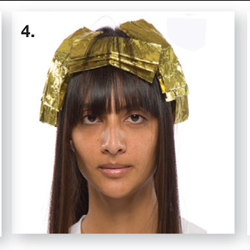
11In the fringe section, leave a horizontal slice parting unfoiled, then apply Formula A to three back-to-back horizontal slice partings. Process this color to level 9 yellow and remove.
-
 12
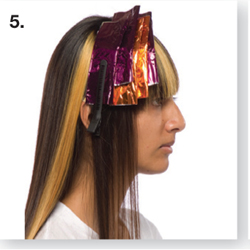
12Isolate a ¾-inch wide vertical-diagonal slice at the perimeter. Working in back-to-back vertical diagonal slices, apply Formula B once, Formula C twice, Formula B once, skip a section and then one more slice of Formula B.
-
 13
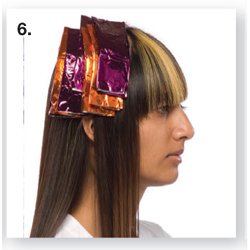
13Continuing in the same direction, apply Forumla C then Formula B to back-to-back slices. Repeat this pattern on the other side.
-
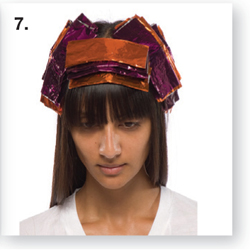
 14
14In the fringe area, take back-to-back horizontal slices and apply Formula C once, Formula B twice and Formula C three times. Apply Formula D to all remaining hair. Process and remove.
-

 15
15
YOU MIGHT LIKE THIS
-
Hair Color
Joico’s “Alison” Minimum/Maximum Color How-To
-
Hair
Joico’s “Primaries” Cut Step-by-Step
-
Hair Color
Joico’s “Primaries” Color Step-by-Step
-
Hair
BTC On Paper Exclusive: Joico Le Graphique Cut Step-by-Step
-
Hair
Joico’s “Emily” Cut Technical


TRENDING NOW!
-
BTC Hair Trend Report
The Biggest Haircut Trends of 2024
-
Copper
What Is The "Cowboy Copper" Hair Trend? Here's What It Really Means...
-
Business
3 Reasons Why Today's Highlights Are So Expensive
-
Uncategorized
TikTok's Viral "Scandinavian Hairline" Is Actually Not New...
-
BTC Hair Trend Report
Quiet Luxury Blonde: The "Old Money" Trend Explained
-
Blonde
Toning: 5 Fast Purple Shampoo Ideas For Blondes, Silver & Gray
-
Blonde
3 Purple Toning Tips For Clear, Bright Blondes
-
Bobs
How to Avoid a Bulky Bob: 4 Techniques To Try


