
Muted Mosaic Nail Art
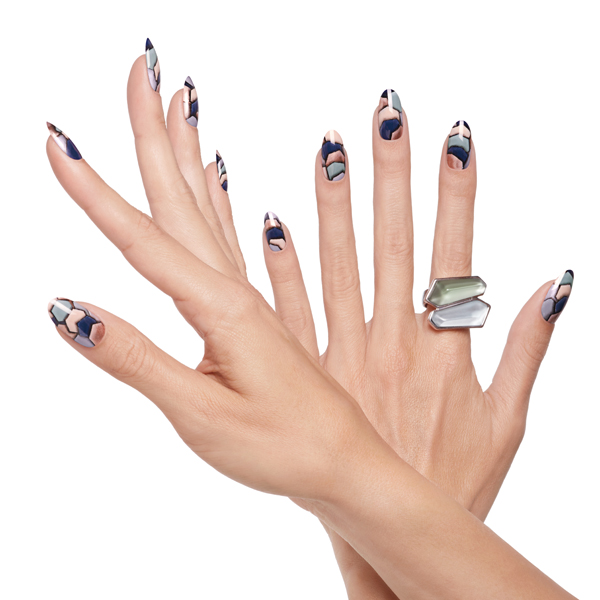

Geometric-inspired designs will make your client feel like a walking piece of art. They’re totally original, super-cool and we love this mosaic nail design using CND’s® new Glacial Illusion Collection. Get all the steps and watch the full video how-to!
Products Used
VIDEO 
HOW-TO STEPS
-
1
Prep the nails. CND® recommends using the P.E.P. Technique to ensure CND® SHELLAC® adheres properly to the natural nail plate. P.E.P. stands for Perform a Manicure, Eliminate Surface Contaminants and Purify Nail Plate Layers.
-
2
Apply a thin layer of SHELLAC™ Base Coat. Cure for 10 seconds in the CND® LED Lamp.
-
3
Apply a thin layer of SHELLAC™ Cashmere Wrap. Cure for 1 minute.
-
4
Dispense a small amount of SHELLAC™ Winter Nights, Radiant Chill, Mystic Slate and Cashmere Wrap into a mixing tray.
-
5
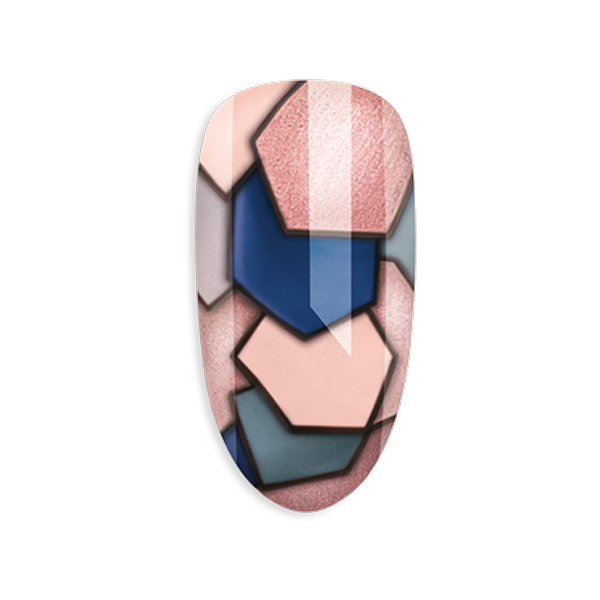
Create hexagon shapes with a detail brush, starting in the top right corner with SHELLAC™ Radiant Chill. Cure for 1 minute.
-
6
Repeat with SHELLAC™ Winter Nights, Cashmere Wrap and Mystic slate, staggering the colors down the nail in alternating hexagon shapes. Cure each layer for 1 minute.
-
7
Use a flat edge brush and SHELLAC™ Black Pool to line the lower edge of each hexagon, feathering outward to create shaded dimension.
-
8
Repeat this process with SHELLAC™ Cream Puff along the inner edges of the hexagons, feathering inward. To help blend the color, use a small amount of 99% Isopropyl Alcohol as needed. Cure for 1 minute.
-
9
Apply a thin layer of SHELLAC™ Top Coat. Cure for 1 minute.
-
10
Wipe with 99% Isopropyl Alcohol to remove top film
-
 11
11Finished Look
More from
CND™
-
Monthly Product Launch List
The Best Hair & Beauty Launches Of November 2023
-
Nails
NAIL SLUGGING: Why We Should All Be Doing It
-
Awards Shows
2022 SAG Awards: The Best Celebrity Hair + Beauty Looks
-
Gifts
MONTHLY LAUNCH LIST: HOLIDAY 2021
-
Nails
Fall Nail Art Trend Alert: Not So Basic Browns
-
Events
7 Trending Beauty Looks From NYFW Spring/Summer 2022
-
Nails
Nail Problems? 4 Ways To Use CND PLEXIGEL™ To Fix Them
-
Nails
10 Gold Nail Art Designs For Ringing In The New Year—’Cus Bye 2020
-
Nails
CND PLEXIGEL™ System
-
Business
4 Pricing Strategies For Nail Art Services
-
Nails
10 Floral Nail Art Designs To Inspire Your Next Mani
-
Industry News
Friends of Beauty Changes Lives Award $250K in Relief Grants
-
Nails
10 Tie Dye Nail Art Designs To Match Those Quarantine Sweatsuits
-
Coronavirus
Beauty Changes Lives Announces An Additional $70,000 In Grant Money Is Now Available
-
Coronavirus
Beauty Changes Lives Announces COVID-19 Relief Grants
-
Nails
7 St. Patty’s Day Nail Designs For When You Need Money, Not Luck
-
Celebrity
2020 Oscars Nail Trends: Bold Hues & Pretty Nudes
-
Nails
8 Valentine’s Day Nail Designs For A Darker Kind Of Love
-
Celebrity
2020 Grammy Awards Nail Trends: French Tips & Jeweled Accents
-
Nails
7 Crystal Nail Art Designs For Big 2020 Energy
-
Celebrity
Nude Nails & Bold Manicures Dominated The 2020 Golden Globes
-
Nails
Watch: Holiday Nail Art Tutorial
-
Nails
SHELLAC™ DURAFORCE Top Coat
-
Nails
VINYLUX®
YOU MIGHT LIKE THIS
-
Hair Color
Mosaic Part 3: Cut and Color from Farouk
-
Hair
Mosaic Part 1: Cut and Color from Farouk
-
Hair Color
Mosaic by Teri Dougherty
-
Hair
Mosaic Part 2: Cut and Color from Farouk
-
Unleash Your Wild Side With Nude & Leopard Print Nail Art
TRENDING NOW!
-
BTC Hair Trend Report
The Biggest Haircut Trends of 2024
-
Copper
What Is The "Cowboy Copper" Hair Trend? Here's What It Really Means...
-
Uncategorized
TikTok's Viral "Scandinavian Hairline" Is Actually Not New...
-
Business
3 Reasons Why Today's Highlights Are So Expensive
-
BTC Hair Trend Report
Quiet Luxury Blonde: The "Old Money" Trend Explained
-
Blonde
Toning: 5 Fast Purple Shampoo Ideas For Blondes, Silver & Gray
-
Blonde
3 Purple Toning Tips For Clear, Bright Blondes
-
Bobs
How to Avoid a Bulky Bob: 4 Techniques To Try

