Fast Foil Placement: 2 Ways To Add Depth
Foil Placement Tips For Creating Dimension
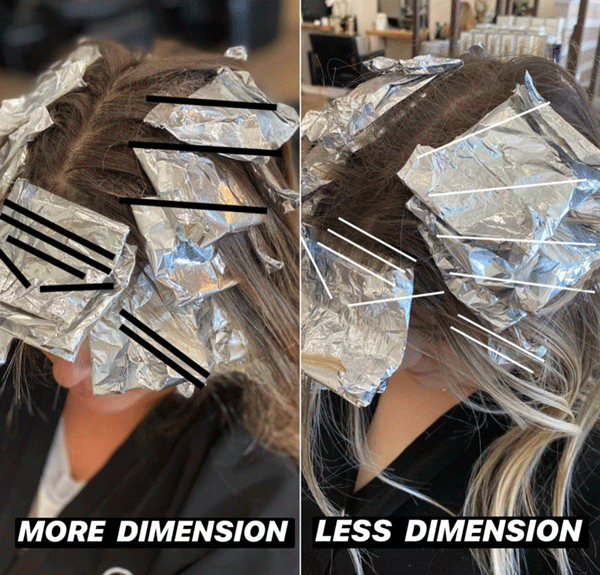
What’s the difference between diffused, lived-in highlights and high-contrast, dimensional ribbons? Here’s a clue: It’s all about angles. To help get you on the right blonding roadmap, we had BTC Team Member Carly Zanoni (@the.blonde.chronicles) stop by The BTC House and share her foil placement strategies for working smarter, not harder. Scroll down for a full dimensional breakdown.
1. Stack Foils For Less Dimension
To create a more bended, lived-in highlight, Carly uses a horizontal placement so that her foils appear stacked on top of each other. “This allows less hair to peek through between foils and creates a more diffused look,” she explains.
Check Out Carly’s Foil Placement Below!
View this post on Instagram
2. Use Extreme Angles For More Dimension
To create more piece-y ribbons of dimension, Carly applies her foils at an extreme diagonal back angle. “The foils should be almost vertical and lay next to each other, instead of stacked,” she says. This placement allows more hair to live between the highlights, creating more contrast between the foils.
Pro Tip: To create a seamless blend and avoid the Kelly Clarkson streaks, paint the lightener to match the parting. For example, when working with diagonal back sections, apply the lightener on the hair at a diagonal in the same direction.
Carly Explains Her Foil Placement For Creating Dimension On Her Insta—Check It Out Below!
BONUS: Over-Foiled? Here’s How To Add Dimension BACK!
Can a client really be TOO blonde? The answer is yes. During her online course, Carly shared her strategy for combating flat color: “I will go in and add a lowlight between my foils wherever I think the color needs some depth. To add a more natural-looking dimension, weave the sections in between the foils. If you want to see a lot more dimension, take slices.”
Adding dimension back isn’t just caused by over foiling, clients who get lightened regularly will also need a lowlight or two. “If my client has been getting the same technique for two years, the hair becomes too blonde and oversaturated no matter what you do. So, I love placing a lowlight wherever I feel the color needs to be broken up,” Carly explains.
Ready To Learn More? Click Here To Purchase Carly’s Class on BTC University & Have Lifetime Access!
More from
Carly Zanoni
-
Brunette
Your Guide To Lifting & Toning Sun-Kissed Brunettes
-
Blonde
You Just Over-Toned Your Blonde Client, Now What?
-
Hair Color
6 Purple Shampoo Mistakes You’re Making
-
Blonde
Conditioner Before Toner: Common Hair Myth Debunked
-
Blonde
6 Blonding Techniques To Save Your Client’s Hair
-
Base Breaking
5 Blonde Foil + Toning Mistakes To Stop Making ASAP!
-
Best Of 2022
10 Toning Tips You’ll Need in 2023
-
Glossing/ Toning
9 Toning Tips for Every Client
-
Fine/ Thinning
Fine Hair: Do You Know How To Handle It?
-
Blonde
5 Mistakes You’re Making With Purple Shampoo
-
Balayage
6 Wet Balayage Tips For Blended, Rooty Blondes
-
5 Things You SHOULD Know How To Do
-
Ask A BTC Expert
5 Foil Tips & Tricks From @the.blonde.chronicles
-
Best of 2020
The Top 10 Foil Tips We Learned In 2020
-
Best of 2020
10 Haircolor Courses From BTC University We Couldn’t Get Enough Of In 2020
-
Blonde
3 Ways To Paint Teasylights
-
Blonde
4 Color Placement Tips To Work Smarter, Not Harder
-
Balayage
4 Post-Quarantine Haircolor Solutions You Can Charge Money For
-
Blonde
Foil Placement Strategies For Fast Blonding
-
Coronavirus
10 Productive Ways To Spend Your Time In Quarantine
-
Business
Tips & Tactics For Staying Busy During Slower Times
-
Blonde
Breaking The Base: 5 Tips For Lifting Without Lightener
-
Balayage
7 Diagrams That’ll Take Your Blonding Game To The Next Level In 2020
-
Hair Color
Root Shadow Vs. Root Melt—Do You Know The Difference?


