Advertisement


What is Base Breaking? Here's Why Colorists Swear by It
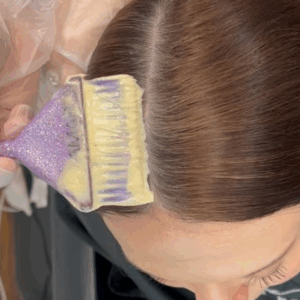
Base Breaking 101: How To Use This Method to Blend & Soften Harsh Lines Ever finish a blonding service and notice the line of demarcation is a little too harsh? That’s where base breaking (also known as base bumping) comes in. It’s a quick, controlled way to soften that contrast, blend the base and tone all at once for a seamless finish. The goal: soften, don’t lighten… Base breaking isn’t about taking your client lighter overall—it’s about shifting the natural base just enough (anywhere from half a level to to one level) to eliminate that harsh line between the highlights and regrowth. Think of it as turning down the depth slightly so everything looks softer and more cohesive. How to base break & when to do it: After highlights are rinsed and the hair is towel-dried, a low-volume developer (typically a 5- to -10 volume) is mixed with either a low-ammonia permanent color Schwarzkopf Professional® IGORA® ZERO AMM Ammonia-Free Color Creme, an alkaline demi like Matrix Super Sync Demi Permanent or a base breaking formulation like Kenra Professional® Color Simply Blonde Base Breaker Extra Cool. The goal is controlled lift in just a few minutes so the stylist can bump the base without overprocessing. Products Used ChromaSilk HI LIFTS Blonde PRAVANA Here are three tips for perfecting base breaking: Work fast: Apply quickly and evenly as processing times move faster on damp hair. Stay in control: Don’t lift too much to avoid unwanted warmth. If brass does pop, follow with a toner or gloss for refinement. Watch your canvas: Avoid base breaking on compromised or overly porous hair—those strands will grab and overprocess in seconds. Here’s when to base break: When you want to shift the natural base level one to two levels. Highlights look too contrasty at the root. When you want to make grays less noticeable without using permanent color. A client’s natural base feels too “flat” against fresh blonding. You want a smoother, more natural grow-out between lightening sessions. A bleach-and-tone or foil highlight client who wants a root touch-up but doesn’t have enough regrowth to complete a retouch with lightener A client who needs a break from using lightener but still wants a blended base Find out more about base breaking & get formulations here: Breaking the Base: 5 Tips for Lifting Without Lightener Base Break & Tone in One Application? Here’s How! Break the Base in 7 Minutes? Here’s How It Works How to Break the Base in Hair Coloring [With Formulas] How to Break the Base With Hair Color in 10 Minutes: When, Why and What to Formulate When to Use a Soft Base Break Instead of a Shadow Root 4 Ways to Eliminate a Line of Demarcation
Latest Stories
-
 Base Breaking
5 Genius Ways To Use 10-Minute Hair Color
These Quick Tricks Are Changing How Stylists Book Their Day Most stylists see 10-minute color as a quick fix for roots—and leave it at that. But when the clock is tight or the service needs to flex, it can recover mistakes, layer in detail work, lighten the hairline without bleach and make double-booking actually doable—without cutting corners. These are the express color techniques that keep appointments moving, results dialed and clients rebooking. They also open the door to fitting in more services—or more clients—without extending your day. No fluff. Just real examples that work. 1. Fix a Bleeder Without Starting Over Timing’s tight. You’re mid-process. Then you spot it—the dreaded bleeder. BTC Team Member Ashley Smith (@paintedbyashleymarie) spotted one with minutes to spare: “I don’t know what I did,” she shares. “But I had a huge bleeder minutes before I needed to shampoo.” Ashley quickly applied Schwarzkopf Professional® IGORA® COLOR10 for the last 10 minutes of processing to fix her mistake and followed with a tonal melt and gloss using Schwarzkopf Professional IGORA VIBRANCE®. Click the image for the full fix, start to finish—including her quick formula combo: See what IGORA® COLOR10 can do beyond root coverage 2. A Quick Base Break That Feels Like a Full Refresh BTC Team Member Jamie Park (@hairbyjpark) had a first-time client who didn’t need a full lightening session—just a subtle base break to soften her grow-out and brighten her overall look. Formulas Move your cursor across the image to reveal the transformation Here’s how she made it feel like a full refresh: Prep the hair with Schwarzkopf Professional Hair Primer to even out porosity Apply IGORA® COLOR10 (9-00 + 8-11 + 9-2 with 30-volume developer) for a soft base break Process for 15 minutes Rinse and follow with a tonal glaze Finish with Schwarzkopf Professional Hair Sealer to rebalance pH and add shine Click to see the full transformation: 3. Maximize Time With Two Services at Once Double-booked days don’t leave much room for extras, but the right timing can make more possible. Ever wish you could fit both coverage and lightening into a single processing window? Click to watch how Ashley makes it happen—without adding time to the appointment: She starts by applying IGORA COLOR10 in 6-00 + 6-4 for gray coverage, working from the back forward. Then, while that processes, she lightens the face frame using Schwarzkopf Professional BLONDME® 30-volume developer. By processing both at once, she frees up time in the schedule, whether that means adding another service or seeing an extra client. Here’s how the timing breaks down: 15 minutes to apply both formulas 20 minutes to process—roots and lightener working at the same time A service that would normally take 35–40 minutes—or require two separate steps—gets done in one window, start to finish. 4. Finish Root Coverage & a Treatment on Schedule Root touch-ups might be routine—but when they make room for treatments or toners, they become more than maintenance without adding time. Ashley uses IGORA COLOR10 to make room for high-impact add-ons—like a Schwarzkopf Professional FIBRE CLINIX Vibrancy Treatment—without adding time to the service. Here’s how she keeps it tight: Color is mixed and applied within 5 minutes Processes for just 10 minutes Treatment is applied immediately after rinsing Client is finished and styled just over an hour after arriving What would normally feel like a basic root touch-up becomes a full-service moment, with better results, a stronger finish and no delay. 5. Accidentally Overprocessed? Not a Problem One of the biggest fears with 10-minute color is going even a few minutes over—and ending up with muddy tone or harsh results. Ashley put that fear to rest: “I started a 10-minute timer after I put on the toner,” she says. “So that means I left the color on for about 20 minutes, and it was still very much true to level and tone. The results felt rich and I loved them!” Click to see the full test: She used a custom blend of IGORA COLOR10—equal parts 6-00, 6-4 and 4-00 with 20-volume developer—and even with extra time on the clock, the final result was balanced, dimensional and exactly what she was going for. With faster processing and smarter timing, services like these don’t just save time—they create space for more revenue. Whether that means adding a treatment, fitting in one more client or simply working more efficiently, the payoff adds up. Discover how IGORA COLOR10 fits into full-service appointments. This content is sponsored.
-
 Base Breaking
When To Use a Soft Base Break Instead of a Shadow Root
Why Ashlee Norman is Saying Goodbye to Shadow Roots—Meet the “Hybrid Color” Melt Do you ever think about base breaking instead of shadow rooting? According to blonding expert Ashlee Norman (@ashleenormanhair), you should. Known for sharing powerhouse color education with her 289k Instagram followers, she recently posted a permanent color formulation method that has us rethinking every color melt of the past. By adding a “Tone Softener” into her permanent color formulas, Ashlee creates a hybrid color that allows her to lift, tone, deposit and gloss for a range of desired results. Keep reading for a crash-course including her hybrid toning and anti-shadow root techniques. Let’s Talk Formulation: How Ashlee’s Hybrid Color Melt Works How It Works: Dilute permanent color to create a “hybrid color” for a soft base break without going too warm or leaving harsh lines of demarcation. How To Formulate: Ashlee mixes Schwarzkopf Professional® tbh – true beautiful honest® permanent color with tbh – true beautiful honest Tone Softener, which is a 4.5 pH conditioning agent, to drop the alkalinity for a cooler lift and to dilute opacity. The Result: “This is why I call it “hybrid” color,” says Ashlee. “It’s more permanent than a demi-gloss, but not as aggressive as a true permanent. It’s somewhere in between.” Hybrid Toning: Tone & Softly Shift the Natural Base It’s not your old school base break that will create unwanted brass. It’s also not a traditional shadow root with an opaque tint that may leave hard lines. Ashlee’s hybrid color melt method allows you to shift the natural base to soften the contrast between the dark color and the highlighted hair at the same time as a shadow root and gloss. End Goal: Expensive Brunette Foilayage on natural Level 4 with Schwarzkopf Professional BLONDME® Precision Lightener Formula A (roots): tbh – true beautiful honest 5-06 + 6-volume developer + tbh – true beautiful honest Tone Softener (1:1:1) Formula B (mids): tbh – true beautiful honest 7-16 + 13-volume developer + tbh – true beautiful honest Tone Softener (1:1:1) Formula C (ends): tbh – true beautiful honest 9-49 + 10-19 + 13-volume developer + tbh – true beautiful honest Tone Softener (1:1:1) Follow These Steps: 1. Apply Formulas A, B and C from darkest to light from roots to ends. Photo Credit: Instagram via @ashleenormanhair 2. Use one end of a wide-tooth comb and flip it before pulling through to avoid cross-contamination (aka overlap.) Photo Credit: Instagram via @ashleenormanhair 3. Feather the application and use your fingers to blend one formula into the next. Photo Credit: Instagram via @ashleenormanhair 4. Process for 10 to 20 minutes based on how coarse the hair is. Photo Credit: Instagram via @ashleenormanhair Scroll through the bombshell “expensive brunette” finished look: Photo Credit: Instagram via @ashleenormanhair Photo Credit: Instagram via @ashleenormanhair Photo Credit: Instagram via @ashleenormanhair Photo Credit: Instagram via @ashleenormanhair Photo Credit: Instagram via @ashleenormanhair Photo Credit: Instagram via @ashleenormanhair Photo Credit: Instagram via @ashleenormanhair Photo Credit: Instagram via @ashleenormanhair Why tbh – true beautiful honest Tone Softener? The tbh – true beautiful honest Tone Softener [4.5 pH conditioning agent] cuts down the alkalinity as well as dilutes the opacity to get a more sheer deposit as well as avoiding too much exposure of warmth, says Ashlee. The multi-dimensional permanent shade range also has a cooler base to it, she adds. The “Anti-Shadow Root”: How to Apply an Alkaline Color Melt For high-contrast blonding on Level 4 and darker, Ashlee’s alkaline color melt softens the contrast between a dark natural base color and the highlighted hair. The key to this method is applying teasylights slightly off-scalp before melting, so the “shadow” is actually the natural Level 4 base. The ideal client for this technique – Level 4 base: Photo Credit: Instagram via @ashleenormanhair Teasylights (slightly off-scalp) on Natural Level 4 with BLONDME Precision Lightener Formula A (midlengths): tbh – true beautiful honest 7-16 + 13-volume developer + tbh – true beautiful honest Tone Softener (1:1:1) Formula B (mids to ends): tbh – true beautiful honest 8-64 + 10-19 + 20-volume developer + tbh – true beautiful honest Tone Softener (1:1:1) Get Ashlee’s formulation tools you need—see the tbh – true beautiful honest shades! Follow These Steps: 1. First apply a Level 7 hybrid color (Formula A) just off of the natural base. Photo Credit: Instagram via @ashleenormanhair 2. Melt into a lighter Level 9 (Formula B) through the ends. Photo Credit: Instagram via @ashleenormanhair 3. Process for 10 to 20 minutes. Photo Credit: Instagram via @ashleenormanhair Here’s Why: This leaves the natural Level 4 as a shadow root while starting to shift the natural base through the midlengths and ends at the same time as toning. This creates a double-blend, a fade from dark to light in both the natural base and highlights. Photo Credit: Instagram via @ashleenormanhair Get an up-close look at the cool, blended base shift: Photo Credit: Instagram via @ashleenormanhair Try Tone Softener for yourself—shop at SALONORY! This content is sponsored.
-
 Base Breaking
5 Blonde Foil + Toning Mistakes to Stop Making ASAP!
Use These Quick Color Fixes For Brighter, Blended Blondes Over-foiling, toning formula mishaps, harsh lines of demarcation—OH MY! Blonding can bring out the best (and worst) behind the chair, and if you’re making these five mistakes, we feel your pain. That’s why we tapped some serious blonding experts to help you fix foiling, toning and maintenance roadblocks that are standing in the way of bright, blended blondes. Mistake #1: Over-foiling the interior Fix: Focus on this section for MAX Blonding Say it with us: More foils does not equal bright blondes. In fact, too many foils can shift the overall tone but cancel out dimension that creates brightness. That’s why BTC Team Member Kristen O’Donnell (@kristen_o_beauty) sets her sights (and foils) on the top center section—aka the Mohawk section. This area is especially important for blondies because it is where the lightest hair naturally lives. Kristen applies her signature babylight technique to create maximum brightness where it counts. Check out her tips below: Start with a thin slice for control over the section. Take a tight, babylight weave and lift the hair up to secure the foil underneath. Keep highlights super close together to cover more area and achieve the most lift. Hit play to watch Kristen’s satisfying foil placement! View this post on Instagram A post shared by Hair Videos•Blondes•Education (@kristen_o_beauty) Mistake #2: Foiling blonde clients every 6 weeks Fix: Brighten a client’s base without grabbing lightener We know, our blonde clients want to be bright ALL THE TIME and we honestly can’t blame them. But sometimes their hair (and wallet) need a little break from lightener—and that’s OK! To help her clients extend time between highlights, Kristen grabs the Schwarzkopf Professional® BLONDME Base Breaker. “It’s perfect for softening the client’s natural base. I can get up to one level of lift and Base Breaker tones as it processes so there is no need for an extra step,” she explains. Here are a few more tricks you should know: Base Breakers only need 10 minutes to process (yes, 10 minutes!). Available in three shades: Cool, Extra Cool and Soft Cool. For softer results, apply to damp hair. For brighter results, apply to dry hair. Use 7-volume for fine hair and 20-volume for medium-to-coarse hair. Need a quickie step-by-step? Click through the slideshow to see Kristen’s Base Breaker process! Kristen's client before BLONDME Base Break. Photo credit: Instagram via @kristen_o_beauty Apply Base Breaker in Extra Cool with 20-volume developer and apply right to the regrowth. This will soften the root and give up to one level of lift. Photo credit: Instagram via @kristen_o_beauty "Base Breaker is very visual so keep an eye on the hair while processing to get the desired lift," explains Kristen. Photo credit: Instagram via @kristen_o_beauty Finished result! Photo credit: Instagram via @kristen_o_beauty Kristen's client before BLONDME Base Break. Photo credit: Instagram via @kristen_o_beauty Apply Base Breaker in Extra Cool with 20-volume developer and apply right to the regrowth. This will soften the root and give up to one level of lift. Photo credit: Instagram via @kristen_o_beauty "Base Breaker is very visual so keep an eye on the hair while processing to get the desired lift," explains Kristen. Photo credit: Instagram via @kristen_o_beauty Finished result! Photo credit: Instagram via @kristen_o_beauty Pro Tip: Blend subtle grays FAST with BLONDME Base Breaker. “Base breaks aren’t just for making the hair lighter,” explains Kelsey Grogan (@kolorbykels). “I LOVE using BLONDME Base Breaker to blend natural gray with highlights.” Lift, Tone + Blend Blondes in Just 10 Minutes: Shop Now! Mistake #3: Platinum clients are too dark at the base Fix: Add THIS to your toner formula for a balanced blonde There is nothing worse than achieving the perfect lift on a root retouch only to have the toner pull ashy or even purple 😱. Lucky for all of us, blonding expert Josie Vilay (@josievilay) shared her formulation secrets for keeping freshly lightened roots bright and blended! Here’s a quick cheat sheet of what you need to know: Add a neutral or gold to your toner formula mixed with the same formula used on the ends Apply to freshly lightened areas only Not only does this help alleviate unwanted ashy tones, it also helps create a balanced tone from root to ends. Watch for Josie’s full tutorial and some seriously satisfying application shots! View this post on Instagram A post shared by HAIRSTYLIST | EDUCATOR | SUPER MOM (@josievilay) Mistake #4: Leaving a shadow at the hairline Fix: Tone & lift in ONE step Do you skip foiling baby hairs because it can look like breakage (even though it’s not!) and then fight to blend the darker hairs when toning? We thought so. That’s why we are LIVING for this hairline hack from Kristen. “I love applying BLONDME Base Breaker to the hairline after a highlight service because it gently lifts (and tones) the hair that is too short for highlights,” she explains. Not only does Base Breaker bump the client’s base one level, it also blends any lines of demarcation from foiling—so you can lift, blend and tone in ONE STEP! Did we mention it only needs 10 minutes to develop? Talk about a blended timesaver! Hit play to watch Kristen blend, lift and tone the hairline in ONE STEP! View this post on Instagram A post shared by Hair Videos•Blondes•Education (@kristen_o_beauty) Related: Ready to Break the Base? Here’s How it Works! Mistake #5: Tipping out results in harsh lines of demarcation Fix: Overdirect the section completely forward Avoid harsh lines when brightening up ends by overdirecting, seriously! “This tip changed my life,” Carly Zanoni aka @the.blonde.chronicles shared on Instagram. “The first thing you want to do is hold ends completely horizontal when applying lightener,” she explains. “This along with backcombing and painting on an angle will help diffuse the line of demarcation and create a seamless blend at the ends,” she shares. Seeing is believing, click the play button to watch Carly create the blended tip out of our dreams! View this post on Instagram A post shared by Carly • EDU for Hairstylists (@the.blonde.chronicles)
-
 Base Breaking
Break the Base in 7 Minutes? Here's How It Works
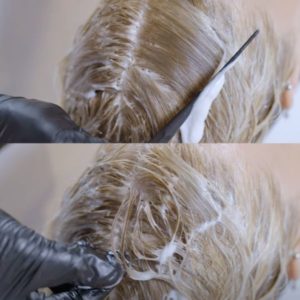
Quick Service Idea: Lift & Tone At The Same Time! Looking for practical techniques to keep your service ticket high while getting clients in and out of your chair ASAP? Look no further! We’re taking it back to the basics and teaching you everything you need to know about base breaking: What it means to break the base, who the ideal base-breaking clients are and pro tips you can’t get anywhere else. Base Breaking Basics: Let’s start at the beginning: a base break is a quick way to lift the hair a half level to one level. Also called base bumping or base adjusting, this technique can be used to quickly lift hair in many situations: To blur and blend an existing line of demarcation To soften regrowth without booking a complete retouch for a foil or bleach-and-tone client To tone a foil client’s highlights while softening their roots Here’s How It Works: Let’s say your blonde client comes in for a routine haircut and asks if there’s anything you can do to freshen up her roots. As we know, not all blondes want to visit the salon for highlights every six to eight weeks! She walks in with about an inch of regrowth—what would you do? By offering a base break, you can get the job done in 10 minutes or less. Here’s how Schwarzkopf Professional® Senior National Trainer Ian Mayer-Marszalek (@ianhairspray) tackles this process step-by-step in the salon: Step 1: Start by rinsing your client and begin your haircut wet. Step 2: When you’re finished with the cut, apply Formula A to wet hair about an inch from the scalp (or to where your client’s regrowth ends). To ensure blend, comb the product downward. Pro Tip: Ian likes to apply his base breaker at the chair with a bowl and brush. This makes it feel more like a full service to your client versus applying it quickly at the bowl. Formulas Step 3: Process for seven minutes, rinse and style as desired. Click the beaker to get the formula! Formulas Formula A:60g Schwarzkopf Professional® BLONDME® Bond-Enforcing Base Breaker Cool + BLONDME® Premium Developer 6% (20 Vol.) (1:1) How To Formulate To Avoid Unwanted Warmth Not only is this service great for quickly softening regrowth, but it will also tone your client’s preexisting highlights. Ian loves Schwarzkopf Professional®’s NEW BLONDME® Bond-Enforcing Base Breaker because it lifts virgin hair a half level to one level without causing warmth. So, you’ll be able to lift and tone—at the same time! Score. Dimensional Highlights Paired With A Base Break—Get The Steps Below! This technique is also perfect when you need to tone and base break a dimensional balayage client. Ian starts by hand painting highlights before taking his client to the bowl to tone and base break at the same time to save time. Step 1: Start by hand painting highlights with Formula A using diagonal forward partings. Saturate through the ends. Pro Tip: Use a beauty blender to help erase lines of demarcation. Ian used a Schwarzkopf Professional® Color Melter Sponge to blend his lightener. Formulas Formula A (highlights):Schwarzkopf Professional® BLONDME® Bond Enforcing Clay Lightener + BLONDME® Premium Developer 12% (40 Vol.) (1:2) Step 2: At the bowl, apply Formula B with a bottle applicator, saturating 2 to 3 inches from the scalp outward with your hands. This will break the virgin hair and tone your client’s fresh highlights simultaneously! Formulas Formula B (base breaker):60g BLONDME® Bond-Enforcing Base Breaker Cool + BLONDME® Premium Developer 6% (20 Vol.) (1:1) Step 3: Process for 7 to 8 minutes. Formulas Pro Tip: Ian uses his Tint Brush to wipe away excess product and pushes the hair upwards to see if it’s finished processing. “What I’m looking for is to see if I have any warm reflection at all compared to what the client came in with,” Ian explains. If you do, that means it’s time to rinse! Step 4: Rinse and style as desired. Have any questions? Watch the full tutorial below to get all of Ian’s tips!
The formulas colorists are creating right now

Advertisement

