
Curly Shag: Step-By-Step and Head Sheet Diagram


Everything You Need To Know About Cutting A Shag On Curly Hair
Shags are having an extended moment and we think it is safe to say they aren’t going anywhere. Clients have been shifting to lower maintenance styles and one of the best things about a shag is its easy upkeep. We reached out to Arizona-based hairstylist Mariah Walraven (@mo_raven) for her tips and tricks on ensuring a flawless cut every time. Swipe through for all of the details!
Who is this technique for?
This look is ideal for clients with medium to thick density and a naturally wavy to loose ringlet curl pattern. “I wouldn’t recommend it for straight, fine or super curly hair,” notes Mariah.
What tools do you need for this technique?
The ARC™ Scissors PHANTOM II are great for this technique because they are versatile in wet and dry cutting. They work perfectly for “both the wet cutting and sliding to remove weight and texturizing on both wet and dry hair,” says Mariah. In terms of at-home styling, product is key. “To create this look I used Schwarzkopf Professional BC FIBRE FORCE and Schwarzkopf Professional OSiS+ Curl Honey and then diffused using the Dyson Supersonic™ Hair Dryer,” explains Mariah.
What is the maintenance like for this technique?
One of the reasons why shags have become so popular is because the maintenance required for the look is minimal. “The grow out is very nice on this cut and I recommend cleanups every 3 or so months,” advises Mariah.
What are the steps for this technique?
Check out this killer head sheet Mariah made to provide more of visual!
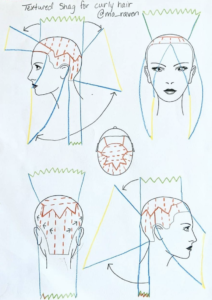
STEP 1: Section out a star at the crown of the head. Make sure no hair is left out at the recession of the head. Clip all other hair out of the way.
Mariah shared her sectioning breakdown on her Insta—check it out below!
STEP 2: Take a ½-inch section from the back of the star point and elevate it to 90 degrees. Point cut to the round of the head between 4 and 6 inches. “I shoot for the layer to hit around ear length. Use this as a traveling guide taking horizontal sections towards the front of the head,” explains Mariah.
STEP 3: Section from the crown to each ear and clip away the rest of the hair.
STEP 4: Starting at the hairline in front, take ½-inch sections vertically and overdirect to the opposite side of the head in front of the face. Razor slice from the cheek bone to the front length, then overdirect each section and repeat to create a face frame.
STEP 5: Razor slice to blend the top layer into the face frame. Repeat on the opposite side.
STEP 6: Section from temple to temple and back to where the forehead begins to level out with the crown of the head. Use your guide from the star point layers to razor slice and connect with the face frame.
STEP 7: Beginning in the back of the head, take a vertical section from the crown to the nape. Elevate 45 degrees and, using the crown layers as a guide, slice using a razor to connect into the length.
Pro Tip: Use this as a traveling guide all the way around the head to connect the length into the crown layers. Make sure to not remove too much weight around the ears.
STEP 8: Following the same pattern used to create the layers and shape, go though with the razor and slice vertically through each section to remove weight.
Pro Tip: “This is a very visual process. Pay attention to how the curls are sitting, where you see weight lines and where the hair isn’t flowing. Every head and curl pattern is different,” explains Mariah. “I then round brush straight to see where there is weight remaining and texturize by slicing with my ARC™ Scissors PHANTOM II shears to blend anything I may have missed wet.”
STEP 9: Re-wet the hair, apply OSiS+ Curl Honey and diffuse.
What is the pricing for this technique?
“This is considered an advanced cut so I charge $80 for cut and style,” says Mariah.
Want to see more from ARC™ Scissors? Follow us on Pinterest!

More from
ARC™ Scissors
-
Blowouts
Bob Styling Guide: 5 Ways To Style Short Hair
-
BTC Hair Trend Report
The Biggest Haircut Trends of 2024
-
Dry-Cutting
Bang Breakdown: How To Cut 2024’s Top Fringe Trends
-
Dry-Cutting
2024 Fringe Guide: How To Consult, Cut & Style Trendy Bangs
-
BTC University
10 Gifts & Stocking Stuffers on Every Hairdresser’s List This Year
-
BTC Events
BTC “On Tour” Nashville Recap: Everything You Missed
-
BTC Hair Trend Report
The Biggest Haircut Trends of Fall & Winter 2023
-
BTC Hair Trend Report
Layering Guide: How To Cut & Style With Confidence
-
Bobs
The ’90s Bob: How To Cut & Style This Trending Haircut
-
Facebook Lives
Volume Guaranteed: Try This Layering Technique For Fine Hair
-
Barbering
How To Style The Biggest Men’s Summer Trends
-
Bobs
The Biggest Haircut Trends of Summer 2023
-
Bobs
The French Bob: How to Cut it
-
Bobs
The Bixie: 3 Cutting Techniques to Master the Look
-
Brunette
Trend Breakdown: Hailey Bieber’s Glazed Brunette
-
Barbering
2023’s Top 9 Hair Trends For Men
-
BTC Hair Trend Report
2023 Fringe Guide: How To Cut This Year’s Biggest Trends
-
BTC Hair Trend Report
2023 Hairstyling: 11 Trends You Need To Know
-
BTC Hair Trend Report
Invisible Layers: What This Haircut Trend Really Means
-
BTC Hair Trend Report
2023’s Biggest Haircut Trends
-
Bobs
Hailey Bieber’s “Preppy, Contoured Bob” Trend: What You Should Know
-
BTC University
4 Styling Secrets For Butterfly Layers
-
This Year’s BIGGEST Products: 2022’s Most Talked About
-
Bobs
The Biggest Winter Haircut Trends To Kick Off 2023

