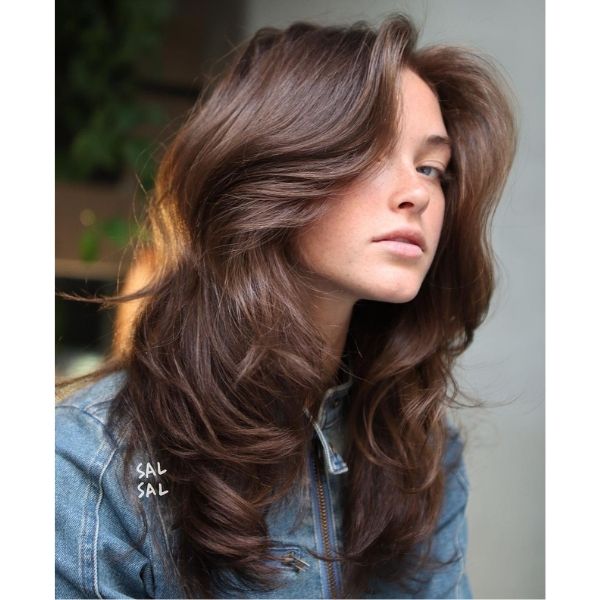
Layering Guide: How To Cut & Style With Confidence
Layered Haircuts Are Trending: How To Cut & Style Long Layers
Creating volume, maintaining length and proper weight removal: Layered haircuts are trending, and we are breaking down everything you need to know about cutting these trendy cuts, all the way to the styling tools you must keep in your kit.
Even our typical one-length clients will be opting for a variety of long layers and face-framing this year, so keep reading to get your favorite hair artists’ tips for nailing the consultation, how to properly texturize, when to dry-cut and SO much more.
First up: If your client needs an gorgeous layered inspo pic, we got you!
Get 30% off ALL ARC™ Scissors through end of December—click to shop.
How-To: Detailed Consultation For “Simple” Haircuts
Picture this: Your one-length client requests layers for the first time. So, you get to work and as you cut, you watch their face turn pale as they see chunks of hair falling to the ground. It’s key to communicate that even long layers, that maintain length, require a decent amount of hair removal. Here’s how TRUSS Professional Brand Specialist Sara Botsford (@sarabotsfordhair) handles that conversation with clients:
1. “I typically start by showing them my guide. I take a small section of hair at the crown and show them the length that I think is appropriate for their layers. This gives them a visual for where the layers will begin,” Sara explains.
2. “I also show them the angle at which I will be cutting so they can see their length fall away. I find this makes them more comfortable in understanding they will not lose length,” she says.
3. “And if they are still nervous, just turn them around and tell them it’ll be a surprise!” Sara adds.
Photo Credit: Instagram via @sarabotsfordhair
Pro Tip: Sara loves using Saphira Hair Sculpting Lotion for a strong hold that feels flexible and soft.
ARC™ Scissors Ambassador Stephanie Carrillo (@modestspotcarrillo) suggests explaining to clients that you can create seamless layers by carving through the interior of the hair to remove weight. “The result is a modern layer that allows the hair to move,” Stephanie explains, adding that: “I like to use words like ‘effortless,’ ‘easy,’ and ‘manageable.’ Styling one-length hair can be difficult, so offering an option to open up the hair and create movement is helpful.”
Photo Credit: Instagram via @modestspotcarrillo
Utilize Fundamental Layering To Create Trending Looks
If your client wants more of a shag silhouette, a-la Brigitte Bardot, you’re going to want to create more of diffused, soft layers for an effortless end result. Plus, this also offers a super-seamless growout that clients LOVE!
The key to this look? Internal layering: “Many times, when cutting shaggy layers, there may not be a lot of length falling,” Stephanie explains. “It’s more about interior hair and weight, so communicate that with your client beforehand and let them know it is about weight, rather than length,” she advises.
Photo Credit: Instagram via @modestspotcarrillo
Pro Tip: This portion of the process can be very artistic as you utilize your creative eye to find areas that need weight removed: “I love going through the hair and identifying the areas where I need to carve and create space. I’m a sucker for texture and volume, so I always look for ways to make the hair move,” Stephanie explains.
Related: 40+ ’90s Supermodel Layers Inspo Pics
Up Next: 6 Tips For Cutting Long Layers
1. Keep The Hair Saturated:
Increase control, add moisture and detangle throughout your entire haircut by using a leave-in conditioner as a cutting aid. “I can’t stress how important it is to keep the hair hydrated, especially when doing a haircut that’s semi-precision,” ARC™ Scissors Artistic Team Member Justin Toves-Vincilione (@ahappyjustin) says. His favorite? Authentic Beauty Concept’s HYDRATE Spray Conditioner.
2. Overdirect To The Center
When cutting the face frame, overdirect the hair across the center point of the face like RUSK Global Creative Director Matt Swinney (@matt.swinney)—here’s why: “This will allow you to open up the hair that sits around the jawline while keeping the length as you work toward the perimeter,” Matt explains. Plus, this will make matching the sides easier.
Photo Credit: Instagram via @matt.swinney
Pro Tip: When styling, use RUSK Volume Mousse to create lift, memory and add shine for create a smooth blow-dried finish.
3. Be Sure To Slide Cut…
If you blunt cut across a section, you can remove too much length! That’s why Justin slide cuts the surface of each section for an effortless end result: “Slightly open and close your shears as you slide to create a clean, soft finish,” Justin explains. This will also help connect the layers, keeping everything consistent and even.
Photo Credit: Instagram via @ahappyjustin
Get Justin’s go-to shear: ARC™ Scissors PARAGON II! “Whenever I do [layered] cutting, I use my PARAGON II 7” for the maximum amount of control and ability to switch from blunt cutting to point cutting,” he shares.
DID YOU KNOW? ARC™ Scissors is one of the few brands that sells authentic Japanese-crafted tools made with 100 percent Japanese steel. “ARC™ Scissors are handmade, and we know that the passion behind the craftsmanship is real. I feel that what we offer our guests in a salon is also a handmade experience as our haircuts are handcrafted as well. So, using a brand that has similar beliefs and attention to detail is one of the main reasons I will only use ARC™ Scissors,” Justin adds.
4. Try Dry-Cutting Layers—Here’s Why
Many stylists are used to wet-cutting layers, but there are different benefits to trying a new technique: According to salon owner Emily Chen (@emchenhair), “[Dry-cutting] delivers the most seamless and soft results,” Emily explains. “You can clearly see how each section is going to fall and behave as you cut it. It gives me the opportunity to put more detail into the haircut.” This is especially important for clients with stick-straight hair, as imperfections can be clearly seen.
Photo Credit: Instagram via @emchenhair
5. Try This Trick For Texturizing Heavy Ends
After carving the face-framing layers, if you’re struggling to refine the ends, Sara uses ARC™ Scissors 10/10 Reversible Texturizer to remove weight as needed. “I wanted the layers to float effortlessly with the rest of the cut, so I removed weight with my ARC™ Scissors to take out about 60 percent of the hair,” Sara says.
Pro Tip To Avoid Holes: “An easy mistake you can make when cutting layers is cutting holes between the sides and back of the hair, directly behind the ear. To avoid this mistake, I make sure I’m dropping out the length before cutting my layers,” Sara explains.
Photo Credit: Instagram via @sarabotsfordhair
6. Customizing For High-Density Clients
It’s a common complaint of clients with thick hair that they feel heavy or weighed down. To remove weight and add movement, ARC™ Scissors Artistic Team Member Rachel Williams (@rachelwstylist) will strategically cut LOTS of layers throughout the cut to free the hair and add volume—plus, face-framing layers starting at the cheek bone to help lift her client’s oval face shape.
“When you customize haircuts to the clients hair density and face shape it brings out the best of the hair and showcases their best features,” Rachel explains.
Photo Credit: Instagram via @rachelwstylist
Pro Tip: Rachel starts this haircut wet and details it dry—that’s why she uses ARC™ Scissors PHANTOM II. “I need a scissor that can not only take me from wet to dry, but it also allows me to ‘cut in motion’ using the axis of my blade,” Rachel explains.
Let’s keep learning! Save these tips for later…
- Long Layers: 4 Tips To Maintain Length
- Invisible Layering Is Your New Favorite Texturizing Technique
- 10 Tips & Mistakes To Avoid For Cutting Long Layers
- The Butterfly Cut by @ahappyjustin
Create A Long-Lasting Finish On Any Layered Cut
Last but not least, it’s time to talk about styling: One of our client’s favorite parts of their appointment is walking out the door with an IG-worthy style (that they might not be able to create themselves!), and it’s our job to deliver. “When it comes to layers, the style is just as important as the haircut! This means that we need to be very intentional about our product and tool choices,” Justin explains, which is why there’s two products he can’t live without:
1. Mousse: “Applying a generous amount of mousse is the best way to add volume and shape to your layers,” explains Justin. “Mousse can enhance the volume and density of any hair type and sets the overall foundation for a bigger, bouncier style.” That’s why he generously applies Authentic Beauty Concept’s Amplify Mousse for all of his layered haircuts.
2. 1.25-Inch Round Brush: This is a must-have for Justin, as using a smaller round brush than you’d typically reach for allows him to add volume and shape to the layers.
Photo Credit: Instagram via @ahappyjustin
Reassure your low-maintenance clients that this style is just as gorgeous air-dried and natural. To help them style their new look, send them home with this genius tip from @thehairbros: “Wrap the hair in loose buns with texture spray and set for 20 to 30 minutes. The result is added volume and waves,” they explain. Try their favorite: Hairstory Undressed.
Related: 5 Layered Bombshell Blowouts Tips
Products Used
UP NEXT: BTC’s Fringe Guide—How To Cut 6 Types of Fringe Clients Will Request