
The Braid Book of Looks

It’s all about them braids! Whether you’re heading to your favorite music festival, attending a black tie event, or simply lounging in your most comfortable pajamas, rocking a braid is always on-trend. Here are 6 chic plaits to keep handy, from fishtails to mohawks, zipper braids and more, to help you braid like a boss.
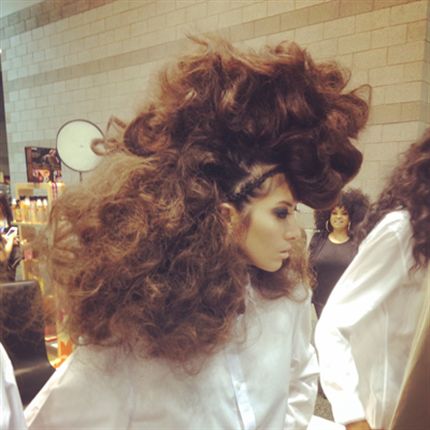
Nick Stenson’s Mohawk Braid
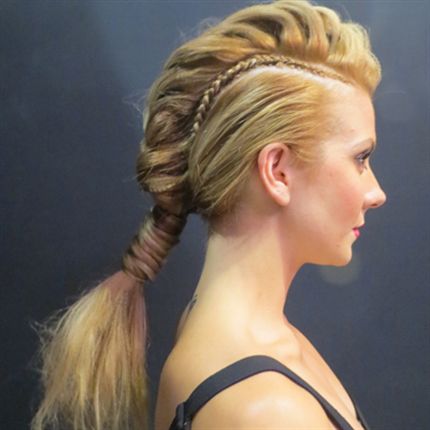
1. Create a horseshoe section at the top of the head and clip away.
2. Apply Matrix Style Link Super Fixer Strong Hold Gel with Hold Booster to each side.
3. Brush both sides flat against the head and gather tightly into a ponytail.
4. Subdivide the pony into small sections. Beginning at the base, tap each section every few inches with a texturizing iron.
5. Once the hair cools, brush through.
6. Release the top, create a small subsection at the edge and create a braid on the remaining section. Then create microbraids on the subsection. Incorporate the braids into the pony
at the meeting point.
7. Gently loosen the large braid to create the Mohawk effect.
8. Wind the ends around the base of the ponytail and pin.
An edgy Mohawk braid by Dilek Onur-Taylor, Salon By InStyle Artistic Regional Manager.
Joseph DiMaggio’s Zipper Braid
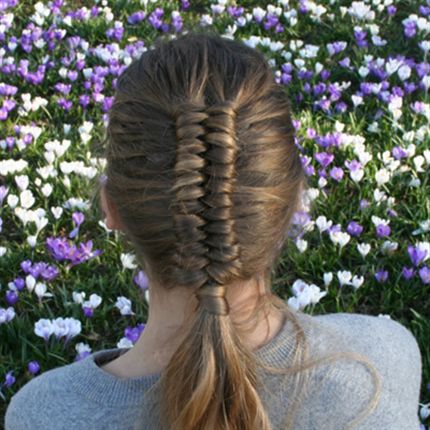
1. Divide the hair into three sections, leaving the center strand slightly smaller than the outside strands.
2. Weave the inside strand up and around one of the side strands, then up around the opposite side strand.
3. Continue in this manner along the desired length. It may be necessary to add some additional length from the inner portion of one of the outside strands to the inside strand as you work downward.
4. As you work, push the hair upward to tighten the braid and produce
the zipper effect.
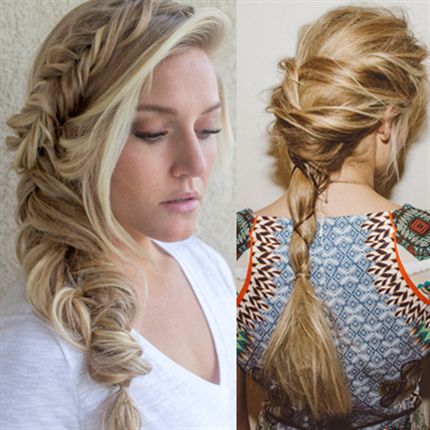
Fishbone, fishtail… whatever you call it, the shape is unique with lots of detail and dimension.
(Image courtesy of Stephanie Brinkerhoff.)
Sherri Jessee’s Fishbone Braid
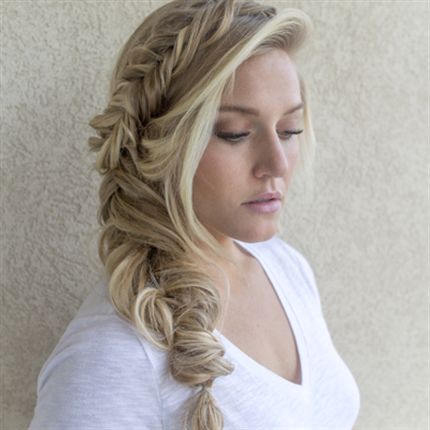
1. Sweep the hair to one side.
2. Divide the hair into two sections.
3. Grab a small section from the outside of one side, cross it over and add it to the section on the other side.
4. Grab a small section from the outside of the opposite side, cross it over and add it to the section on the original side.
5. Continue in this manner to the end of the hair. Pull the braid tight after each plait.
6. Secure the ends, then gently stretch the ends of the braid to enlarge the shape.
7. Mist with PRAVANA NEVO Super Shape.
This braid features two rows of loops that create the look of a zipper. (Image courtesy of Joseph DiMaggio.)
Naeemah’s Avant-Garde Faux Hawk
1. Create a 1-inch vertical section on each side in front, and braid from the bottom up to the top of the head.
2. Gather the remaining hair into two high ponytails, top and bottom.
3. Backcomb the ponytail from base to ends and spray with amika Headstrong Hairspray.
4. Scrunch the teased hair into two buns and secure with large bobby pins.
5. Using the 25mm barrel attachment for the amika 5P Interchangeable
Barrel Curler, separately curl four bundles of hair extensions, securing them with ponytail holders during the curling process.
6. With large, 3-inch bobby pins, secure two bundles to the bottom ponytail and two bundles to the top ponytail, without removing the hair from the bundles.
7. Brush and backcomb each section of hair to create over-the-top volume. Secure with Headstrong Hairspray.
8. Use large French hairpins to mold the style and conceal visible extension wefts and bobby pins.
TIP: When backcombing, place the comb at the dips of the waves and push up. “I like to call this backcombing with a purpose! You will create intensified waves instead of shapeless frizz,” says Naeemah.
“This look can stand on its own, but the cornrows that frame the hairline make the look even edgier,” says amika’s Naeemah LaFond.
Jim Markham’s Side Braid
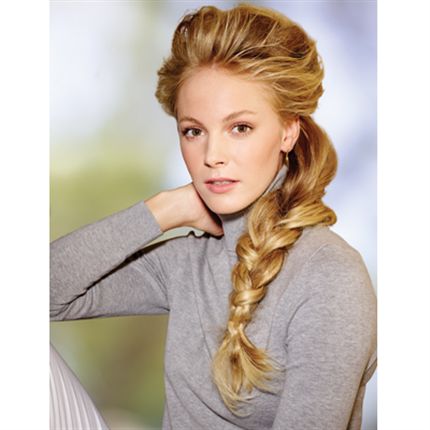
1. Create texture with ColorProof DrySpell® Color Protect Dry Shampoo.
2. Isolate a top section and sprinkle the roots with PowderFix® Texturizing Powder.
3. Backcomb the crown and top sections with a teasing comb and AllAround® Color Protect Working Hairspray.
4. Mist the lengths with TextureCharge™ Color Protect Texture + Finishing Spray.
5. Gather all hair to one side, divide into three sections, braid and secure the ends.
6. Beginning at the top of the braid, tug and loosen random sections with the tip of a tail comb.
7. Finish with HardCore® Epic Hold Color Protect Hairspray.
“Right now the coolest braids are textured, loose and carefree, and this braid hits all three—it’s glamorous without trying too hard,” notes Jim Markham. (Image courtesy of ColorProof.)
Jennifer MacDougal’s Faux Braid

1. Criss-cross strands loosely from temples to the nape in the back and secure with an elastic.
2. Prep the remaining hair with L’Oréal Professionnel True Grip.
3. Moisten two half-inch strands in the ponytail with L’Oréal Professionnel Extreme Splash to create a leathery effect.
4. Cross these strands over the front of the ponytail, then behind the ponytail. Repeat twice.
5. Secure the end of the “braid” with an elastic and backcomb the ends.
Jennifer created this “not really a braid” for L’Oréal Professionnel’s Techni.ART launch in New York City. (Image courtesy of Jennifer MacDougal.)
More from
Nick Stenson
-
Celebrity
“Hairstyle: The Talent Show” Is Now Airing—Here’s What To Know
-
News
Nick Stenson Beauty Launches Exclusive Line At Ulta Beauty
-
The BTC Show
Ulta Beauty at #thebtcshow 2021
-
Blonde
Blonding & Styling: 5 Tips & Tricks From The Ulta Beauty Pro Team
-
Business
WATCH: Ulta Beauty’s Conversation on Black Representation
-
Business
Ulta Salons Are Reopening—Here’s What You Need To Know
-
Business
Coronavirus: Nick Stenson On Leading Your Team Through A Crisis
-
Celebrity
WATCH: Interviews With 8 of Your Fave Matrix Artists & Social Stars
-
Manufacturer
Auditions For The Ulta Beauty Design Team Are Open: Here’s What You Need To Know
-
#thebtcshow 2019
#THEBTCSHOW 2019: DAY 3
-
THE BTC SHOW 2019
BTC BALAYAGE & BLONDES CO-LAB AT #THEBTCSHOW 2019
-
#thebtcshow 2019
#THEBTCSHOW 2019: DAY 2
-
THE BTC SHOW 2019
Matrix At #THEBTCSHOW 2019
-
Haircuts
Video How-To: Lived-In Lob Cut + Party-Ready Upstyle
-
#THEBTCSHOW 2018
6 Tips For Longer-Lasting Styles From Insta-Famous Hairstylists
-
#THEBTCSHOW 2018
Co-Lab Styling at #thebtcshow 2018
-
Balayage
THE BTC SHOW 2018: Day 1
-
Collections
Ulta Beauty Pro Team Collection
-
Celebrity
Giuliana Rancic’s Trending Red Carpet Ponytail
-
Celebrity
9 Glam Moments From The 2018 Golden Globe Awards
-
Best of 2017
Everything We Learned About Cutting Bobs In 2017
-
Bobs
WATCH: Cutting Layers + Adding Movement On A Short Bob Cut
-
Color Melt
7 Quickie How-Tos & Tips From Top Industry Experts
-
#thebtcshow Austin 2017
The Matrix Color Melt Jam: 3 Color Formulas

