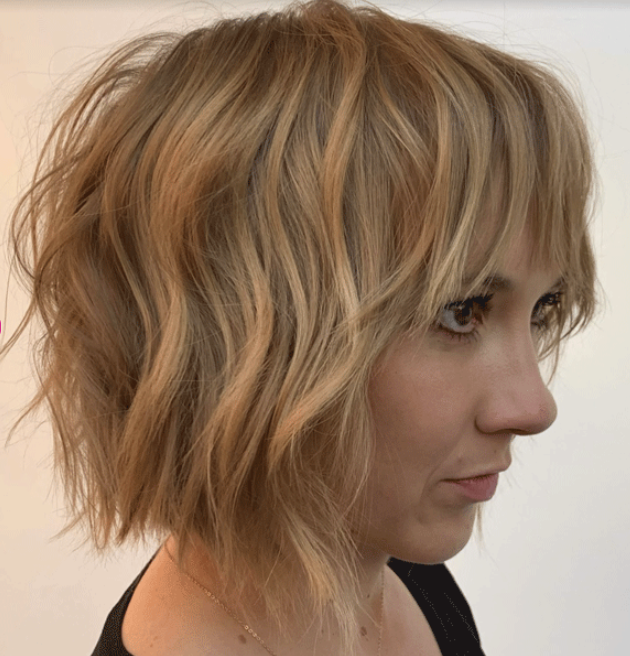
Shags: 3 Tips For Cutting Texturized Layers
How To Create Maximum Texture Without Texturizing Scissors
Now that shags are the reigning haircut of the year, we’re always looking for time-saving techniques you can use without sacrificing the trendy results your clients are requesting. You’re in luck! ARC™ Scissors Team Member Carolynn Judd (@styled_by_carolynn) is sharing her best techniques for texturizing layers without creating holes in the haircut below.
Keep scrolling for three texturizing tips to start using ASAP and click here for Carolynn’s entire course on BTC University!
Inside Carolynn’s Haircutting Tool Kit
Using one pair of scissors to establish the shape and create texture, cut the hair from wet to dry AND create blended layers might seem like an impossible haircut dream—but it’s not!
That’s why Carolynn used the PHANTOM Swivel from ARC™ Scissors. They are Made in Japan and allow her to cut through wet and dry hair without snagging or pulling (which can cause frayed ends.)
Pro Tip: Why a swivel? Carolynn loves to cut with the ARC Phantom Swivel because it eases the tension on her wrist and elbow. The thumb rest rotates to give her maximum movement, so she doesn’t have to adjust her entire arm when cutting different angles.
Learn Carolynn’s cutting tips below and click here to purchase your pair of ARC™ Scissors and use her techniques in the salon!
3 Cutting Tips For Creating Texture
You can learn Carolynn’s entire technique in her 90-minute course on BTC University, but we’re teasing these need-to-know cutting tips now!
Tip #1: Cut alternate lengths to create shape and texture
Shags are all about piece-y, textured ends. So, Carolynn cuts both long and short subsections into the perimeter to create shape and texture at the same time. Here’s how:
- Starting at the nape, divide the section it into five vertical subsections.
- Pinch the bottom of the subsection, holding at zero elevation and slight tension.
- Use the axis of the scissor to slide cut down, creating a point at the ends.
- Cut the next subsection slightly shorter than the previous one. Alternate the length for each subsection from long to short.
- The finished section should have about five alternating subsections.
Pro Tip: The ending subsections on either side should be the longer length. This avoids creating any holes in the perimeter when adding in layers.
Tip #2: Avoid shelf layers with shear shattering
To avoid a hard disconnection between layers, Carolynn uses her signature shear-shattering technique to soften square sections and create a more blended texture.
“Take one-inch vertical sections and overdirect them straight out,” Carolynn explains. “Then, shear-shatter the bottom inch of the section evenly to create a soft, square layer,” she adds.
Tip #3: Section around the ear to avoid a hole
Use a cutting comb to measure around the ear to maintain the connection between the front and back of the haircut. “Whatever hair is covered by the comb leave it alone. This is your insurance. If you overdirect that out, it will create a huge hole in that section,” Carolynn explains.
Slide for the before and after!

Have questions? Carolynn has answers!
One of the benefits of watching a course on BTC University? Artists are able to answer your questions in REAL TIME! Here are some technical questions viewers had for Carolynn during her livestream:
Question: Why don’t you use a texturizing shear for this cut?
Answer: “It always depends on the client. My client today has really nice hair and I don’t need to worry about removing a ton of weight at once to achieve the cut we are going for. Also, this technique is here to make your life easier so you don’t have to worry about going back in through each section to create texture because you are already doing that with your straight shears.”
Q: Could you twist each subsection instead of pinching?
A: “Twisting can give the cut more organic results, because not every section is twisted evenly. Also, the length variations in twisting are very different and less uniform, pinching can create the same result without having to go back in and clean up any stray longer pieces.”
Ready to learn more? Become a BTC-U Member and receive unlimited access to Carolynn’s entire course on BTC University!
More from
Carolynn Judd
-
Blowouts
Bob Styling Guide: 5 Ways To Style Short Hair
-
Blonde
The Biggest Hair Color Trends of 2024
-
Blonde
The Biggest Hair Color Trends Of Winter 2023
-
Bobs
The Biggest Winter Haircut Trends To Kick Off 2023
-
Conditioners
5 Cutting Tips For Perfectly Soft Bobs & Lobs
-
Balayage
Fall 2022’s Hottest Hair Color Trends
-
Bobs
The 10 Biggest Haircut Trends Of Winter 2021
-
Beachwaves
Bobs: 5 Tips To Build Volume With Blowouts + Waves
-
Ask A BTC Expert
5 Tips For Cutting Shags On Short Hair
-
Bobs/Lobs
5 Styling Tips For Every Bob & Lob
-
Bobs
10 MUST-SEE CUTTING TIPS FROM 2020
-
The BTC Show
4 Dry Cutting Techniques For Every Client
-
Haircuts
Why You Should Have Multiple Scissors In Your Tool Kit
-
Business
What To Expect When Salons Reopen After Quarantine
-
BTC Events
BTC “On Tour” New York City 2020
-
Bobs
Textured Lob How-To + Shear Shattering Techniques
-
Bobs
Point Cutting: Use This Cutting Technique For Perimeters of All Lengths
-
Bobs/Lobs
Watch: How To Dry Cut & Texturize A Blunt Bob
-
BTC Events
BTC “On Tour” Nashville—Here’s How We Closed Out Our 2019 Tour
-
BTC Events
BTC “On Tour” Nashville
-
#thebtcshow 2019
Moroccanoil® at #THEBTCSHOW 2019
-
#thebtcshow 2019
#THEBTCSHOW 2019: DAY 2
-
Bobs
3 Cheats To Make Bobs Appear Fuller
-
Bobs
Video How-To: Textured Bob


