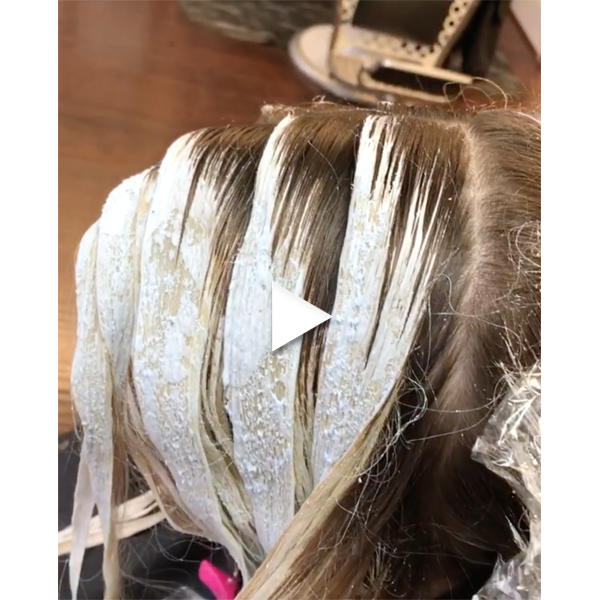
How To Transition Foils To Balayage
Plot Twist: Your client is so over her super blonde strands and wants to switch to a low-maintenance look that screams lived-in. What do you do? Below, we’re breaking down how to transition foils to balayage with the help of BTC Team Member Ashlee Allen (@aaashleee). Keep scrolling to see how it’s done, to get her fave formulas AND to learn Ashlee’s quick toning trick for extra security when blonding!
Products Used
Tap The Arrow On The Below Post To See Each Step In The Process!
View this post on Instagram
What Ashlee Used To Do
Because this client wanted to be super blonde, Ashlee opted to do very heavy foils. But after years of foil highlights and pesky grow out lines, they decided to transition to balayage for a more low-maintenance, lived-in color.
How She Transitioned Foils To Balayage
- Using a hand-painted balayage technique only, Ashlee blended the new growth (this client had about 5 months of regrowth) into her previous highlights. “I used my signature balayage placement so her hair would still maintain a highlighted effect at her root,” notes Ashlee.
- Then, she feathered the lightener directly over the previous blonde to brighten her client up overall. “Whenever I transition someone from foil highlights to balayage, I always paint more blonde around the face for brightness and less in the interior to maintain more depth,” she added.
Note: Worried about overlapping lightener? Ashlee isn’t. “Because of Olaplex, I feel comfortable overlapping my lightener on previously lightened sections and knowing that I’m not compromising the hair’s integrity.”
Ashlee’s Formulas
- Formula A (lightener): Oligo Professionnel Blacklight Extra Blonde Lightener + Oligo Professionnel Blacklight Balayage Clay Lightener + 35-volume developer + Olaplex No.1
- Formula B (base toner): Equal parts Oligo Professionnel Calura 6NB + 6N + 7-volume developer
- Formula C (midlengths and ends toner): Oligo Professionnel Calura 9V + 9AI + 7-volume developer
A Quick Toning Trick For Extra Security
Olaplex No.2 is known as a treatment, but have you ever thought to apply it before applying your toning formula? That’s what Ashlee does to ensure her client’s strands have extra protection! “I normally don’t mix Olaplex into my toners and glosses, however I do apply Olaplex No.2 onto the midlengths through the ends of my client’s hair and then tone directly on top of that,” she shares. “It acts as a porosity filler and I get an even tone every time. It also extends the longevity of my toners.”
More from
Olaplex
-
The Bubble Technique: 5 Tips To Create Rainbow Hair Color
-
The Best Beauty Looks At The 2024 Oscars
-
12 Questions With Celebrity Colorist, Jenna Perry
-
3 Pre-Appointment Steps To Prepare Your Client For A Chemical Service
-
The Biggest Hair Color Trends of 2024
-
OLAPLEX Announces New Brand Ambassadors
-
New Year, New Hair Launches—See The Best Ones So Far!
-
Simona Tabasco’s Hollywood-Inspired Glam Waves
-
The Best Hair & Beauty At The 2024 Emmy Awards
-
The Best Celebrity Hair Colors & Formulas From The 2024 Golden Globes
-
Curly Styling: How To Get Defined Curls With One Product
-
No.9 Bond Protector Nourishing Hair Serum
-
10 Hair Gift Sets Sure To Spread Joy This Holiday Season
-
Your Guide To Fall & Winter 2023’s Hair Color Trends
-
Use This Trick To Keep Velcro Rollers Sanitary In The Salon
-
Meet OLADUPÉ: OLAPLEX Dupes Their Own Product in Viral Campaign
-
These September Hair Launches Will Cure Your Post-Summer Blues
-
BLONDE ENHANCER TONING CONDITIONER
-
3 Tips For Achieving Waves (Without An Iron!)
-
The Hottest Hair Product Launches Of Summer 2023
-
Hailey Bieber’s Hairstylist Shares The Products He Won’t Style Without
-
Volumizing Blow Dry Mist
-
6 Blonding Techniques To Save Your Client’s Hair
-
Met Gala 2023: The Hottest Hair & Beauty Looks