
3 Tips For A Blended Foilayage

3 Tips For A Blended Foilayage
Ever struggle with connecting foiled sections? Gaps between sections can result in a foilayage that looks uneven or full of dark holes. To answer all of you blended questions, we had BTC Team Member Jessica VanDerWouden (@jleighwebdoeshair) stop by The BTC House in West Hollywood, Calif. to share her tips and tricks for bringing it all together! Scroll down for all the info, including her go-to lightener and some extra pro tips! Want to learn more about Jessica’s California Foilayage technique? Click here to purchase Jessica’s class on BTC University and receive lifetime access!
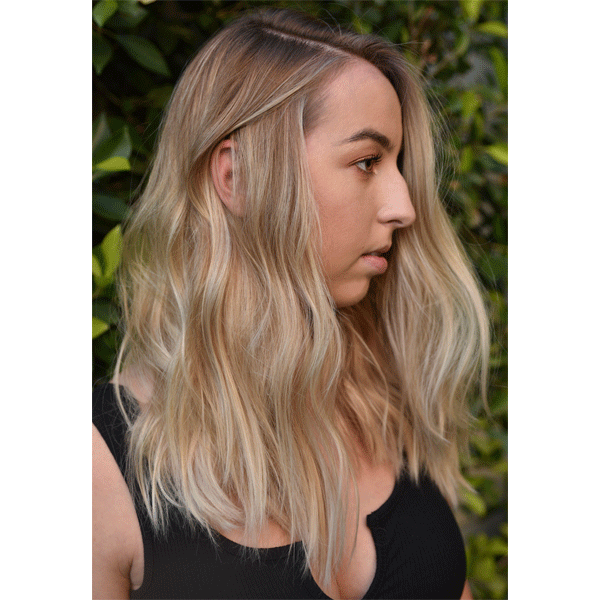
Swipe to see the before & after!
1. Connecting The Money Piece
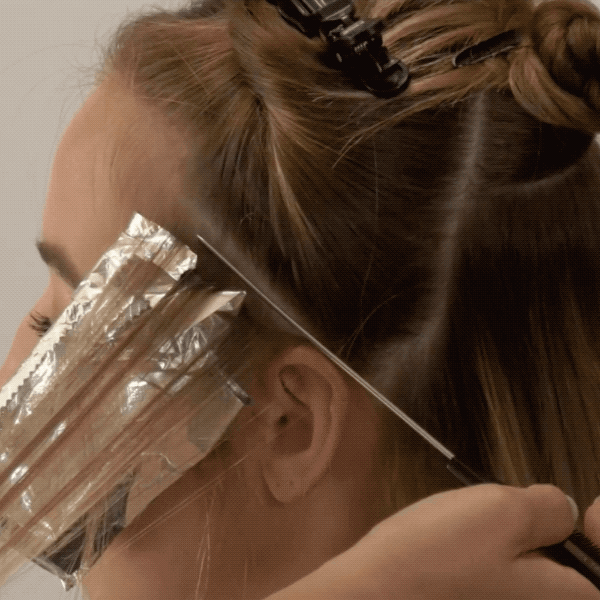
We all love a bold money piece, but connecting the face frame to the hairline can be difficult. To ensure a bold blend, Jessica uses diagonal partings around the hairline. Creating thin, babylight sections until she reaches behind the client’s ear. Then, she will gradually work towards horizontal sections, have full horizontal partings at the client’s recession. When painting the money piece, Jessica will continue with diagonal partings to connect with the hairline.
Pro Tip: Don’t be afraid of placing thin sections into a foil. To ensure the integrity of the hair stays intact, Jessica chooses to lighten her client with BB Bleach from Alfaparf Milano. Jessica uses this as her go-to lightener because it has a non-volatile formulation that will prevent swelling and damage.
2. Work With The Client’s Natural Fall
If the client has any peaks or recession at their hairline, Jessica suggests placing that section in its own foil to avoid any dark holes. Isolate the section off, Jessica explains, and use tension to pull the hair where it would naturally fall, then apply the lightener. This technique also works if the client has a small peak at their front hairline!
Pro Tip: To ensure her foils don’t slip in finer sections, Jessica will surface paint the lightener onto the hair first. Then, place the foil and continue to fully saturate with the product.

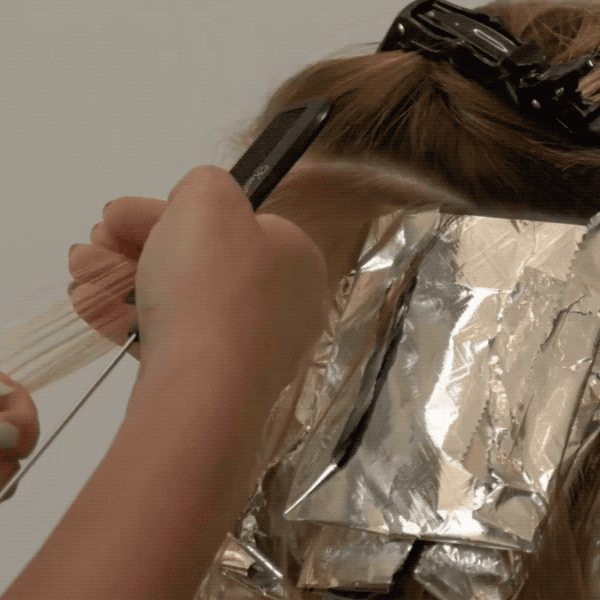
3. Blending The Back

Continue using diagonal partings on the back hairline on either side of the nape, with a horizontal section in the middle. Follow that pattern up the head, diagonal, horizontal, diagonal until you reach the bottom of the crown. Then, take two diagonal partings, creating a triangle, to even the section out. When working within the crown, use horizontal partings to continue to paint all the way up til the back foils meet the side sections.
Click through to see more of Jessica’s day at The BTC House!
Products Used

More from
Alfaparf Milano
-
Blonde
The Biggest Hair Color Trends of 2024
-
Blonde
Coverage In Dimensional Color: 3 Mistakes To Avoid
-
Balayage
Cowboy Copper Reverse Balayage Dos & Don’ts
-
BTC Events
BTC “On Tour” Nashville Recap: Everything You Missed
-
Celebrity
“Hairstyle: The Talent Show” Is Now Airing—Here’s What To Know
-
Events
4 Reasons You Need To Attend Alfaparf’s #LOVEYOUREVOLUTION Tour
-
Uncategorized
How To Formulate A Classic Golden Blonde Toner
-
Blonde
Warm Honey Blonde Curls
-
Blonde
4 Placement Tips To Create Depth When Blonding
-
Balayage
The Money Piece: How To Adjust For Natural Or Bold Balayage
-
Best Of 2022
10 Toning Tips You’ll Need in 2023
-
Balayage
5 Tips To Upgrade Your Cutting, Blonding & Styling Techniques
-
Industry Events
HairStyle: The Talent Show—Enter To Win This TV Contest!
-
BTC Quickies
5 Quickie Hair Cheats We Stole From Instagram
-
Awards Shows
Alfaparf Milano Announces Colorist of The Year 2022 Winner
-
Balayage
How To “Fake” A Full Foil—Try This Genius Trick!
-
The BTC Show
#THEBTCSHOW 2022
-
Facebook Lives
3 Hacks For Coloring Rich Copper Curls
-
Curls
4 Tips For Defined Curls To Try Right Now
-
Foilayage
4 Foilayage Placements for Brighter Blends
-
Brunette
Semi di Lino Brunette Anti-Orange Conditioner
-
Brunette
Semi di Lino Brunette Anti-Orange Low Shampoo
-
Glossing/ Toning
Color Wear Gloss Toner
-
Balayage
3 Tips To Create A Watercolor Balayage

