Articles > Hair Extensions > WATCH: Tape-In Extension Application
Last updated: July 18, 2019

WATCH: Tape-In Extension Application

close formula

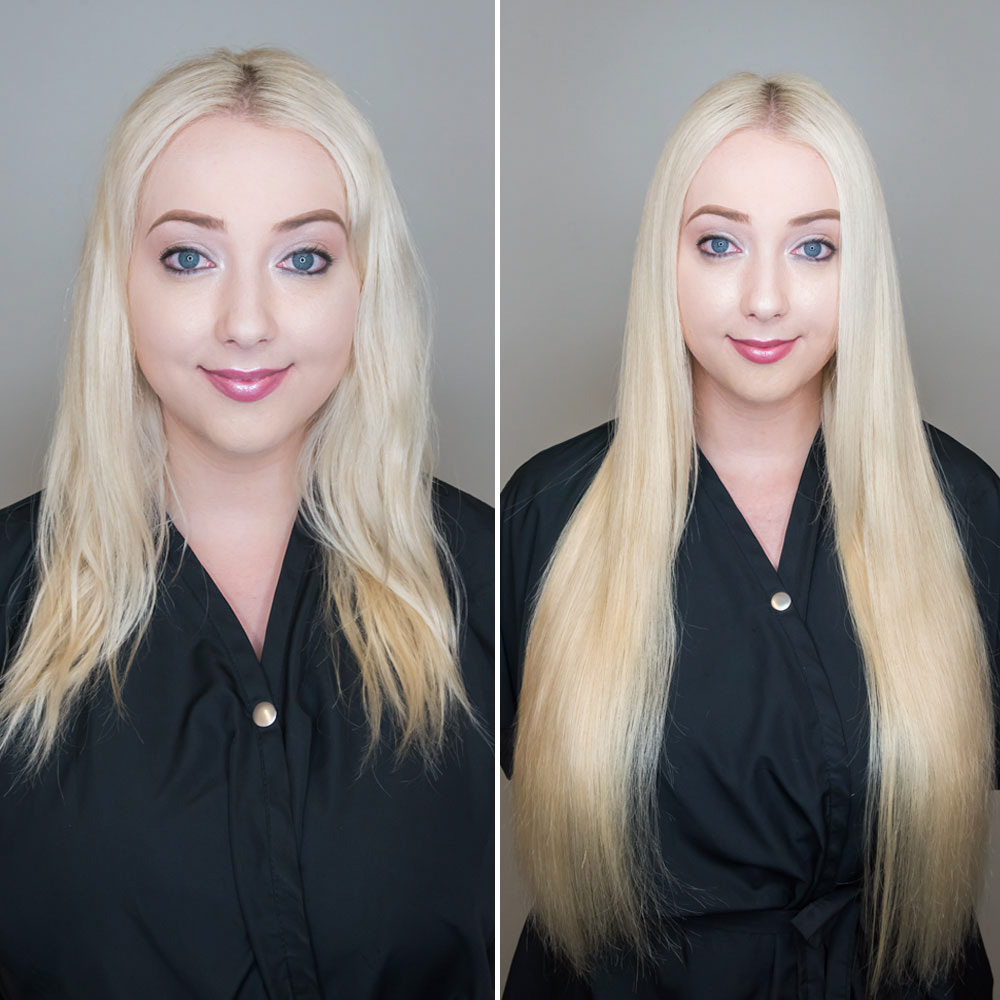
Build your holiday season books with extensions! Tape-in extensions are fast (a whole head won’t take more than two hours, start to finish) and add oomph to party styles. We have the exclusive how-to on tape-in installation from Kim Vō and @platinum_perfection, aka Zach Mesquit, using TRUMATCH hair extensions—almost 300,000 people the full hour of FREE education on BTC’s Facebook! Keep reading for tons of tips from these two experts and to watch the entire video.


How much do hair extensions cost? And how much should you charge? Click here!


Choose the correct extension.

  • “If anyone says I love your extensions, it’s not a compliment,” Zach says. “You don’t want them to be able to tell.”
  • Avoid detection by selecting an extension that matches her hair perfectly. With TRUMATCH, you can match her:
    • Texture: Straight with body, slightly wavy or simply wavy—if your client has a wave pattern, you can actually match it.
    • ColorTRUMATCH extensions are available in 16 colors, but get this—you can lift or deposit up to two levels on the extensions, for a truly custom result.
    • Denier: Also called thickness, this is the ability to match hair type—so you can select fine hair for fine-haired clients, medium hair for medium-haired clients and thick hair for thick-haired clients.
  • Use an extension that has longevity. TRUMATCH extensions can be used up to 8 times!
  • Create a luxury experience for your client by selecting high-quality extensions, and giving her a high-quality service.


Kim and Zach during our exclusive Facebook Live!


Install the tape-ins so they’re undetectable.

  • On extension virgins, Zach likes to leave a few millimeters between the scalp and where he places the tape tab.
    • Why? It’s more comfortable for her and lets her get used to the feel of wearing a head full of extensions.
    • While her maintenance appointment will have to be a week sooner (for example, in five weeks instead of six), she’ll be able to immediately wear her hair up without any scalp tugging or visible tape.
  • Begin installation at the occipital and work in horizontal sections up the head. The hair density and existing cut will determine section spacing, but this is Zach’s rule of thumb:
    • On longer, more layered hair, leave ¼ inch between horizontal sections.
    • On blunt, shorter hair, leave ½ inch between horizontal sections.


Use a rattail comb to position the extension so the oils from your hand don’t break down the adhesive.


Remember these important details for the ultimate extension installation experience.

  • Always work on clean hair for the longest-lasting results—any product or scalp oil can break down the adhesive more quickly.
  • Ask the client where she parts her hair and whether she changes up her part often—this will determine how you part the hair to install the extensions.
  • Steer clear of the hairline—as a rule, you should stay ½ inch to an inch away from the hairline.
  • If you need an extension in the top front of the head, don’t be afraid to cut a weft in half! Word of caution, though—you WILL need to use wirecutters with TRUMATCH extensions, because the tape tabs are the strongest on the market.


You can cut extensions in half if needed!


Get a foolproof, long-lasting installation with Zach’s method.

  • Take a fine slice (you should be able to “read through it,” Zach says).
  • Anchor each extension “sandwich” by applying the bottom tab first.
  • Stick a tab to a rattail comb and use the comb to place the tab where you desire.
  • Use your little finger to roll the slice of hair onto the adhesive, taking care to make sure no stray hairs are stuck that will pull from other areas and make your client uncomfortable.
  • Apply the top tab. Zach likes to use a clamping tool to make sure the tabs are secure.
  • Work in a bricklay pattern to create the appearance of fuller hair and ensure coverage.
  • For extra dimension, consider using two different colors in each “sandwich.”


Take fine slices so thin that you can “read through them,” Zach says.


Watch Zach and Kim walk through the entire application below!


More from
TruMatch