One-Step Dimensional Red Highlights
Achieve Dimensional Red Highlights In One Process
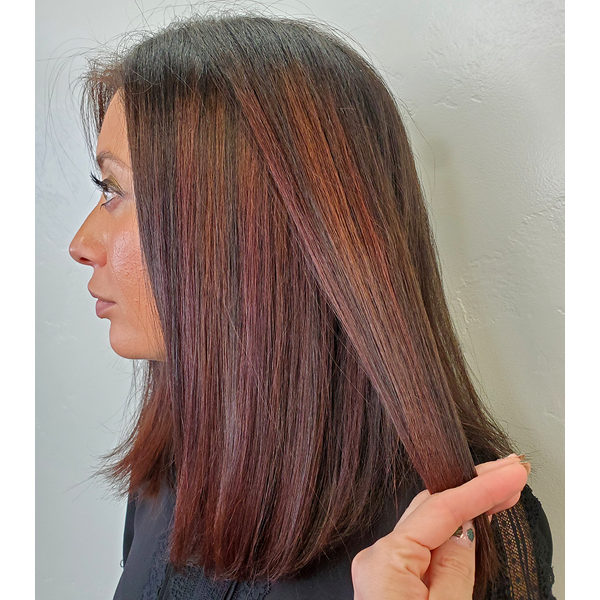
Aloxxi International Educator Robertina Martinez (@hairbyrobertina) showed us how she creates dimensional red highlights in a single process. Watch the video above to see how she mixes balayage with color blocking to save time and create vibrant pops of copper and red throughout the hair. But before you do that, keep scrolling to get her expert tips on sectioning, formulation and color placement. Plus, check out the finished look and grab the formulas!
SAVE 20% Off Aloxxi Products With The Code “btclove” Until February 28!
Sectioning & Parting
Before getting started, always establish where the client’s part is so you know what to work around. If the client usually wears their hair going forward, Robertina will take a diagonal section going toward the face for a bolder piece of color, versus taking a diagonal section going away from the face which will disperse the color for a softer blend.
After creating the first section, use a tail comb to create zip zag partings on both sides. The zig zag partings are the key to creating a color block look that is diffused instead of chunky.
Check Out The Before & After!

Formulation
Aloxxi DIMENSIONS Highlighting® Colour allows Robertina to simultaneously lift and deposit haircolor in one session. The entire process takes 45 minutes to give the hair time to first lift and then deposit pigment. If your client has previously colored hair, Robertina recommends adding Aloxxi BOOST to help the developer lift through previously colored hair. As the name suggests, it helps add an extra level of lift when added to your formulas.
Pro Tip: Want to cool down your warmer tones during formulation? Robertina added Aloxxi Blue Creme Developer to her red formula (Formula B) to help cut down on the pigment’s warmth and produce a cooler shade of red. It can also be used to help eliminate warmth from blondes.
Color Placement
Where and how the haircolor is placed matters for keeping the look natural and diffused, but still bright and vibrant. Here’s how Robertina places the formulas:
- First, section the hair and use a brush to apply haircolor from midlengths to the ends. Saturate the color using your fingers.
- As you move upward feather out the color, leaving about an inch to a ½-inch of the base haircolor at the roots. This will help the red and copper hues seamlessly blend with the rest of the hair.
- Once the section is finished, move on to the next one making sure to alternate colors as you go and leave a section of the natural haircolor in between so the red really pops.
Pro Tip: Robertina doesn’t use anything to separate the painted sections from the rest of the hair. As they are finished, she gently places them going toward the face and leaves the natural hair going back to separate them. The sections shouldn’t bleed if they’re placed gently, but film and foils can be used if needed.
Tap The Beaker For The Formulas!


Products Used
More from
Aloxxi
-
Hair Color
Cover & Nourish Grays In Just One Step—Here’s How!
-
Barbering
5 Genius Blonding, Color + Cutting Cheats To Try Now
-
BOOST
-
Hair Color
DIMENSIONS Highlighting® Colour
-
Balayage
5 Mistakes To Avoid When Foiling The Hairline At The Nape
-
Color Melt
Two-Toned Color Melt
-
Hair Color
White LIGHTENER
-
Blonde
WATCH: Toning Platinum Blondes For Winter
-
Blonde
Bronde Foilayage & Melting Technique
-
Hair Color
RRx Treatment
-
Blonde
13 ’90s-Inspired Chunky Money Piece Formulas
-
Balayage
5 Foil & Paint Tips For Faster Blonding
-
Facebook Lives
Watch: Express Gray Coverage How-To
-
Vibrant
Rainbow Hair Round Up
-
Balayage
5 Hair Tutorials To Watch Right Now
-
BTC Events
BTC “On Tour” New York City 2020
-
Styling
Sleek, Smooth Blowout With Volume
-
Haircare
13 Treatments & Masks Your Clients Will Thank You For
-
Mousse
Volumizing Whip
-
Curls
Watch: Soft, Bombshell Waves Tutorial
-
Conditioners
Bombshell Shampoo & Conditioner
-
Shine
Bombshell Shine Mist
-
Balayage
10 Haircolor Technique Videos You Loved In 2019
-
Hair Color
How To Transition Warm Tones For Fall & Winter


