3 Elevated Hairstyles For Women Over 50 Your Clients Will Love
The Styling Details, Prep Tips and Face-Framing Techniques That Make These Looks Feel Soft, Polished and Effortless Healthy shine, soft movement and touchable styling are key details clients over 50 are asking for right now—especially when it comes to blowouts, ponytails and updos that feel polished without looking overly styled. For stylists, that means focusing less on stiffness and overdone volume and more on a healthy-looking finish, strategic face framing and movement that keeps the hair feeling current. Vanessa Drozda (@vidabeautybabe), salon owner and Joico Artist of more than a decade, recently showcased her signature approach to healthy-looking hair on Netflix’s “Age of Attraction.” “My approach to hair completely changed in my 40s,” Vanessa explains. “I began focusing more on health and condition, because youthful hair is shiny, healthy and silky.” Vanessa’s styling philosophy centers on softness, movement and strategic face framing to keep styles polished without looking overworked. “Keep hair soft and touchable and stay away from those stiff, teased looks,” she advises. Below, Vanessa shares the prep tips, placement techniques and styling steps behind three elevated hairstyles for women over 50. More women over 50 are asking for softness, movement and healthy-looking shine—see the haircut and hair color trends driving those requests right now. 
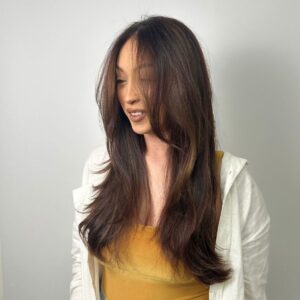
1. Soft, Glossy Blowout “This shiny blowout is my go-to, everyday look,” she says, explaining that softer curls and face-framing movement are what keep the finish polished and effortless. Photo courtesy of Joico Step 1: Start With Moisture and Color Protection “I have a non-negotiable…and it’s starting every cleanse with Joico K-PAK Color Therapy Shampoo,” Vanessa explains. “The formula is gentle, but it keeps my color vibrant for twice as long and leaves hair super healthy.” She follows with Joico K-PAK Color Therapy Conditioner, focusing on moisture to help avoid dullness and dryness. “I like to leave it in for three to five minutes,” she shares. Photo courtesy of Joico Step 2: Prep For Shine Vanessa applies Joico Dream Blowout Glass™ throughout wet hair before drying. “It’s a heat protector up to 450 degrees [Fahrenheit],” she says. “Dream Blowout Glass also seals in moisture and fights humidity and frizz for up to 72 hours.” Photo courtesy of Joico Vanessa’s pro tip: Use it solo before the hair is fully dry to maintain softness and movement through the final style. Step 3: Focus on Soft Movement Around the Face To create the finished shape, Vanessa uses softer curls and movement around the face instead of overly structured styling. “Keep hair soft and touchable and stay away from those stiff, teased looks,” she advises. For stylists using a traditional dryer and iron setup, Vanessa recommends a 1.25-inch round brush to create bounce and smoothness without overworking the hair. Looking for more? See all the long hairstyles clients over 50 are asking for. 
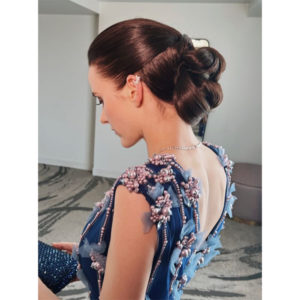
2. Effortless Updo With Face-Framing Detail Vanessa’s approach to updos is all about softness, movement and shape that still feels effortless. Instead of creating a tightly structured style, Vanessa keeps the finish airy and touchable with loose ends, soft bends and face-framing detail. Step 1: Start With Day 2 or 3 Hair Vanessa builds this updo on day two or three hair, using Dream Blowout Glass beforehand to help preserve shine, softness and humidity resistance between styling days. “This protects me from humidity, and days later, my hair is still shiny and moisturized and ready for my updo,” she explains. Step 2: Protect the Hair Before Restyling Before using any hot tools, Vanessa applies Joico Heat Hero throughout the hair. “It protects hair up to 450 degrees [Fahrenheit] and has a built-in split-end mender,” she says. “Not only am I avoiding hair damage, but I’m also helping to heal it.” She then adds a few fresh curls through the ends to create softer texture and movement throughout the updo. Photo courtesy of Joico Step 3: Keep the Shape Lifted and Soft To maintain a more lifted shape, Vanessa sweeps the hair into a high ponytail before creating the bun. “Keeping the ponytail elevated creates the illusion of an instant facelift,” she explains. Instead of wrapping the bun tightly, Vanessa leaves the ends loose and fanned out for a softer finish. She also pulls out face-framing tendrils at the corners of the eyebrows to keep the style from feeling overly severe. Step 4: Lock In Shine Without Stiffness To finish, Vanessa uses Joico Hold Hero to give the style hold while maintaining softness and shine. “This ultra-hold and mega-shine finishing spray gives the updo stability without that stiff or crispy look,” she says. 3. Bouncy Ponytail With Soft Texture A polished ponytail can completely change the overall shape of the face—especially when placement, movement and shine are part of the strategy. Vanessa calls this one of her favorite quick styling looks because it creates lift while still feeling soft and wearable. Press play to watch the tutorial: Step 1: Prep With Heat Protection and Shine Before styling, Vanessa applies Heat Hero throughout the hair to help protect against heat damage while maintaining a glossy finish. “It’s my ultimate armor against heat damage, protects hair up to 450 degrees [Fahrenheit], leaves hair with a glossy finish and helps conceal split ends,” she explains. Step 2: Add Soft Bend Through the Ends Vanessa curls the hair through the midlengths and ends before finger-combing through the shape to keep the finish soft instead of overly structured. Step 3: Focus on Ponytail Placement Using a paddle brush and spiral ponytail holder, Vanessa secures the ponytail high on the head to create a more lifted effect. “I want my pony to land at a 45-degree angle from my cheekbones,” she advises. “This is going to draw the eye upwards and give an instant facelift result.” Step 4: Create Extra Lift To elevate the shape even more, Vanessa adds a second ponytail holder roughly two inches above the base to help support the ponytail and create additional lift and bounce. Step 5: Finish With Hold and Shine Vanessa finishes the style with Hold Hero for long-lasting hold and reflective shine without making the ponytail feel stiff. “This ultra-hold and mega-shine finishing spray keeps every glossy hair in place without that stiff or crispy look,” she says. Got clients over 50? These are the haircut and hair color trends influencing what they’re asking for. Products Used Wella Professionals Elements Conditioners Wella Professionals Wella Professionals EIMI Collection Conditioners Wella Professionals Wella Professionals LuxeOil Collection Haircare Wella Professionals EIMI Thermal Image Heat Styling Wella Professionals
Latest Stories
-
Shine3 Steps to a Softer, Longer-Lasting Silk Press
Here’s How To Layer Product & Technique So Your Silk Press Stays Smooth Long After the Blowout A perfect silk press balances slip, tension and controlled heat to create a smooth, reflective finish with movement and density through the ends. Celebrity stylist and salon owner Marc Mendez (@therealmarcmendez) proves the difference between “straight” and silky comes down to how you layer your product and control your tension. Here’s how to build slip, shine and longevity, without overloading the hair or frying the cuticle. Move the slider to see the before and after: Formulas Move your cursor across the image to reveal the transformation Step 1: Prep for Slip and Control A smooth silk press starts with the right prep. Marc uses Kenra Professional® Platinum Blow-Dry Spray on clean, detangled hair to create lightweight slip and even heat protection before blow-drying. Spraying section by section gives control without over-saturating the hair, letting the brush glide through with tension that smooths instead of stretches. Photo Credit: Instagram via @therealmarcmendez New to silk presses? See The Silk Press: 7 Tips to Perfect the Process for the full breakdown. Step 2: Build Softness and Shine After the prep spray, Marc begins blow-drying in controlled sections, then works Kenra Professional® Silkening Heat Crème through each one to refine the hair as he goes. The crème adds a lightweight barrier that smooths the cuticle as tension and airflow stretch the curl pattern. This step builds softness and reflective shine directly from the blow-dry, creating a smooth, controlled finish that feels polished and balanced. Photo Credit: Instagram via @therealmarcmendez Healthy curls are always the goal—discover how to protect texture and perfect your press in 5 Silk Press Tips to Avoid Damaging Curls. Step 3: Finish for Gloss and Movement After working in the Silkening Heat Crème, Marc completes the look with a few drops of Kenra Professional® Platinum Silkening Gloss. This final layer locks in moisture, enhances the reflective shine built during the blow-dry, and adds smooth, fluid movement. The finish is controlled, lightweight, and polished—proof that intentional layering creates lasting results. To lock in the press and extend smoothness, Marc explains, “After the blow-dry, I use a titanium flat iron as the final step of the silk press. Letting the hair cool [after] every step really helps the hair not swell back up and stay straight.” Press play to see Marc’s process from start to finish: Want to master styling every curl type? Watch Curls, Defined and learn all of Brendnetta Ashley’s (@edgybgirl) techniques on BTC-U.
-
ShineClassic Blowouts Are Back: 4 Tips to Achieve Smooth Strands
Pro Tutorial: How To Achieve A Polished, Classic Blowout The return of the classic blowout is nothing short of iconic. With celebrity It-Girls like Bella Hadid and Sydney Sweeney rocking this timeless style, your clients will request the same bounce, shine and slightly beveled finish at the ends. With summer in full swing, you’ll need to know how to protect against humidity for smooth finish that lasts, so we tapped amika Lead Pro Team Educator Jeffrey Allen (@jeffreydoesmyhair). He’s sharing his top techniques and product pairings that ensure a sleek, frizz-free finish—even in high humidity Check out the frizz-free finish Jeffrey delivered for his client: Formulas 1. Rethink Your Conditioning Strategy That perfect polish begins at the shampoo bowl. One of the biggest mistakes stylists can make is applying conditioner from root to ends. To enhance that voluminous finish, focus your choice of amika conditioner (based on your client’s hair needs) on the midshaft to keep those ends bouncy and weightless. Pro Tip: To further fight frizz, Jeffrey uses amika forget frizz shampoo and conditioner, which both offer 74 percent humidity protectant for up to 72 hours*, even in areas with high humidity. Plus, this duo features a low-pH to seals the cuticle, making it great for color services. Formulas 2. Master Product Progression: How To Layer from Base to Finish Achieving that luxe, high-gloss finish starts and ends with the right product lineup—paired with using each product at the correct stage. To control frizz and lock in long-lasting bounce, save Jeffrey’s go-to smoothing cocktail, broken down by product category. Prep Products amika the wizard detangling primer: Detangles and primes for even product absorption. Wet Stylers amika frizz-me-not hydrating anti-frizz treatment: This is the star of the show. Here’s why: Designed to be heat-activated, this product is a two-in-one smoothing styling treatment and conditioning leave-in, allowing you to use less products with more intention. frizz-me-not forms a hydrophobic barrier that seals moisture in while repelling frizz-inducing humidity through extended humidity shield technology. It’s a heat protectant up to 450°F for frizz control up to 72 hours (even in high humidity!)** amika the shield anti-humidity spray: Think of this as a style sealant—it locks in your blowout with heat protection and style memory, making it a must-have for event styling and the perfect pair for frizz-me-not. Press play to see how Jeffrey applies frizz-me-not section-by-section while providing an expert product recommendation for his client: Dry Finishers amika superfruit star lightweight hairstyling oil: Adds softness and further enhances the cuticle’s smoothness. 3. Skip The Rough-Dry—Here’s Why For a sleek, long-lasting result, Jeffrey advises stylists to blow-dry with intention—that means following the natural direction of the cuticle, skipping the rough-dry entirely. This technique not only smooths the hair shaft but also helps lock in shine and reduce frizz. 4. Target Moisture at the Roots & Midshaft—The Ends Will Follow “Begin blow-drying at the root to midshaft, where moisture retention is highest,” Jeffrey explains. “What I’m doing is pushing the moisture out, section by section, before I get towards the ends.” This ensures even drying, reduces damage to fragile ends and helps you maintain control and shape throughout the blowout. Formulas *Clinically proven for up to 72 hours. **Up to 74% less frizz for 72 hours in high humidity. This content is sponsored.
-
Shine4 Styling Tips For a Foolproof Bouncy Blowout
How To Build Volume on Medium & Fine-Haired Clients Bouncy layers and mega-volume styles aren’t just for the thickest locks. For your clients whose hair leans on the finer side or even the middle of the road, the right technique can create voluminous styles that last. And they won’t have to sacrifice moisture and shine for endless heat and tight rollers to get it. Keep scrolling for four easy-to-follow styling tips to give your clients a blowout that lasts long after they leave your salon doors. 1. Finishing up your haircut? Here’s how to make that salon-fresh look last. Are you finishing your haircuts with a classic blowout? You should be—here’s why. Not only does this allow you to detail the cut on dry hair, but you’re also able to build volume and shape that reveals and accentuates your work. The key: Don’t rush through the blowout and grab your wand to throw in some waves. Build a strong foundation with a round brush and a cocktail of volume-building products that will create volume that actually lasts. From start to finish, here are Denver-based Sara Botsford’s (@sarabotsfordhair) go-to products for a typical layered haircut appointment: Prep: Saphira The One Leave-In Spray Mask to heal split ends, detangle and add shine. (Pro tip: This spray is also a convenient cutting lotion.) Finish: Build a blowout with long-lasting shape using Saphira Sculpting Lotion for an all-day yet soft and flexible hold. Swipe to see the before and after of Sara’s styling routine: Formulas Move your cursor across the image to reveal the transformation Styling products infused with 26 minerals for healing? Click here! 2. Turn fine-to-medium density hair into supermodel volume—here’s how. If you’re looking for a round brush and roller collab that works even for finer-haired clients, you’ve come to the right place. Sara has perfected her technique for giving lower density strands a much appreciated lift. Here’s how Sara turns up the volume: On damp hair, spray Saphira Volumizer onto the roots to add body and volume while achieving a gentle hold and a silky smooth feel. Apply Sculpting Lotion from midlengths to ends for additional protection. Starting at the crown, blow-dry and round brush two to three inch sections throughout. Set on a velcro roller to cool. After the crown is complete, continue setting the hair on rollers or by allowing each section to cool on the round brush. Remove the rollers to reveal BIG, BOUNCY hair! Click the image to see the results for yourself: Photo Credit: Instagram via @sarabotsfordhair 3. This product cocktail proves that shine & hydration go hand-in-hand. Dry, brittle hair? Don’t know her! Sarayah Hernandez (@hairbysarayah) has a simple product combination that leaves her clients’ hair glass-like and silky every time: Prep with The One Leave-In Spray Mask for hydration. Blow-dry the hair, working in sections. Finish with a touch of Saphira Mineral Drop Oil for shine! Bonus points: Both products are infused with Saphira’s signature 26 minerals, giving the hair a nourished look and feel: Photo Credit: Instagram via @hairbysarayah 4. Bouncy blowout in just five easy steps. Blowout longevity = a strategic product lineup. That’s why Alyssa Salmon (@thehairwaytoheaven) uses nourishing but purposeful styling tools every step of the way. Here’s Alyssa’s go-to method for clients (and herself!): Gently cleanse the hair with nourishing Saphira Mineral Moisturing Shampoo and Conditioner to dissolve any build-up on the scalp. Globally apply The One Leave-In Spray Mask to detangle and add heat protection. Spray Volumizer all over the roots ONLY to accentuate and build. If you want extra volume, apply Sculpting Lotion for flexible body. Plus, it can help boost the longevity of the look with its touchable but strong hold. Blow-out, then apply Mineral Drop Oil globally to smooth out any frizz and loose ends. Click the image to see Alyssa’s entire process: Photo Credit: Instagram via @thehairwaytoheaven Achieve volume, shine and moisture all at once—add Saphira to your salon menu.
-
ShineRachel Brosnahan's Elegant Red Carpet Updo
If you watched this year’s Emmy Awards, “The Marvelous Mrs. Maisel” actress Rachel Brosnahan‘s elegant updo caught your eye. The Outstanding Lead Actress In A Comedy Series nominee graced the red carpet after an upstyle by stylist Owen Gould (@owengould). Keep scrolling for a step-by-step guide on how to recreate this iconic look behind the chair!

