How To Avoid Muddy Tones When Mixing Creative Color
Here’s How To Keep Vibrant Tones Bright When Color Melting
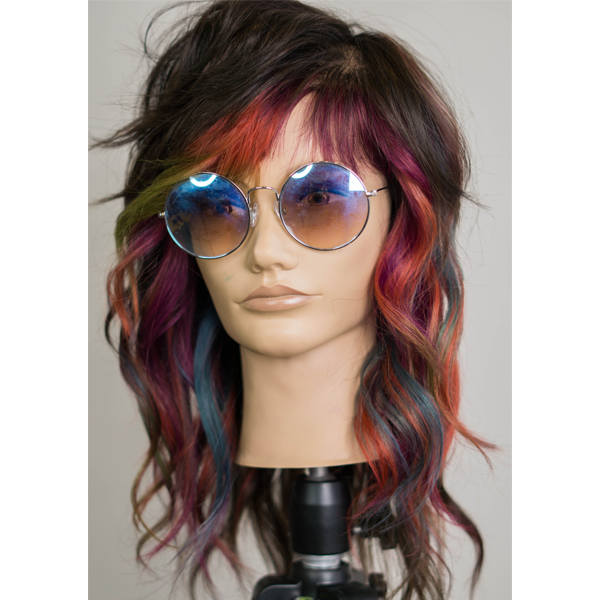
Learn how to color melt vibrant shades like a pro with Ulta Beauty Design Team Member Janelle Eyre (@jeyre.hair)! Keep scrolling to get her three tips that will help you avoid muddy tones when formulating and color melting. When you’re done, make sure to watch the full 40-minute tutorial above for more education. Plus, don’t forget to check out the finished look and grab the formulas!
Searching for new career opportunities in the New Year? Click here!
1. Avoid Muddy Shades With Your Formulas
Janelle mixes her custom colors keeping in mind how they’ll fade and how they’ll look next to each other to avoid a muddy result. For example, she prevents the orange formula from fading green in the future by adding fuchsia pink. Plus, she creates a blue formula for depth so the brighter shades don’t look muddy against the mannequin’s Level 7 base. When in doubt, always reference the color wheel.
2. Test Out The Colors First
Janelle tests her custom shades on a piece of white and yellow card stock before applying them to her client’s hair. This helps her figure out how the formula will lay against platinum and yellow-toned hair. She can see if the color looks muddy or needs more work beforehand, so she can apply her formulas with confidence later.
Check Out The Finished Look & Tap the Beaker For The Formulas!


3. Color Melt Carefully To Avoid Muddy Tones
When color melting natural shades, you can vigorously blend two colors together to get a nice melt. Color melting fashion colors requires a more delicate touch. Here’s how Janelle does it:
- First, apply your first shade to a thin section and saturate.
- Apply the second formula under the first shade, making sure they don’t touch and blend up.
- Once the two colors meet, pinch the hair using two fingers and swirl the colors together until it’s blended.
- Continue this step with all shades, for a gentler blend.
Note: If the colors don’t look melted together, chances are they won’t be once the client’s hair is dry. So keep blending until you get the desired result.
More from
Ulta Beauty
-
Hair Color
The Bubble Technique: 5 Tips To Create Rainbow Hair Color
-
BTC Hair Trend Report
The Biggest Haircut Trends of 2024
-
Business
New To Budgeting & Investing? Start Here!
-
Business
The Ins & Outs Of Assisting: How To Be & Choose The Right Hair Assistant
-
Curly
Curly Consultation & Haircutting: Watch The Full Tutorial!
-
News
How Maui Hairdressers Are Rebuilding Post-Lahaina Fires
-
Business
How To Make 6 Figures From Stylists Who Actually DID IT
-
BTC Events
AI, Mental Health & Social Media: 7 Business Tips You Can’t Live Without
-
Business
6 Saving & Investing Tips To Grow Your Profit
-
Facebook Lives
Volume Guaranteed: Try This Layering Technique For Fine Hair
-
Bobs
The Biggest Haircut Trends of Summer 2023
-
Industry News
Vernon François Joins Ulta Beauty Pro Team of Industry-Leading Artists & Educators
-
Industry News
6 Award-Winning Hairstylists Join the Ulta Beauty Design Team
-
BTC Hair Trend Report
2023 Hairstyling: 11 Trends You Need To Know
-
BTC Hair Trend Report
2023’s Biggest Haircut Trends
-
Business
5 Steps You Must Take To Build A Strong Salon Culture
-
Beachwaves
6 Tips For Faux Blowouts & Effortless Waves
-
Blonde
The Biggest Hair Color Trends Of Winter 2023
-
Accessories
15 Styling Trends That Will Be Everywhere in Winter 2023
-
Balayage
5 Tips To Upgrade Your Cutting, Blonding & Styling Techniques
-
#ONESHOT HAIR AWARDS
Modern Art
-
BTC University
Dear Stylists, 4 Smart Ways To Protect Your Income
-
Facebook Lives
25-Minute Butterfly Layers Cut & Style
-
Business
Client Retention Checklist: 7 Ways To Keep Them Coming Back


