25-Minute Butterfly Layers Cut & Style
Three Tips To Cut & Style Butterfly Layers Quickly
Trendy haircuts like Butterfly layers can be a huge money-maker—if you know how to manage the appointment time. Book back-to-back appointments with these quick tips to get your clients out the door with an incredible new haircut.
Scroll through these three quickie cheats to master the viral butterfly layers WITH styling in just 25 minutes.
1. Cut Fringe Using A Triangle Guide
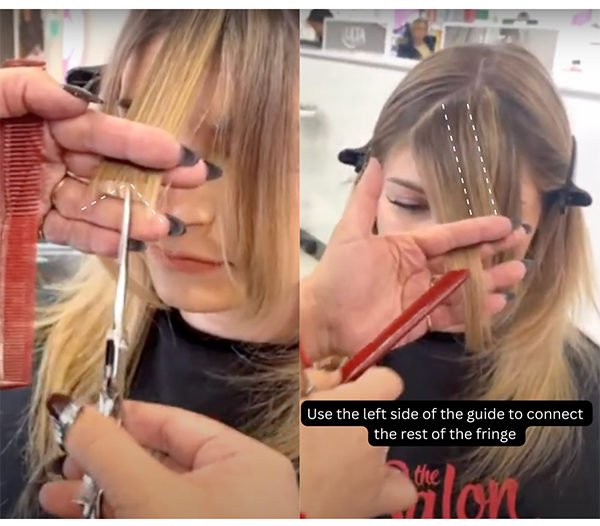
Ulta Beauty Stylist Amanda Diaz (@aestheticbyamanda) first sections their client’s fringe into a large triangle, then separates the section into three parts. This will create the framework for a contoured face frame that will connect into the butterfly layers later.
Try Amanda’s quick technique to create textured fringe in just three steps:
- Point cut the center section into a triangle.
- Then, overdirect each side of the triangle as a guide connecting the left and right sections.
- Be sure to point cut the entire fringe section. This is key to building texture and movement quickly!
Pro Tip: If you’re not sure how short to cut your client’s fringe, Amanda recommends starting just above the tip of their nose. (You can always take more length off if needed!)

Looking for a new salon environment to flourish in? Check out this Ulta Beauty Career Locator to find your perfect fit.
2. Use Organic Sectioning Throughout The Entire Head
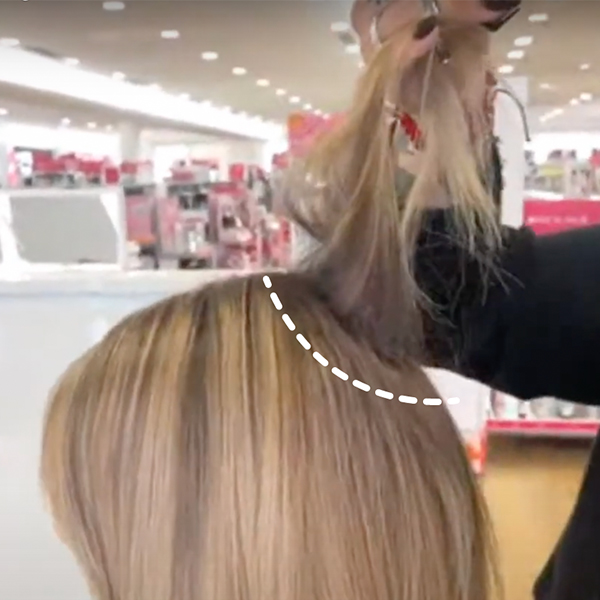
For this cut, it’s really important to eliminate any extra weight that could create a heavy shelf layer. The contoured face frame adds structure around the face, so be sure the rest of the cut is just as balanced.
Try this to avoid a heavy crown layer:
Take a circular section at the crown and point cut any extra length or blunt lines. This quick step makes a huge difference in the way the client’s layers lay without extra bulk.

3. Contour The Fringe With This Styling Trick
To accentuate the layers and movement created, be sure you’re showing every client how to style their hair at home.
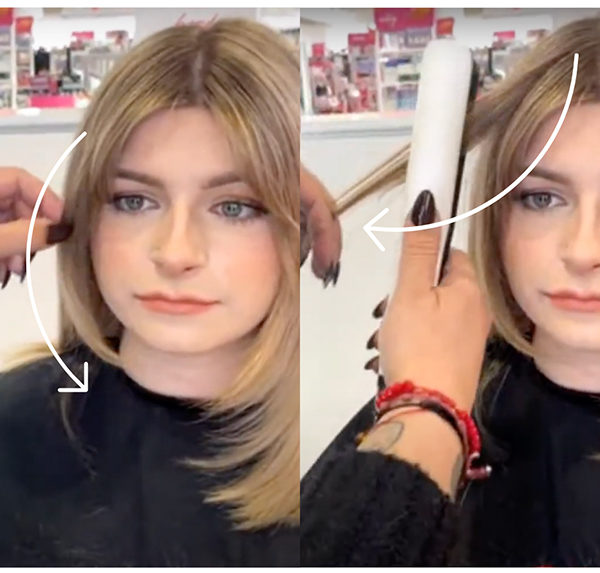
For the IG-worthy layered, bouncy look, try this flat iron trick:
- Using a flat iron, round the face-framing section in toward your client’s chin.
- Then, take one piece from the back of that section and round it away from the face.
This technique will sculpt the layers around the client’s face, making sure their face frame does not hang heavy around their eyes and chin.

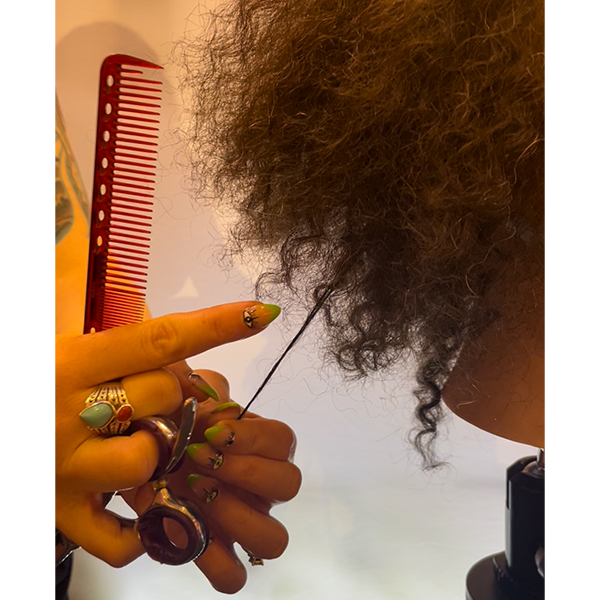
Check out Amanda’s full service demo above! Plus, use these tips when cutting this trend on curly curly hair:
More from
Ulta Beauty
-
Hair Color
The Bubble Technique: 5 Tips To Create Rainbow Hair Color
-
BTC Hair Trend Report
The Biggest Haircut Trends of 2024
-
Business
New To Budgeting & Investing? Start Here!
-
Business
The Ins & Outs Of Assisting: How To Be & Choose The Right Hair Assistant
-
Curly
Curly Consultation & Haircutting: Watch The Full Tutorial!
-
News
How Maui Hairdressers Are Rebuilding Post-Lahaina Fires
-
Business
How To Make 6 Figures From Stylists Who Actually DID IT
-
BTC Events
AI, Mental Health & Social Media: 7 Business Tips You Can’t Live Without
-
Business
6 Saving & Investing Tips To Grow Your Profit
-
Facebook Lives
Volume Guaranteed: Try This Layering Technique For Fine Hair
-
Bobs
The Biggest Haircut Trends of Summer 2023
-
Industry News
Vernon François Joins Ulta Beauty Pro Team of Industry-Leading Artists & Educators
-
Industry News
6 Award-Winning Hairstylists Join the Ulta Beauty Design Team
-
BTC Hair Trend Report
2023 Hairstyling: 11 Trends You Need To Know
-
BTC Hair Trend Report
2023’s Biggest Haircut Trends
-
Business
5 Steps You Must Take To Build A Strong Salon Culture
-
Beachwaves
6 Tips For Faux Blowouts & Effortless Waves
-
Blonde
The Biggest Hair Color Trends Of Winter 2023
-
Accessories
15 Styling Trends That Will Be Everywhere in Winter 2023
-
Balayage
5 Tips To Upgrade Your Cutting, Blonding & Styling Techniques
-
#ONESHOT HAIR AWARDS
Modern Art
-
BTC University
Dear Stylists, 4 Smart Ways To Protect Your Income
-
Business
Client Retention Checklist: 7 Ways To Keep Them Coming Back
-
Fine/ Thinning
Fine Hair: Do You Know How To Handle It?


