
Watch: Color Melting & Toning Tips For Color Corrections
This Color Melting Technique Will Save You Time On Your Color Corrections
Watch Schwarzkopf Professional ASK Expert Educator Juli Waits (@hairbyjuliwaits) break down the color melting technique she uses to save time and break up harsh bands when color correcting. Keep scrolling to grab her tips on sectioning, how to ensure a seamless melt and her go-to tool when melting, then watch the full video tutorial above. Plus, check out the finished look and grab the formulas!
Work In Diagonal Sections
Working in diagonal sections when applying a root smudge will result in a softer finish. Applying a root smudge in straight sections will result in harsh lines that the client won’t appreciate, especially if they like to pull their hair up.
CLICK HERE To Purchase Schwarzkopf Professional’s IGORA VIBRANCE® Demi-Permanent Shades!
Keep A Comb On Hand
Stylists should keep a specialized color comb or a fine toothed comb handy when color melting. Juli prefers using a fine toothed comb, because there might be areas that need added dimension and it’s easier to create v-shaped pockets in the hair using a fine toothed comb.
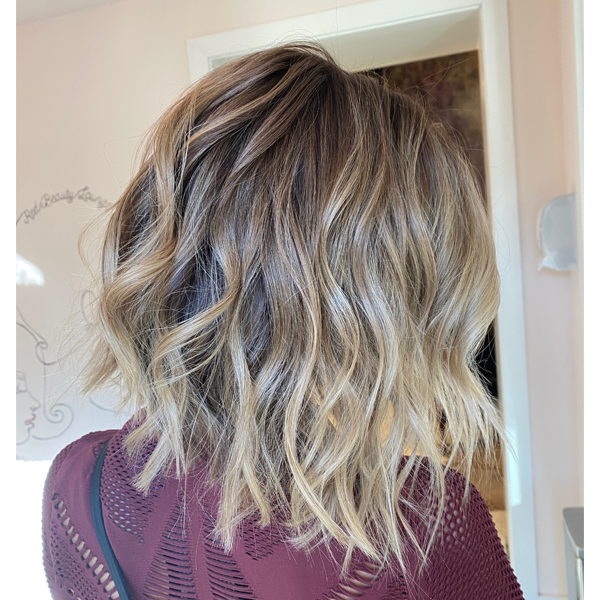
Here’s The Final Result On A Client! Tap The Beaker For The Formulas!

Achieving The Perfect Blend
Before applying the base color, melt the root smudge down using a comb. When the base color is applied it will blend into the root smudge to produce a natural, third transition color. Once the toners have been applied to the entire section, run a fine toothed comb through the hair to continue melting them together for a seamless blend.
Products Used
More from
Schwarzkopf Professional®
-
Brunette
Your Guide To Lifting & Toning Sun-Kissed Brunettes
-
Industry News
Schwarzkopf Professional® Relaunches IGORA VIBRANCE Featuring Legendary Athletes
-
Brunette
Lily Collins’ Suede Brunette Bob
-
Oil
4 Ways to Use A Bonding Hair Oil
-
Business
Why Promoting Women to Leadership Positions is the Key to a Successful Hair Brand
-
Bridal
Common Bridal Hair Challenges We Don’t Talk About
-
Hairsprays
OSiS+ Elastic Hairspray
-
Curls
OSiS+ Curl Jam
-
Curls
OSiS+ Tipsy Twirl
-
Curls
OSiS+ Bounty Balm
-
Monthly Product Launch List
9 New Product Launches To Bring Into Summer
-
News
Schwarzkopf Announces Dove Cameron As New Global Brand Ambassador
-
Bridal
3 Tips To Create 2024’s Biggest Bridal Updo Request
-
News
The BTC Beauty Box is Back & Better Than Ever—Same Best-Sellers, No Subscription Needed.
-
Blonde
Mariah Carey’s “Hollywood Blondeshell” Transformation
-
Industry Events
Schwarzkopf Professional® Launches LIFT Event Series Starring Chris Appleton
-
Met Gala
MET GALA 2024: EVERY CELEBRITY BEAUTY LOOK FROM THE RED CARPET
-
Met Gala
BRIE LARSON’S MET GALA GOLDEN BLONDE
-
Met Gala
KERRY WASHINGTON’S SHORT & SWEET WET PIXIE
-
Oil
FIBRE CLINIX® Bonding Oils
-
Shampoos
Purple vs. Blue Shampoo: It’s More Than Color Theory, Here’s Why
-
Copper
Muted Bronze
-
Monthly Product Launch List
The Best Hair Launches Of March 2024
-
Hair Color
IGORA ZERO AMM Permanent Color
