How To Create Finger Waves: Mistakes and Solutions
How To Create Finger Waves: Watch The Video
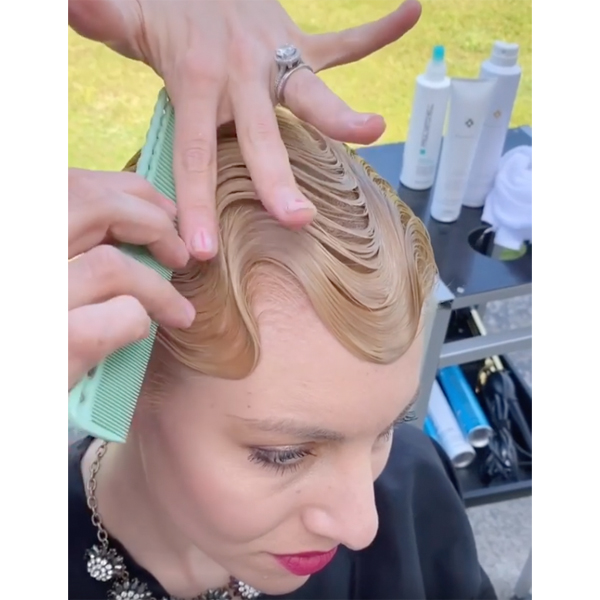
Do finger waves still give you the shakes? Don’t worry, this isn’t your state board test, and after you watch John Paul Mitchell Systems Educator Mary Cromeans (@cuomocromeans) sculpt finger waves in 10 minutes, you’ll be ready to try these on your next client! Get her finger wave tips and tricks below!
Products Used
Quick backstory: We spotted Mary working gorgeous finger waves on a model at the JPMS Hawaii Seminar on the Big Island. Yes, we spent an entire week with the JPMS team and 100+ hairdressers—not only learning technical and business tips to help in the salon, but also being inspired by Hawaii’s culture and its role in Paul Mitchell’s history. It was a celebration for the brand’s 40th anniversary, and how appropriate to see finger waves to pay homage to Paul Mitchell the man, who was known for sculpting hair?
We were fortunate to get some exclusive time with Mary for a close-up look at her go-to finger waves technique, so watch the video and get her tips below!
Watch The How-To Video Below!
Mistake #1: Trying this technique on hair that’s too long.
Wet-set finger waves are best suited for clients with short hair—think no longer than mid-neck. It’s an ideal set for close-cropped guests who feel like they want a drastic style change. If your guest has longer hair, the wet-set may take FOREVER to actually set, so switch to a dry-set style using a curling iron.
Mistake #2: Not using enough product.
The undeniable key to gorgeous finger waves is in product choice. In the video, Mary uses copious amounts of Marula Rare Oil 3-in-1 Styling Cream on her model Karen. This product hydrates and conditions while also holding the set, and will allow Karen to brush the set waves out into a beautiful soft style.
Mary’s other go-to? Paul Mitchell Super Sculpt. This is one of the brand’s original products intended for wet sets, and it dries quickly with a stiffer finish.
The final secret: Keeping the hair wet while you work. This is why Mary liberally sprays Paul Mitchell Awapuhi Moisture Mist throughout the service—it reactivates product and keeps the hair workable.
Mistake #3: Choosing the wrong tool.
The must-have tool for wet-set finger waves is a comb with both fine and slightly wider teeth. Mary uses the wide side to “draw” the pattern into the hair, then switches to the fine side to erase bumps and comb tracks and to bring the hair back together into a patent leather-like finish. (Side note—if you WANT comb tracks in the hair, go for it! Sounds like a cool update on a classic look!)
Swipe through for the finished look!
Tap here to see everything that went down at the JPMS Hawaii Seminar!
More from
John Paul Mitchell Systems
-
BTC Events
Celebrity Colorist Justin Anderson Joined BTC’s “On Tour” Nashville Benefit Show
-
Copper
6 Trendy Red & Ginger Formulas To Try
-
Color Protecting
The Demi Color Gloss
-
Hair Color
The Color
-
BTC Hair Trend Report
8 October Hair Launches That are Scary Good
-
Copper
Warm Papaya Glow
-
Industry Icon Robert Cromeans Announces Retirement From JPMS
-
Events
This 3-Day Hair Show Brought Thousands Of Stylists To Nashville
-
Monthly Product Launch List
16 New Hair Products To Add To Your Spring Rotation
-
Manufacturer
John Paul Mitchell Systems Launches Sustainable Restage Of Tea Tree Line
-
News
Pick The New Paul Mitchell Colorways Shade—Here’s How!
-
Monthly Product Launch List
11 New Game-Changing Hair Launches To Add To Your Arsenal
-
Hair Color
Lime Green-Toned Color Block
-
Color Depositing
Clean Beauty Color Depositing Treatment
-
Hair Color
Vivids: 6 Creative Color Placement & Formulation Tips
-
Industry News
Remembering The Life of Angus Mitchell
-
Monthly Product Launch List
The Best Hair Product Launches Of Fall 2023
-
Manufacturer
John Paul Mitchell Systems® Launches New Pro Rewards Program
-
News
These Are The Hottest Hair Launches To Close Out Summer 2023
-
Events
Paul Mitchell’s New Colorways Contest Is Live
-
Hair Color
BTC Exclusive: Fern the Barber Leads John Paul Mitchell Systems Colorways Launch
-
Heat Protection
Hot Off The Press Thermal Protective Hairspray
-
Hairsprays
Neuro Protect HeatCTRL® Iron Thermal Protection Hairspray
-
News
The Hottest Hair Product Launches Of Summer 2023


