5 Mistakes To Avoid When Foiling The Hairline At The Nape

5 Common Mistakes That Can Ruin Your Nape Hairline Application
With a lot of clients still working from home, chances are they’re taking full advantage of that ponytail and topknot life. So if you’re not painting the hairline at the nape, you’re missing out on an opportunity to let your work POP with dimension from all angles. This area of the head is often overlooked, so we’re sharing five common mistakes and how to avoid them! Keep reading to find out what they are and what to do instead.
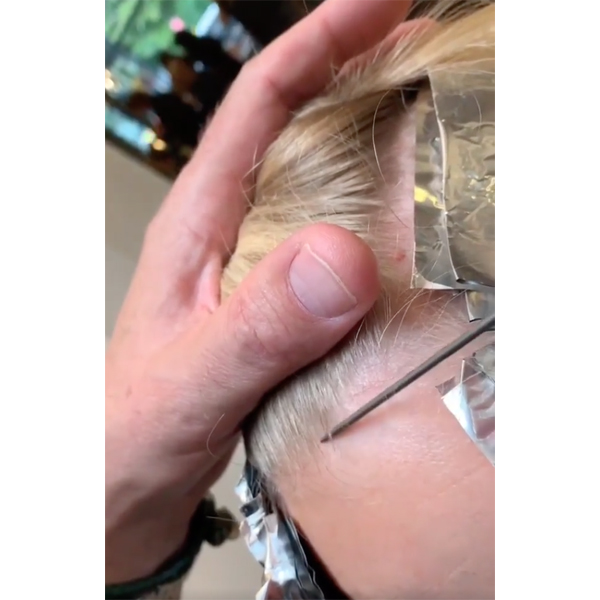
Mistake #1: Laying The Foils Against The Neck
Laying foils against the neck can result in problems like too much tension, not having enough neck to lay a long foil over, the client not tilting far enough forward and buckling foils. So to avoid all of the above, Sam Fongemie (@paintloveblend) recommends laying the foils against the head instead. “I get the tension just right, no buckling foils, lays nice and flat because the head is a harder surface than the soft part of a neck,” she explains in an Instagram caption.
Watch the video below to see Sam’s technique!
View this post on Instagram

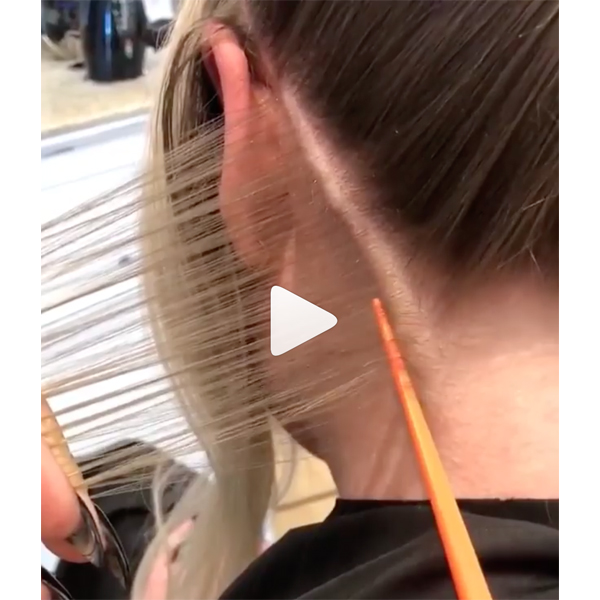
Mistake #2: Painting Too Close To The Scalp
Nothing ruins a lightening session faster than bleeding, splotchiness and hotspots, which are three things that can happen if the nape hairline application is too close to the scalp. To avoid an uneven lift, BTC Team Member Mallery Share (@hellobalayage) says to always stay ½ to 1 cm away from the scalp when painting.
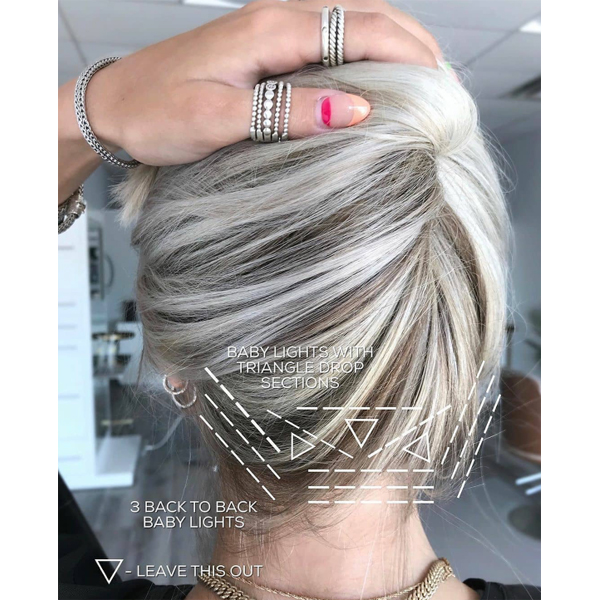
Mistake #3: Not Connecting The Front Money Piece With The Nape Hairline
Do you ever spot dark shadows when snapping a pic of the hair pulled up? It’s because the nape hairline wasn’t connected to the front money piece. BTC Team Member Chrissy Danielle (@hairbychrissydanielle) says to use the back hairline as a guide to connect the two to ensure there are zero dark shadows when the client pulls their hair up into a ponytail or topknot.
Check out the diagram below to learn Chrissy’s nape hairline placement!
Mistake #4: Foil Slippage
If foil slippage is an issue you constantly struggle with, Chrissy has just the trick! Well, two actually:
- Your lightening formula should be a thicker consistency. “You actually want it a bit thicker because once you lay the product on the hair it helps lock that foil in,” she shares.
- When placing the foil, first fold the foil over your comb. Then, lift the section up, place the foil and when bringing the section down, pull on the hair as you push up with the foil to create extra security.

Mistake #5: Not Properly Prepping The Hair
Even the best colorists have had that “oh crap” moment at least once where they rinse and blow-dry after a lightening session only to discover an uneven lift. To prevent this, prep the hair with a pre-color treatment like Aloxxi ColourPrime Pre-Color Treatment. It evens out the porosity of the hair prior to applying lightener, resulting in an incredibly even lift and silkier, smoother and shinier hair.
Tap through the below post to see BTC Team Member Jamie Park’s (@hairbyjpark) process, from applying Aloxxi ColourPrime Pre-Color Treatment to the finished look!
View this post on Instagram
Products Used
Quickie How-To: Super Fine Hairline Foiling