Volume Guaranteed: Try This Layering Technique For Fine Hair
4 Tips For Perfecting Face-Framing Layers On Fine Hair
If you’ve struggled with achieving this year’s trendy, layered looks on your finer-haired clientele, we hear you. That’s why we tapped Ulta Beauty Design Team Member Justin Toves-Vincilione (@ahappyjustin) for his foolproof layering technique for fine hair types…And it only takes 15 minutes! (Shags and butterfly cuts, we’re coming in hot.)
Keep scrolling for tips on using sectioning, overdirection, elevation and precise cutting to recreate Justin’s volume-boosting layers in record time.
Check out Justin’s before and after:

NEXT UP: The Contoured, French Bob with @ahappyjustin on BTC University!
1. Preserve all-over length with this simple sectioning tip.
Justin’s key to preserving length while adding layers is simple: Leave the back of the hair one length. That might sound like the opposite of what layers are trying to do, but hear us out: While the all-over length in the back serves as a backdrop for the front layers, the crown will add movement to the back once the look is complete. How? It lays the foundation for concave layering later on.
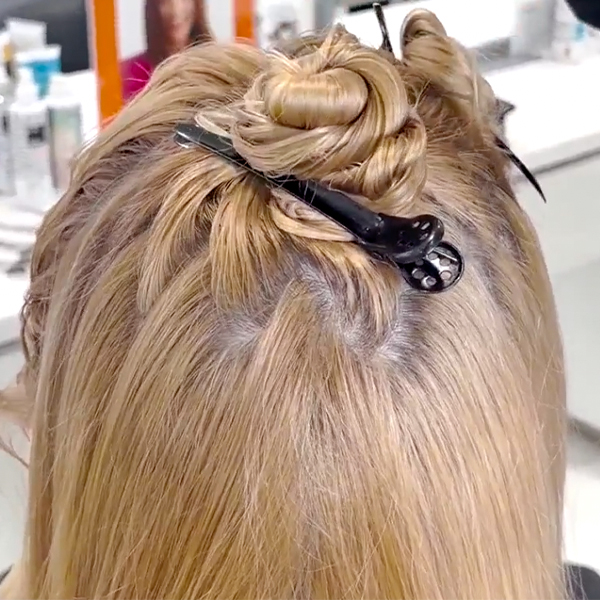
Here’s how Justin sets up his zigzag crown parting:
- Section your client from the center part to the back of the ear, dividing the front and back sections.
- Section out the crown with a zigzag part. Secure with a pin for later. This is crucial for adding movement to the back section later on without reducing length and density.
- Fully service the back section, excluding the crown.
Pro tip: Whenever you’re working with finer-haired clients, it’s important to keep the hair moisturized and saturated with water. If you catch the hair drying out, add water as you work.

Ready to take the next step as a stylist? Learn more about Ulta Beauty careers!
2. Don’t be afraid to take off too much hair when cutting layers.
The number one mistake that stylists make when creating layers on fine-haired clients is not taking away enough length. (Yes, we know that sounds surprising, but trust the process!) Without taking away some length, your hard-earned layers won’t have the volume and bounce your client is looking for.
Here’s how Justin preserves the perfect amount of length when cutting his face-framing layers:
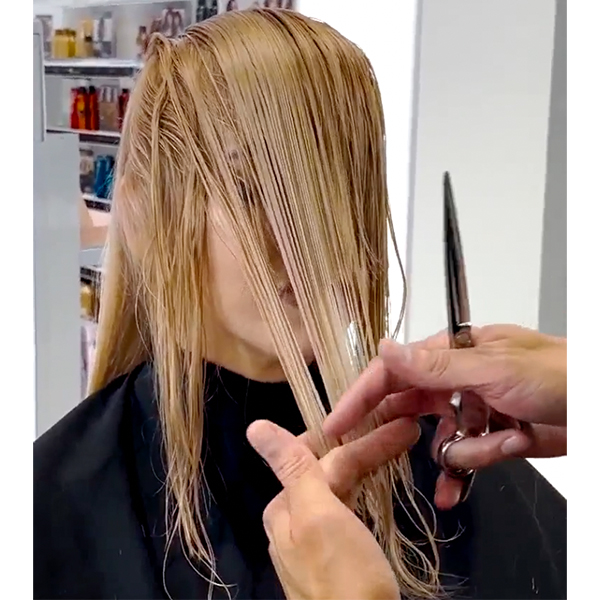
- Working with the front of the hair, take a triangular section right off the center part. This will be your guide.
- Hold the guide straight out from the face with high tension and trim it at the tip of the nose. You’ll know if your guide is correct if it falls just above the cheekbone.
- Then, split your freshly cut guide into two even parts. Combine one part with a new section from the same side at a diagonal forward.
- Hold the combined guide and new section out at 90 degrees, then cut a blunt line directly at the guide. The result: A layer that dips just a little deeper past the cheekbone, elongating with subsequent layers.
- Continue until you move on from the initial center part. Then, take vertical sections to move with the natural fall of the hair. Remember, overdirection is your friend here!
Pro tip: Justin uses shears that are specifically meant for cutting blunt lines—which are ESSENTIAL for creating any kind of layers on fine hair.
Scroll to see Justin’s process:
Watch Justin’s full technique on BTCTV!
3. Use concave layering to add movement through the back of the head.
Once both of the front sections are layered, move on to the crown. The goal: To add movement over the back’s one-length haircut through a concave layering technique where the hair is cut to curl inwards towards the head. (We’ll give you a hint: Overdirection does all of the work for you.)
Here’s Justin’s concave layering technique:
- Detangle the crown section and split it into two even parts: Top and bottom.
- Pull the top section all the way forward. Instead of cutting this section according to your original guide, you’re going to cut it along with the guide below the parietal ridge.
- Cut along the parietal guide, adding hair from the crown as you go; you should notice less hair being taken off as you work towards the last section, showcasing the length you’ve preserved.
Pro tip: The higher you hold the hair, the more layering you’re going to create. The lower you hold the section, the more length you are going to preserve.

Connection, creativity & endless opportunity: Move forward with Ulta Beauty.
This content is sponsored.
More from
Ulta Beauty
-
Industry News
Kecia Steelman Named New Ulta Beauty CEO as Dave Kimbell Announces Retirement
-
Business
How To Use Education To Build Client Trust & Sell More Retail
-
BTC "On Tour"
BTC “On Tour” 2024 Wraps Up In Los Angeles
-
Make More Money
6 Things To Never Say When Offering An Add-On Service
-
Chain Salons
IGK’s “Good Behavior Blowout” Now Available at all Ulta Beauty Salons
-
Business
3 Cutting Fundamentals To Relearn For A Booming Business
-
Hair Color
The Bubble Technique: 5 Tips To Create Rainbow Hair Color
-
BTC Hair Trend Report
The Biggest Haircut Trends of 2024
-
Business
New To Budgeting & Investing? Start Here!
-
Business
The Ins & Outs Of Assisting: How To Be & Choose The Right Hair Assistant
-
Curly
Curly Consultation & Haircutting: Watch The Full Tutorial!
-
News
How Maui Hairdressers Are Rebuilding Post-Lahaina Fires
-
Business
How To Make 6 Figures From Stylists Who Actually DID IT
-
BTC Events
AI, Mental Health & Social Media: 7 Business Tips You Can’t Live Without
-
Business
6 Saving & Investing Tips To Grow Your Profit
-
Bobs
The Biggest Haircut Trends of Summer 2023
-
Industry News
Vernon François Joins Ulta Beauty Pro Team of Industry-Leading Artists & Educators
-
Industry News
6 Award-Winning Hairstylists Join the Ulta Beauty Design Team
-
BTC Hair Trend Report
2023 Hairstyling: 11 Trends You Need To Know
-
BTC Hair Trend Report
2023’s Biggest Haircut Trends
-
Business
5 Steps You Must Take To Build A Strong Salon Culture
-
Beachwaves
6 Tips For Faux Blowouts & Effortless Waves
-
Blonde
The Biggest Hair Color Trends Of Winter 2023
-
Accessories
15 Styling Trends That Will Be Everywhere in Winter 2023


