Formulas > Brunette > Seamless Chocolate Blend
Last updated: October 31, 2019

Seamless Chocolate Blend

By Liz Haven O'Neill

open color formula
close formula
  • Formula A:

    0.5 oz. Schwarzkopf Professional BLONDME Bond Enforcing Premium Lightener 9+ + 0.6 oz. 7-volume developer + 0.6 oz. 20-volume developer

  • Formula B:

    0.5 oz. BLONDME Bond Enforcing Premium Lightener 9+ + 1.2 oz. 20-volume developer

  • Formula C:

    Schwarzkopf Professional IGORA VIBRANCE® 6-0 + IGORA VIBRANCE® 7-1 + 6-volume developer

  • Formula D:

    1 oz. IGORA VIBRANCE® 7-4 + 6-volume developer

  • Formula E:

    1 oz. IGORA VIBRANCE® 8-46 + 6-volume developer

  • Formula F:

    1 oz. IGORA VIBRANCE® 9,5-4 + 6-volume

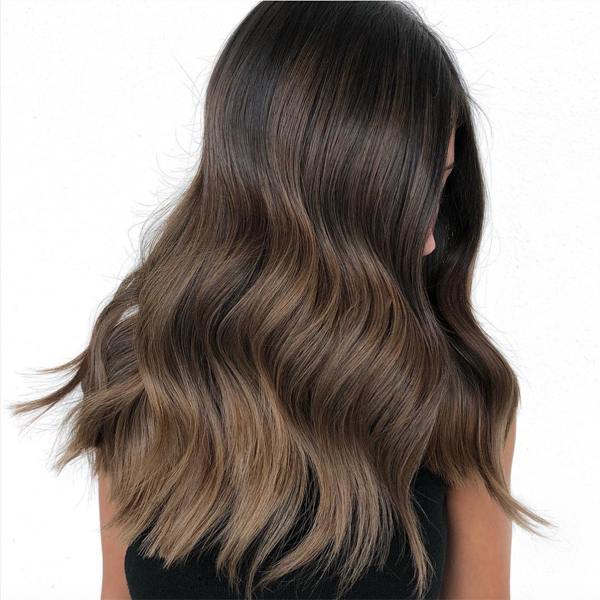
This is making us hungry…OMG. This seamless chocolate blend by BTC Team Member Liz Haven O’Neill (@lizhaven) looks gorgeously natural, but is really the result of considered placement, a precise technique and six formulas. Keep reading for her pricing, steps and tips, PLUS see what backbar product she totally swears by!


Pricing

“These are all starting prices,” Liz says. “For each extra bowl of color mixed, I add $10.”

Full Foilayage: $350+

Lowlight: $40+

Toner: $40+

Haircut: $90+

TOTAL: $520+


Watch The Video How-To Below


Who Did It

Products Used

COLOR FORMULAS

  • Formula A:

    0.5 oz. Schwarzkopf Professional BLONDME Bond Enforcing Premium Lightener 9+ + 0.6 oz. 7-volume developer + 0.6 oz. 20-volume developer

  • Formula B:

    0.5 oz. BLONDME Bond Enforcing Premium Lightener 9+ + 1.2 oz. 20-volume developer

  • Formula C:

    Schwarzkopf Professional IGORA VIBRANCE® 6-0 + IGORA VIBRANCE® 7-1 + 6-volume developer

  • Formula D:

    1 oz. IGORA VIBRANCE® 7-4 + 6-volume developer

  • Formula E:

    1 oz. IGORA VIBRANCE® 8-46 + 6-volume developer

  • Formula F:

    1 oz. IGORA VIBRANCE® 9,5-4 + 6-volume

FORMULA STEPS

Starting Level: Natural Level 4


1. Section the hair with Liz’s technique. First, find the natural part—“customizing to each guest’s natural part is very important,” Liz says—and where the natural part meets the apex of the head, part to the tip of the ear on both sides. This creates two front sections.


2. Next, where the curvature of the head meets the front section, part a diagonal-back section just below the occipital bone, creating a triangle. Section the triangle off neatly. “This will create a natural diffused veil over the crown,” Liz says.


3. Part from the point of the triangle to the nape. This leaves two remaining sections at the mastoids and nape.


4. Begin with ¾-inch diagonal back subsections in the bottom-right section. “I always begin in the back and adjust my developer as I work my way to the top,” Liz shares. Tease the subsection, clip and secure the tease, then weave the subsection. Place it on a foil on a balayage board and paint with Formula A.


Pro Tip: “I paint the lightener where I want to see brightness and leave the natural pigment where I want to see depth,” Liz says. “I utilize full saturation—this is why the balayage board is important. It allows me to use pressure to get even saturation.”


5. Repeat for each section, working first in the back right, then back left. Then move onto the triangle section (using horizontal subsections). When you reach the front, use Formula B.


6. The woven sections left out of foils are lowlights. Fully saturate these sections with Formula C.


7. Process for about 45 minutes or until desired highlight level is achieved. “I wanted a very clean end result, so I lifted her to a very clean Level 9/10 so I didn’t have any orange pigment to battle,” Liz explains. “This also ensures a clean fade.”


8. Shampoo with SEVEN® haircare KENTE BOND Shampoo to optimize moisture retention and aid in creating disulphide bonds. To comb out the teasy subsections, use KENTE BOND Conditioner.


Pro Tip: Liz prefers the KENTE BOND system because…science! “The Kente Bond system encourages moisture and repairs the disulfide bonds responsible for elasticity and strength,” she shares. “Heat styling, coloring, lightening…these things break down disulfide bonds. That’s why it’s important to reintroduce moisture and use a reparative system to remedy the stress. KENTE BOND is my prescription!”


9. Towel-dry the hair. Apply Formula D to the roots, Formula E to the mids and Formula F to the ends. Process for 20 minutes.


10. Shampoo with KENTE BOND Shampoo, condition with KENTE BOND Conditioner and spray towel-dried hair with KENTE BOND reparative spray to reduce blow-dry time and ensure ongoing hair health. 


11. Style as desired (check out Liz’s blowout technique!).