Articles > Hair Color > How-To: @LarisaDoll’s Melting Sunset Hair
Last updated: December 12, 2017

How-To: @LarisaDoll’s Melting Sunset Hair

close formula

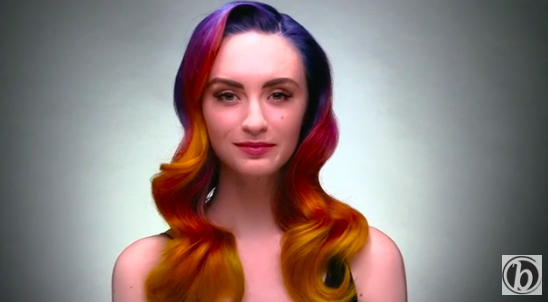
Larisa Love is the queen of color. Brilliant fashion colors are so important to her that she actually left a stable salon job in Beverly Hills to strike out on her own and showcase her love for exciting haircolor. It was a risk, but it paid off—now Larisa, better known as @LarisaDoll to her more than 182k Instagram followers, experiments with the brightest shades, the deepest melts and some of the most innovative looks we’ve seen!


Larisa totally credits her major success to Instagram, calling the platform “a must.” “It’s worldwide—I have clients who fly out from Europe to come see me,” she shares. “They would have never known about me if I didn’t put it out on Instagram. When I started posting my work, I was booked out two years in advance in a couple months!”


Recently, Larisa created this insane Melting Sunset Mermaid look using Joico Color Intensity, and lucky for you, we’ve got the how-to! Try it on your clients and make sure to post it to Instagram—and tag #behindthechair!


Joico Color Formulas
Formula A: Color Intensity Sapphire Blue + Color Intensity Black Pearl (2:1)


Formula B: Color Intensity Clear + Color Intensity Indigo (1:1)


Formula C: Color Intensity Hot Pink + Color Intensity Soft Pink (2:1)


Formula D: Color Intensity Orange


Formula E: Color Intensity Yellow 


1. Begin by prelightening hair using a virgin bleach application, applying first to midshaft and ends, then applying to scalp. 


2. Starting at the top of the head, take a teardrop-shaped section and apply Formula A approximately 1 inch down the hair in the front to approximately 3 inches down the hair in the crown. The point of the teardrop section is at the center of the front hairline.


3. Continue the teardrop shape as you work your way down the sides and back of the head with Formula A. Apply color to both the top and bottom of each parting to ensure proper saturation.


4. Apply Formula A from the scalp area, three inches down the hair shaft in the front hairline area. Work your way toward the front hairline taking ½-inch partings, gradually reducing the amount of color with each parting.


5. Starting at the back of the head, take ½-inch partings and apply Formula B approximately 3 to 4 inches down the midshafts. Work your way up to the crown area using the “scissoring” technique with the fingers to gently smudge any lines of demarcation.


6. Starting at the back of the head, take ½-inch partings and apply Formulas C, D and E down each parting. Gently rest—don’t push!—each section on top of the previous.


7. Starting at the left bottom side, take a small piece of hair from the back section and pull it forward to determine how far down the hair shaft you will need to begin your application of Formulas C, D, and E. Repeat on the opposite side.


8. Once application is complete, process for 20 minutes.


9. Rinse and lather at the same time using K-PAK Color Therapy Shampoo to keep darker shades from bleeding onto lighter shades. Continue to rinse until water runs clear. Shampoo again with K-PAK Color Therapy, rinse and condition with K-PAK Color Therapy Conditioner, and rinse thoroughly. Style using Joico styling and finishing products.


Watch the video for more from @LarisaDoll!
Follow @JoicoIntensity and tag #JoicoIntensity
to see fashion colors galore!