Chop, Chop: Meet The 5-Step Textured Curly Cut
This Voluminous Curly Cut Is A Classic—& Perfect For Curly Clients.
With shorter and shorter hair trending on every Pinterest board, stylists are wanting to get in-the-know about classic curly cuts. Ulta Beauty educator Brittany Prater (@bee.hair.day) showcased foolproof steps for creating a curly, layered look that’s great for higher density curls, zig zags and coils.
Click here to learn more about careers at Ulta Beauty!
1. Kick off your cut by sectioning the hair.
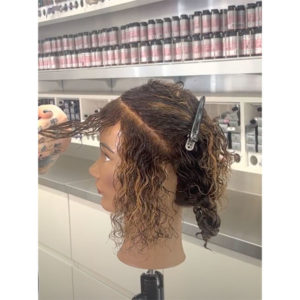
- Part the hair down the center and section it off into four quadrants.
- Organize each section with a diagonal-back into two strand twists to keep the hair in place as you go.
- Follow this rule: Tighter texture/more density = smaller sections. Less density = larger sections.
- Also, make sure your diagonal-back mimics the hairline—this is the foundation of the crisp short-to-long shape you’ll be looking for.
Pro tip: Curly hair already has a lot of hold on its own, so you can rely on moisture from water or a leave-in conditioner to do most of the work for you.

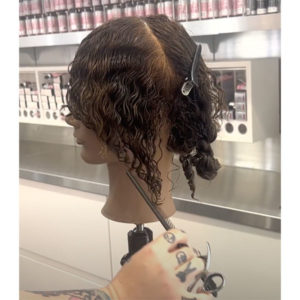
2. Accentuate the cut by adding some curly bangs.
For some cute, bouncy bangs, start above the parietal ridge. Draw the length of the bangs straight out from the head with a comb and slightly angle to the side. When cutting, be sure to consider saturation and curl shrinkage as the hair starts to dry.
Pro tip: To combat unbalanced cutting, Brittany recommends holding loose tension in the section and keeping a spray bottle nearby to add saturation.
3. Blend, blend, blend for a chic short-to-long style.
Connect your freshly cut bangs to her second section with point cutting or horizontal cutting, depending on the hair type. When you reach the third section, slide cut with a diagonal-back, working with the round of the head. When you get toward the back of the head, you should see a curly bang, some face framing, and plenty of weight and definition in the back.

4. Add some internal volume with invisible layers.
Invisible layers can add a lot of easy volume and texture to short curls. Here’s how:
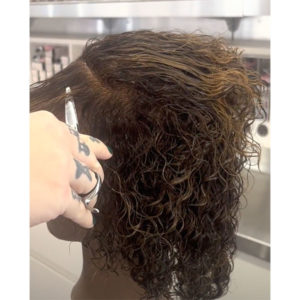
- Starting in the fringe area, use a closed scissor to lift up clumps of curls that you think could use a boost. This is all about visual expertise, so there aren’t any rules here!
- After you’ve weaved out your desired section, use the “pinch and tuck” method to chop the length.
- The result: shorter, stacked curls that seamlessly elevate heavier pieces.
Brittany also advises not to cut too closely to the top of the head or around the face because surface level layers aren’t weighed down and don’t help keep the short-to-long silhouette. We’re all about invisible, internal layers!

5. Prepare for the final touch-up.
As the hair dries and adjusts to shrinkage, pay close attention to curl placement. Before cleaning up any loose curls, go in with a pick and release any casting that may have occurred during product styling. Then, run a serum over each curl, trimming outliers through the curl’s C-shape. Do this to make face-framing layers pop, take some locks a little shorter and really customize your cut.

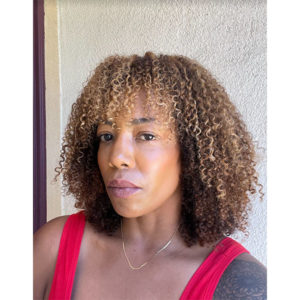
And voila—a timeless, voluminous cut that’s inclusive to all types of coily, kinky and curly hair.
More from
Ulta Beauty
-
Hair Color
The Bubble Technique: 5 Tips To Create Rainbow Hair Color
-
BTC Hair Trend Report
The Biggest Haircut Trends of 2024
-
Business
New To Budgeting & Investing? Start Here!
-
Business
The Ins & Outs Of Assisting: How To Be & Choose The Right Hair Assistant
-
Curly
Curly Consultation & Haircutting: Watch The Full Tutorial!
-
News
How Maui Hairdressers Are Rebuilding Post-Lahaina Fires
-
Business
How To Make 6 Figures From Stylists Who Actually DID IT
-
BTC Events
AI, Mental Health & Social Media: 7 Business Tips You Can’t Live Without
-
Business
6 Saving & Investing Tips To Grow Your Profit
-
Facebook Lives
Volume Guaranteed: Try This Layering Technique For Fine Hair
-
Bobs
The Biggest Haircut Trends of Summer 2023
-
Industry News
Vernon François Joins Ulta Beauty Pro Team of Industry-Leading Artists & Educators
-
Industry News
6 Award-Winning Hairstylists Join the Ulta Beauty Design Team
-
BTC Hair Trend Report
2023 Hairstyling: 11 Trends You Need To Know
-
BTC Hair Trend Report
2023’s Biggest Haircut Trends
-
Business
5 Steps You Must Take To Build A Strong Salon Culture
-
Beachwaves
6 Tips For Faux Blowouts & Effortless Waves
-
Blonde
The Biggest Hair Color Trends Of Winter 2023
-
Accessories
15 Styling Trends That Will Be Everywhere in Winter 2023
-
Balayage
5 Tips To Upgrade Your Cutting, Blonding & Styling Techniques
-
#ONESHOT HAIR AWARDS
Modern Art
-
BTC University
Dear Stylists, 4 Smart Ways To Protect Your Income
-
Facebook Lives
25-Minute Butterfly Layers Cut & Style
-
Business
Client Retention Checklist: 7 Ways To Keep Them Coming Back


