How To Fix A Botched Balayage Service
Color Correction: How To Fix A Balayage Gone Bad
A new client sits in your chair requesting balayage but she’s currently rocking chunky highlights that are giving you MAJOR Kelly Clarkson circa the early 2000s vibes. What do you do? Lucky for us, BTC Team Member Shawna Russell (@hairbyshawna_russell) shared how she fixes a botched balayage service on Instagram! Click through her post below to see the full process and then keep scrolling for a step-by-step breakdown.
Products Used
View this post on Instagram
Step 1: Start with the darkest part.
With color corrections, the first step is to balance out the canvas. That’s why Shawna’s rule of thumb is to always start with the darkest part of the hair. Why? Simply because it takes longer to lift. Since the entire underneath section was dark virgin hair, she started there by balayaging with Schwarzkopf Professional BLONDME Bond Enforcing Premium Lightener 9+ + 30-volume developer + FIBREPLEX No°1 Bond Booster.
Step 2: Tackle the old highlights and banding, starting with the darker pieces.
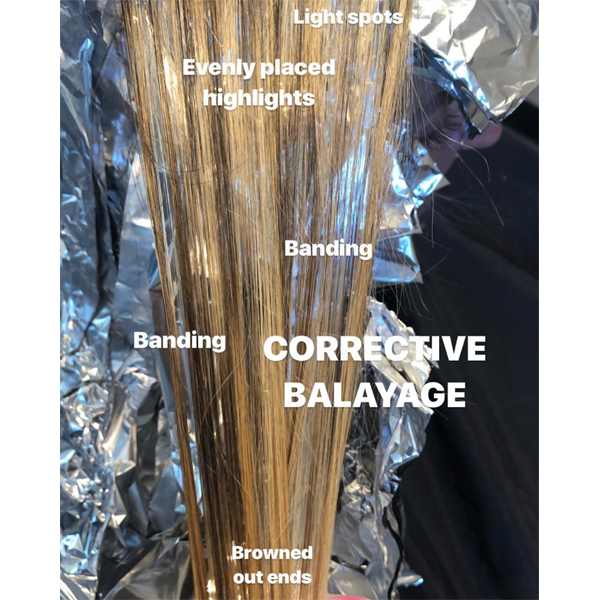
After assessing what she’s working with up top (i.e. evenly placed highlights, light spots, banding, browned out ends), Shawna separated the dark pieces of hair from the lighter pieces and applied Schwarzkopf Professional BLONDME Bond Enforcing Premium Lightener 9+ + 20-volume developer + FIBREPLEX No°1 Bond Booster on the dark pieces only. Again, this will take longer to lift than the previously lightened pieces which is why Shawna painted these first.
Step 3: Paint the lighter pieces.
Next step in the process is to lighten the previously lightened hair. For these pieces, Shawna applied Schwarzkopf Professional IGORA® Vario Blond Plus Powder Lightener + 10-volume developer + FIBREPLEX No°1 Bond Booster.
Step 4: Reapply lightener where needed.
“When doing corrective work, sometimes there’s surprises,” notes Shawna. That’s why it’s crucial to keep an eye on the hair during the lightening process. Even though the client said the underneath section was all virgin hair, pulling back the foils revealed that some sections had old color on them. So Shawna did another round of lightener with Schwarzkopf Professional BLONDME Bond Enforcing Premium Lightener 9+ + 20-volume developer + FIBREPLEX No°1 Bond Booster.
Step 5: Erase demarcation lines with a shadow root.
Next step is to erase the line of demarcation left by the grown out highlights and the easiest way to do this while ensuring the next fade out is more seamless is to add a shadow root. For this correction, Shawna painted one with Schwarzkopf Professional IGORA VIBRANCE® 6-0 + 7-1 + IGORA VIBRANCE® Activator Lotion 1.9%.
Step 6: Tone the blonde.
Once the hair is processed and much more even looking from roots to ends, it’s time to tone the blonde. Shawna went in with Schwarzkopf Professional IGORA VIBRANCE® 1.5 oz 9-1 + 0.5 oz. 0-00 + 2 oz. IGORA VIBRANCE® Activator Gel 1.9%.
Pricing & Total Chair Time: “This process took 6 hours start to finish at $100/hr,” shares Shawna. “Expensive? Yes! But you know what? I accomplished on my beautiful client something she always wanted all her life but said she could never get.”