
How-To: Soft Knotted Bridal Updo
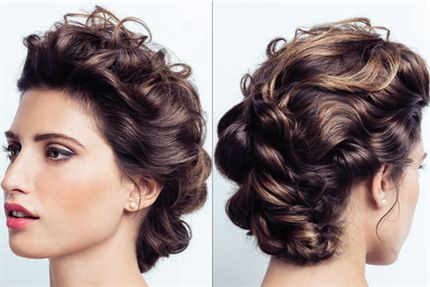

Summertime brings the brides, and you’ve got to be ready! Luckily, L’ANZA Healing Haircare Global Healing Director Ammon Carver gives us the 411 on what looks this season’s brides totally covet. Since you are a professional, you KNOW the importance of keeping up with what’s trending and keeping your techniques up to date. The Salon by InStyle supports their stylists by offering mega-crazy amounts of *paid* education and training. (Pssssst, they also offer a storewide associate discount, medical, dental, paid time off and a 401K!) The Soft Knotted Bridal Updo is one of hundreds of looks you’ll learn while building your career at The Salon by InStyle—check out the how-to below!
1. Apply Healing Volume Zero Weight Gel all over damp hair, then round brush the hair to give it a foundation with some grip and hold.
2. Take a section that goes diagonally from just behind the ear to the front hairline and clip it out of the way. Repeat on the other side. Then, create a V-shaped section at the crown.
Pro Tip: Take sections that go on a diagonal because as you drape the hair, it will cover your partlines.
3. Spray the top of the middle section with Keratin Healing Oil Lustrous Finishing Spray, then smooth it with a comb.
4. Tie the section into a ponytail with an elastic. Keep the elastic loose, then gently tighten it so it lays at the base. This keeps the top neat and hides your partlines.
5. Take a piece of hair from the ponytail and wrap it around the elastic. Bobby-pin underneath to hold the hair in place.
6. Lift the ponytail up and out of the way gently, clipping it to the top section. Create a second ponytail section underneath, using the same method to tie the ponytail in step 4.
7. Drop the top ponytail, split it in half cleanly. Take the bottom ponytail and bring it up in between the two sections of the top ponytail, then gently clip it out of the way.
8. Join the two split sections of the top ponytail together again, then create a third ponytail below it, incorporating that hair into the third ponytail. Tie the elastic in the same way you did in step 4.
9. Drop down the second ponytail that you clipped away, and use your fingers to pinch and pull the loop around that ponytail to make it look full.
Pro Tip: To get the hair full, but retain control, use the Keratin Healing Oil Hair Plumper to plump the hair and give it shape.
10. Repeat the process until you reach the bottom hairline, tying off your last ponytail so it hugs the nape of the neck. When you run out of hair to add from the sides, just keep doing ponytails, then open then and pull the bottom ponytail through. To finish, roll the ends under and pin.
11. Unclip the front two sections and spray with Healing Style Dry Texture Spray. Take a ½-inch curling iron and point it so it’s angling backwards. Open the clamp, wrap the hair around the iron, then pin and let the curl set. Repeat with all the hair in the front section, alternating the direction of the curl but always point the iron backwards.
12. Unclip all the curls, pull them out and gently brush out. Arrange the brushed-out curls and spray with Keratin Healing Oil Lustrous Finishing Spray.
Pro Tip: The way you approach brushing the sections depends on the texture of the hair you’re working with. For this situation, the curl formation wants to jump back, so Ammon is more aggressive with his brushing.
13. Squirt some Keratin Healing Oil Cream Gel into the palm of your hand, then dip a blush brush into the gel. Work the blush brush around, then go along the hairline and lightly brush them with the blush brush to add final polish.
More from
Ammon Carver
-
New Appointments
Cali-Curl Announces Ammon Carver as Artistic Director
-
The BTC Show
Ulta Beauty at #thebtcshow 2021
-
Foam
Watch: 3 Styling Tricks To Enhance Volume
-
Blonde
Blonding & Styling: 5 Tips & Tricks From The Ulta Beauty Pro Team
-
Business
WATCH: Ulta Beauty’s Conversation on Black Representation
-
Business
Ulta Salons Are Reopening—Here’s What You Need To Know
-
Facebook Lives
Watch: Wet Set Finger Waves How-To
-
Accessories
Watch: Quick Holiday Services + Add-Ons
-
Blonde
WATCH: Quick Tips + Techniques With The Ulta Beauty Pro Team
-
Manufacturer
Auditions For The Ulta Beauty Design Team Are Open: Here’s What You Need To Know
-
#thebtcshow 2019
L’ANZA HEALING HAIRCARE AT #THEBTCSHOW 2019
-
#thebtcshow 2019
#THEBTCSHOW 2019: DAY 2
-
L'Anza
So You Want to Be An On-Stage Educator? Read This…
-
Watch: Onstage Educator Auditions
-
Haircuts
Video How-To: Lived-In Lob Cut + Party-Ready Upstyle
-
Manufacturer
Ulta Beauty Announces Pekela Riley As Newest Member of Pro Beauty Team
-
#THEBTCSHOW 2018
3 Quickie Tips For Staying On-Trend: Balayage & Effortless Texture
-
Balayage
THE BTC SHOW 2018: Day 1
-
BTC Events
L’ANZA Healing Haircare at #THEBTCSHOW 2018
-
Collections
Ulta Beauty Pro Team Collection
-
Bobs
Blunt Bob + Sun-Kissed Highlights
-
Ponytails
5 Tips For Creating The Perfect Ponytail
-
Gray Coverage
Two Haircolor Techniques That Will Impress Your Clients
-
Events
L’ANZA B.I.G. Event 2017

