Articles > Hair Color > How-To: Caramelized Chocolate Layers
Last updated: April 16, 2019

How-To: Caramelized Chocolate Layers

open color formula
close formula
  • Natural Level:

    4

  • Formula A (lightener):

    Goldwell Oxycur Platin Lightening Powder + 30-volume developer

  • Formula B (toner):

    Equal parts Paul Mitchell PM Shines 6BV + 6A + Processing Liquid

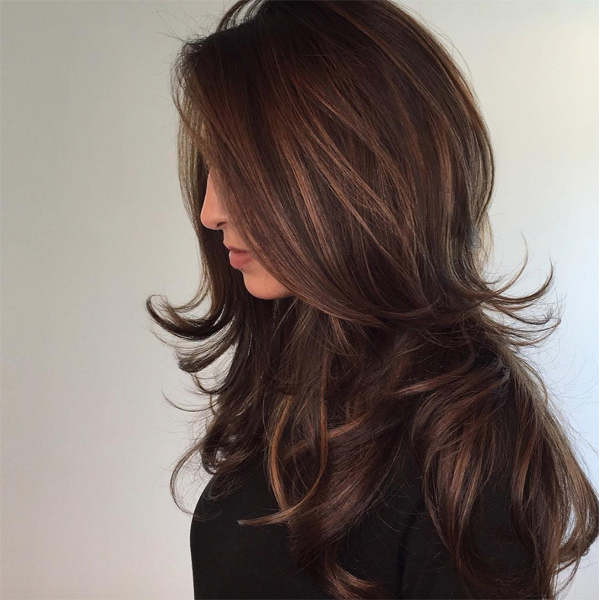
OK it’s official, stylist Liz Haven O’Neill (@lizhavenhas mastered the art of the celeb treatment! After leaving Liz’s chair, her client literally looks ready to walk the red carpet because the #ONESHOT nominee is no stranger to making her clients look and feel like A-list material. Oh, and her Insta is filled with beautiful balayage, bouncy blowouts, feathery layers and voluptuous curls (aka, we NEED to know her secrets!) So, Liz—spill!


“This guest came into the salon with a natural Level 4,” Liz shares. “All of her hair was virgin except for about three to four inches that remained on her ends from our last balayage session, which took place over a year ago!  After our consultation, we decided to re-establish a full balayage with a Level 6 being our target balayage level.”


Click the beaker for her formula, and see below for her steps!


Pricing
Full balayage
: $190+
Toner: $35+
Haircut: $89+
Total price: $314+


Products Used


Sectioning
Through some trial and error, Liz has discovered a sectioning technique that she swears by for all her balayage/hair painting looks.


1. Find the guest’s natural part.


2. Where the natural part meets the apex, part from the tip of one ear to the other. This should create the two front sections.


3. Where the parietal ridge meets the front section, make a diagonal back parting that ends just below the occipital, and mirror it on the other side. This should ultimately create a triangle in the crown area.   
 

4. After sectioning off the triangle neatly, there will be two remaining sections located at the mastoids. These two sections are Liz’s starting point.


After sectioning, Liz uses a vertical feathering technique—short, vertical strokes applied with minimal pressure from the scalp to the midlengths (only painting the surface), more pressure toward the midlenghts and even greater pressure (using a balayage board for full saturation) on the ends. “Each subsection is ½ to 1 inch in depth,” notes Liz. “I weave each of these sections, which helps me achieve a natural/organic effect. I then separate each painted section with foil to help incubate and speed up the processing time.”


If the guest has thicker hair and requires more application time, Liz starts with a lower developer while working on the first two sections at the mastoids. She then uses a higher developer while working in the triangle section, then increases the developer again for the last two front sections. “This helps maintain the integrity of the hair,” Liz says. “The first two sections will have a lower developer to slow down the speed of the processing time, giving me ample time to finish the application. As I work through each section and finish applying the highest volume on the last two sections, everything will finish processing at the same time. There will be zero over-processing this way.”


Color Formulas
Formula A (lightener): Goldwell
Oxycur Platin Lightening Powder + 30-volume developer

Formula B (toner): Paul Mitchell PM Shines equal parts 6BV + 6A + Processing Liquid


Application
1. Balayage using Formula A and process for about 30 minutes without heat, until a warm Level 8 is achieved.


Note: Liz took her client to a clean Level 8 to avoid any red tones. She decided to use 30-volume developer, as she prefers not to use heat on her clients.


2. Shampoo with Goldwell Dual Senses Color Fade Stop Shampoo. Rinse and towel-dry.


3. Spray a light and even mist of Goldwell Dual Senses Color Structure Equalizer all over. 


4. Apply Formula B at the shampoo bowl, evenly saturating the hair and combing it through. Process until a Level 6 is achieved, about 20 minutes on this particular client.


5. Rinse the hair, then shampoo with Goldwell Dual Senses Color Fade Stop Shampoo and condition with Goldwell Dual Senses Color Detangling Conditioner.


Haircut
Liz created a blunt square perimeter, then established face framing. For the interior, she used a “short to long” layering technique achieved with the deep point cutting method. After she dried her client’s hair, she customized her shape with detail cutting. “One method I use to achieve this result is by removing weight in the crown area with a channel-cutting approach using texturizing shears,” she notes.


Styling
Liz achieved maximum body and volume with her famous “pageant blowout.” “I applied Goldwell Top Whip Ultra Strong Volume Mousse on her root area and Oribe Imperial Blowout on the midshaft to ends. After letting it cool in a roller-shaped section, it pretty much styled itself!” Liz says.