
How-To: 2 Boho-Inspired Festival Looks

By the label.m team; @labelmusa
She’s on her way to Lollapalooza and Austin City Limits this summer, but maybe she doesn’t want to sport a flower crown or a messy half-up topknot. Time to switch it up, right? We promise this is not your average hippie hair. Here are two hot looks for your summer music buffs!
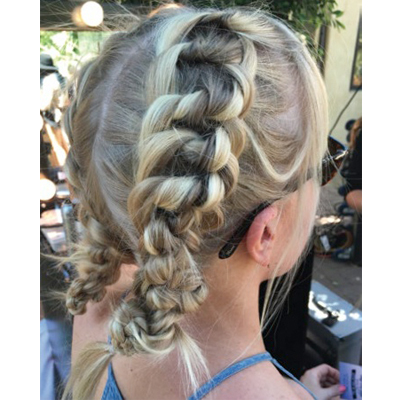
Four-strand Knot Braid
1. Prep dry hair with label.m Texturising Volume Spray
.
2. Divide the head from hairline to nape with a center, vertical parting.
3. Using a label.m tail comb, section out a slightly diagonal horizontal section at the front of the hairline, approximately 1/4- to 1/2-inch wide. Divide this section in half.
4. Place the right subsection over the left, maintaining a gap between the two sections. Lace the hair under and back out of the gap—like tying shoelaces.
5. Have an assistant hold and separate the two pieces of hair with tension.
6. Create a second, slightly diagonal horizontal section 1/4- to 1/2-inch wide behind the first.
7. Repeat steps 3 through 5. Your assistant should now be holding four separate sections.
8. Create a third, slightly diagonal horizontal section 1/4- to 1/2-inch wide right behind the second.
9. Divide this section in two, separate left and right subsections from the first section and add to the section.
10. Repeat steps 4 through 5.
11. Continue this technique until the side is complete. Secure the ends with an elastic.
12. Repeat on the opposite side.
Pro Tip: Keep the tension consistent. The lighter the tension, the looser the braid. Strong tension keeps the braid tight and crisp.
Check out the video how-to for this look here!
Hair Tapestry
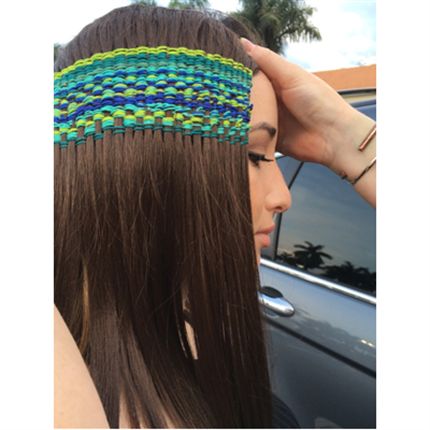
By Amanda Laura Lewis; @allhairanddesign
Note: Because of the size of the pattern, the hardware used and the time-consuming nature of the look, Amanda highly recommends using a weft.
Amanda Laura @allhairanddesign has long been a fan of the hair tapestry trend, and while there are plenty of online tutorials on creating the look, Amanda found the round loom used in the tutorials caused the weft and the hair to arc, which resulted in a messy pattern with fewer options for creativity. Through trial and error, she discovered the secret is to work on a straight loom, allowing the weft to lay flat.
To create these particular looks, Amanda created an über-dense weft by quadrupling the hair and securing with thread. Once the hair was situated in the loom, she weaved her first color through the hair using an over/under pattern. When she reached the opposite side, she doubled back in an opposite under/over pattern, working back toward the original side.
To attach the weft to the hair, Amanda pinned it to two inverted braids on the parietal ridge. At this point, she says, you can curl, straighten or add texture to match the texture of your client’s hair. The beauty of hair tapestry is that you can use as many colors, shapes and patterns as you like—the possibilities are literally endless!

