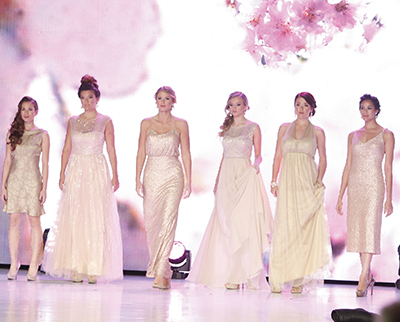
5 How-Tos for Wedding “I Dos”
Your brides want the ultimate in romance for their wedding hair. And who better to create romantic wedding hairstyles than BTC’s Bridal Expert Stephanie Brinkerhoff? Steph first presented these looks at BTC’s 2015 COLOR, Cut & Style Show in New Orleans, and the moment they debuted, they became instant “musts” for every bridal stylist’s portfolio!
Bundled Braid
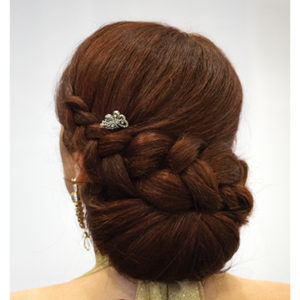
1. Divide the head in half at the ears and clip away the top.
2. Gather the bottom into a low ponytail, omitting the hairline.
3. Flip the ponytail inside out, creating a “topsy tail.”
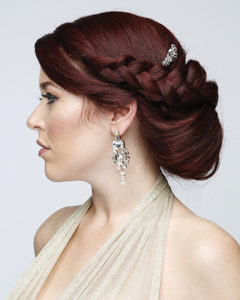
4. Backcomb the ponytail from roots to ends, creating maximum texture and volume.
5. Wrap the backcombed ponytail upward, creating a looped chignon. Secure with bobby pins.
6. Wrap the omitted hairline section over the top of the chignon for a sleek, smooth texture. Secure with pins.
7. Release the top and backcomb the crown to create volume.
8. Gently sweep all of the hair on top to the left side of the chignon and pin the crown in place.
9. Use the lengths to create a thick braid. Wrap it across the top of the chignon and pin it in place under the chignon on the opposite side.
Beaux Hawk
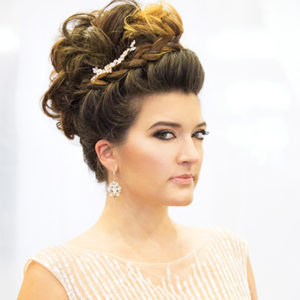
1. Isolate a 2-inch hairline section that extends from the top of the forehead to the bottom of the nape.
2. Gather the remaining hair into four or five ponytails, from the top of the head to the center back, creating a Mohawk shape.
3. Curl and backcomb the top ponytail using a ghd Curve® Classic Tong, then loosely wrap the hair around the elastic, creating a softly curled bun.
4. Repeat this process on each ponytail.
5. Release one side of the hairline section, direct it upward to the Mohawk shape, create a one-sided Dutch braid that is adjacent to the Mohawk and extends from nape to forehead and secure with bobby pins.
6. Create a second braid on the other side and secure as before.
Vintage Gathers
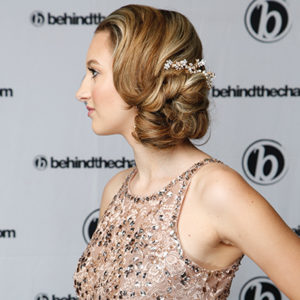
1. Divide the head in half, top and bottom, and clip away the bottom. On the top, beginning on the “heavy side,” subdivide the hair into 1 to 2-inch sections, directing each section toward the face. Clip each curl in place to cool.
2. Repeat on the opposite side and throughout the crown.
3. Release the bottom, divide into subsections and create loose curls with a ghd Curve® Classic Tong.
4. Sweep the bottom section to the heavy side, twist it into a loose chignon and secure with bobby pins.
5. Release the top sections and gently brush the hair away from the face with a boar bristle brush, creating a deep, vintage wave. If more wave definition is required, clip the waves.
6. Incorporate the ends into the chignon and secure with pins.
Looped Chignon
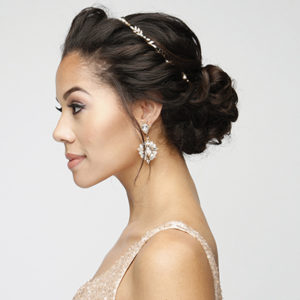
1. Divide the head into four sections—sides, crown and nape.
2. Gather the nape section into a ponytail in the center back.
3. Braid the ponytail, coil it around the elastic and pin the braided bun into place.
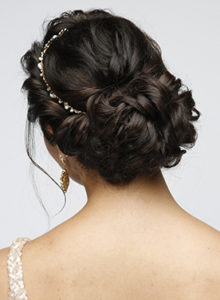
4. Release the top section and apply Kenra Platinum® Texture Powder 4 to the roots.
5. Working in horizontal subsections, backcomb, Kenra Volume Spray 25 to the roots and curl with a ghd Curve® Classic Wave Wand roots to ends.
6. Keeping the volume intact, twist the entire crown section together and pin it in place just above the braided bun.
7. Repeat this technique—powder, backcombing, spraying and curling—throughout the side sections. Curl all of the hair away from the face.
8. Once the side sections are curled, create soft rope braids on each side.
9. Drape the braids across the top of the updo in back, incorporate all remaining strands into the updo and secure with pins.
Fairytale Braid
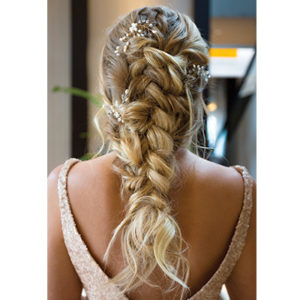
1. Isolate a 3-inch hairline section from the top of the forehead to the center of the nape.
2. On the remaining hair in the center of the head, begin creating a Dutch French braid at the top of the head and gradually switch to a Dutch braid as work progresses along the head.
3. Once the braid is complete, curl all of the isolated hairline sections, directing the hair away from the face.
4. Beginning at the top, subdivide the hairline into 2-inch sections, twist each section softly and weave it into the braid.
5. Continue working in this manner until all of the hairline sections are incorporated into the braid.


