Articles > Razor > Razor Cutting: Fix These 3 Mistakes For Better Results
Last updated: February 09, 2022

Razor Cutting: Fix These 3 Mistakes For Better Results

close formula

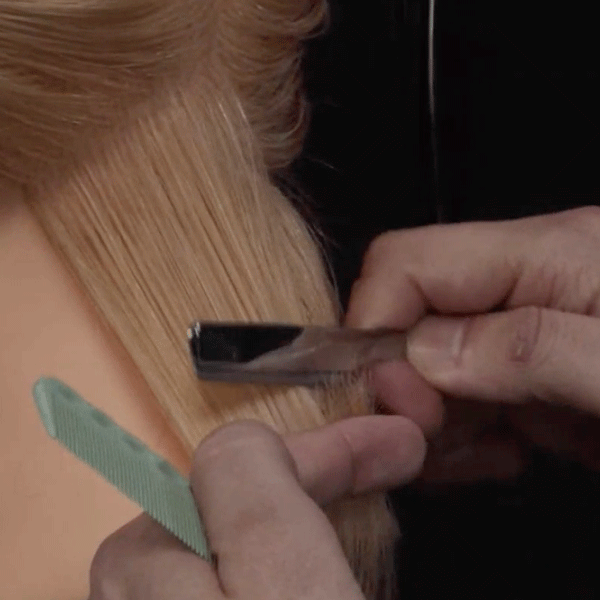
Razor Cutting Education: 3 Solutions For Avoiding Damaged Results

Ready to add razor cuts to your service menu but afraid of over texturizing or creating damage? We had Jacob Khan, aka @jacobhkhan to his 446k Insta followers, teach his fundamental razor cutting techniques for creating strong lines and soft texture. PLUS he shared three reasons why razor cuts can leave hair looking damaged with fixes for each one. Scroll down for some takeaway tips and click here to receive unlimited access to Jacob’s class on BTC University!


Takeaway Tips:

You can learn Jacobs’s full technique in his 90-minute course, but we’re teasing these tips you need to know now!


Tip #1: 3 Reasons Razor Cuts Look Damaged & 3 Ways To Fix It 

Avoid damaged looking results with these three quick fixes from Jacob’s livestream: 


1. Dry Cutting: Avoid frizzy ends by keeping the hair damp throughout the haircut. “You don’t want the hair to be completely soaked, but moisture is really important to create that slip you need to glide the blade through the hair easily,” he explains. 


2. Using A Dull Blade: Not only does this create frayed results, it can actually expose the cuticle, which acts as a layer of protection for the hair, leaving it more susceptible to damage. How can you tell? “If you look at the ends and see a white ball, that’s an exposed cuticle,” explains Jacob.


3. Sections Are Too Big: Avoid creating more work for the razor (and you!) by working in sections that are see through, instead of larger, thicker sections. “The razor has to be able to push through all of that hair, which requires more strokes and that leads to frayed ends,” he explains.  


Tip #2: Adjust Stroke Size To Create Texture  

Using different motions with his razor, Jacob is able to create strong lines for the perimeter and softer, textured lines within the interior of the shag. He broke down how to achieve these different textures below:


  • Shorter Stroke = Stronger Line: Keep the motion tight by creating movement with your fingers, not the entire wrist. “I’m actually tapping with my finger to create tighter movement with the blade,” Jacob explains. 


  • Longer Stroke = Softer Line: Expand the motion depending on how much texture is desired. Incorporate the wrist to create a broader stroke with the razor for softer texture. 


Pro Tip: Once the section is cut, check the hair that is remaining in your fingers. “That line should mirror the exact type of line that was just created. So it is a great way to make sure the stroke is consistent,” he adds. 


Tip #3: Release The Guide to Avoid Cutting Too Much

Unlike cutting with scissors, all razor cutting happens above the fingers. So when following a guide, it is important to hold the section a little lower. “You want to be able to cut on the guide, so slide your fingers down so the guide can be seen but not cut into or the cut will just keep getting shorter and shorter,” Jacob explains. 


Slide For The Before & After!

close formula


Have Questions? Jacob Has Answers!

One of the benefits of watching a course on BTC University? Artists are able to answer your questions in REAL TIME! Here are some technical questions viewers had for Jacob during his livestream:


Question: Do you change your tension when working around the ear?


Answer: “That’s a valid question because when working with scissors if the tension is too tight around the ear, it will result in a jump. When working with a razor, you’re already creating a bit of space because the hair is slightly elevated out to avoid cutting the client’s neck and to create space for your fingers. You should still be mindful of the tension, but it can for the most part stay the same throughout the cut.”  


Q: How do you maintain a strong perimeter when creating internal layers?


A: “It’s very visual. When taking vertical sections to create those internal layers, make sure you are allowing that strong shape at the bottom to fall out of your fingers. Take a look at the vertical section and notice any softness. If there is any, avoid using the razor in that area and only place strokes that seem heavy.”


Want To Learn Jacob’s Entire Technique? BTC-U Members Have Unlimited Access To His Class On BTC University—Become a Member NOW!