Perfect Fall Brunette In Just 20 Minutes? Read This!
6 Steps For Soft, Dimensional Brunettes—FAST
With the holidays right around the corner, appointments are booking up fast. What if there was a way to speed up your winter balayage services? Joico Artistic Director of Haircolor Laura Gibson (@lgibsoncolorist) is sharing how she achieves ultra-soft, dimensional brunettes in just 20 minutes.
Keep scrolling for six easy steps to start using ASAP! Here’s a hint: it’s all about strategic sectioning.
Slide to see Laura’s technique IRL!

Watch the BTCTV video above for Laura’s full 20-minute balayage technique!
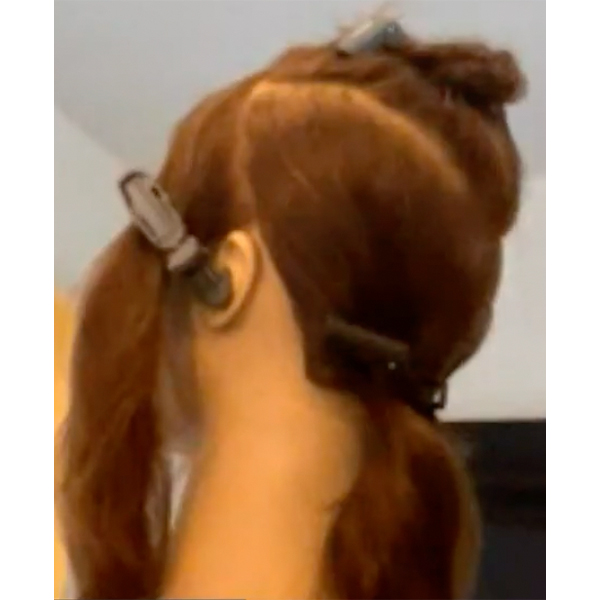
1. Strategically section the hair into four simple parts.
Laura’s goal is to make sectioning as easy as possible—that’s what we’re looking for during the holiday season! The easier it is to repeat your sectioning strategy, the easier it is to service each client more efficiently. Here’s how it’s done:
- Starting in the front, use the client’s part as a guide and section off about three inches along the hairline, ending behind the ear. Repeat on the opposite side.
- Create a large “V” section starting at the crown and ending at the occipital bone, connecting to the initial hairline part. Make sure it reaches all the way down to the occipital bone. This ensures there won’t be any disconnect between the top and bottom layers.
- Section off the rest of the bottom section.
2. Formulate to avoid over-lifting.
To keep her brunettes from venturing too far into blonde territory, Laura mixes Joico Blonde Life Balayage Lightener with equal parts 20-volume and 30-volume Joico Lumishine Creme Developer.
“Alone, 30-volume creates too much lift and 20-volume doesn’t lift enough. But, by mixing them, you get a 25-volume sweet spot,” explains Laura.
Pro tip: Laura grabs the Blonde Life Balayage Lightener because it only lifts seven levels. This keeps her brunettes from lifting too bright!
Want to learn more about Joico’s professional hair color? Click here.
3. Start your application along the hairline.
The front is where we want the most pop. To emphasize the brightest pieces, layer each painted section with an unpainted veil to add depth and prevent the brunette from looking too blonde. Here’s Laura’s technique:
- Sectioning off the money piece, divide the remaining hair into three subsections.
- Start painting the first subsection at the midlengths, then feather at an angle to avoid harsh lines. Cover with plastic to protect the hair from runaway lightener.
- Place another veil between the first and second subsections.
- Repeat with the second and third subsections.
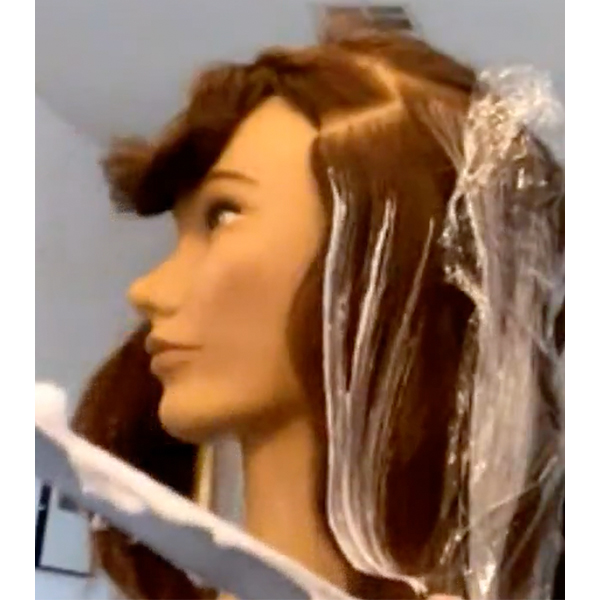
Pro tip: When painting your sections, make sure the lightener is highest and thickest towards the front and drops down towards the back. This will leave depth through the top of the hair.
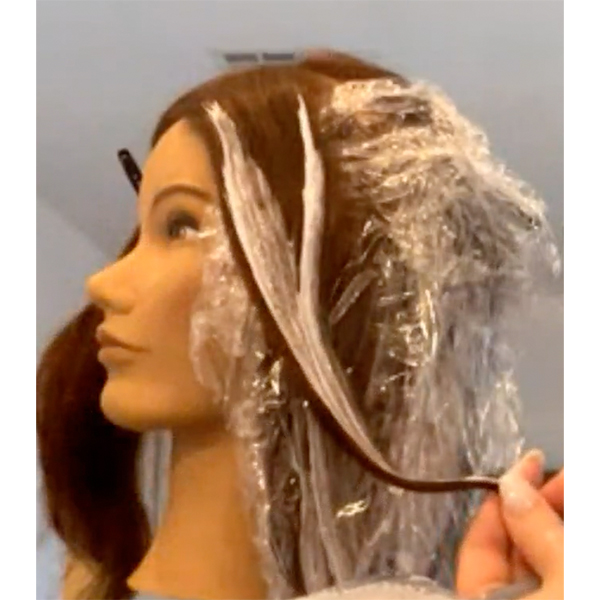
4. Avoid painting the money piece all the way to the root.
To avoid a traditional highlighted look, start painting the two money piece sections about an inch from the scalp. Paint a “V” that meets right below the cheek for a softer, more dimensional graduation.
Pro tip: The thinner the client’s hair, the thicker you’ll want the sections to be. Otherwise, the result will be too blonde!
5. Tackle the back section by splitting the nape into two small triangles.
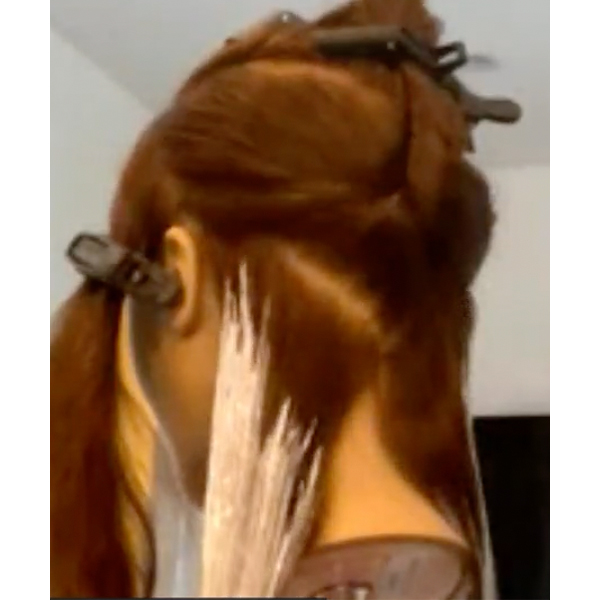
Split the nape section in half. (Hint: These will be the smallest sections you take!) Make sure to hold the hair nice and tight.
- Remove a small section of hair from the front of each nape section to add depth.
- Section out a veil above the two triangle sections.
- Paint each triangle with the highest points toward the face, then cover with plastic.
Pro tip: Make sure to keep your balayage board fully loaded with lightener! Every time you have to stop and add more, you’re also adding onto your appointment time.
6. Save dimension for last!
The top section is all about softening the transition between the client’s base color and the highlights. Since the initial parting was in a V-shape, the entire section will resemble an upside down triangle. To maintain dimension, split the section in half and weave the top to apply lightener. Then, keep the bottom half of the section product-free to maintain depth.
Pro tip: Remember to start your weave much lower than an actual highlight, using the front sections as a guide.
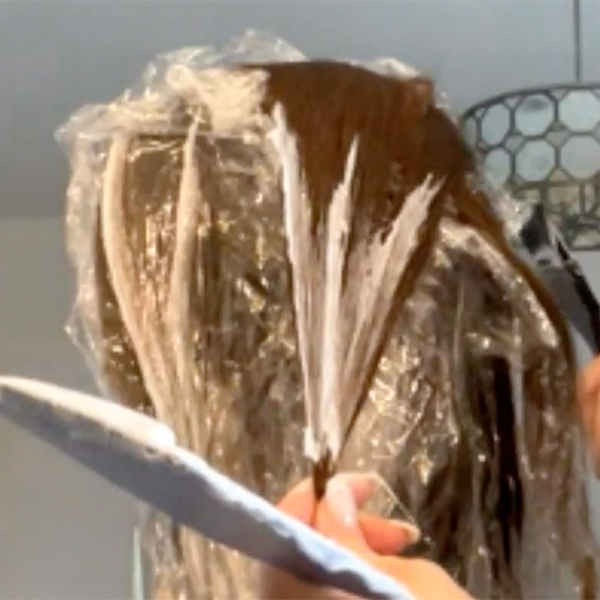
Want to see Laura’s balayage technique in action? Click here to watch how you can achieve soft dimension in just 20 minutes!
This content is sponsored.
More from
Joico
-
Balayage
One Step, Three-Layer Multidimensional Balayage
-
Balayage
Sunset Copper Balayage
-
Monthly Product Launch List
The Best Hair Launches Of March 2024
-
Hair Color
Blonde Life® SilverLight™ Lightening Powder
-
Bond Building
Defy Damage® IN A FLASH™
-
Da’Vine Joy Randolph’s Glamour Waves
-
Celebrity
Zendaya’s Classic Volume Bob
-
Celebrity
The Best Beauty Looks At The 2024 Oscars
-
Blonde
Building The Perfect “Summer Blonde”
-
Gray
Make Gray Hair Look & Feel Younger: 3 Tips Every Stylist Should Try
-
Haircare
KBOND20 Defy Damage Power Masque
-
BTC Events
BTC “On Tour” Nashville Recap: Everything You Missed
-
Monthly Product Launch List
The Best Hair & Beauty Launches Of November 2023
-
Haircare
Inner Joi™ Strengthen Shampoo
-
Conditioners
Inner Joi™ Strengthen Conditioner
-
Haircare
Inner Joi™ Strengthen Masque
-
Haircare
Joico Launches Vegan, Naturally-Derived Haircare Line, Inner Joi™
-
Blonde
How To Create A Natural Shadow Root Through Teasing
-
Blonde
“Fake” A Full Foil In 3 Steps: Here’s How
-
BTC Hair Trend Report
Your Guide To Fall & Winter 2023’s Hair Color Trends
-
Blonde
Honey Blonde Curls: 3 Strategic Placement Tips To Create Brightness
-
Hair Color
Bold Color Trends You Need To Know For 2024
-
BTC Events
AI, Mental Health & Social Media: 7 Business Tips You Can’t Live Without
-
Manufacturer
Joico Announces Jeannetta Walker-Rodgers as Global Technical Director


