
Last updated: May 30, 2017
Tyson Daniel “Heidi” Step-by-Step
GET THE HOW-TO


Advertisement
Tyson Daniel “Heidi” Step-by-Step
HOW-TO STEPS 
-
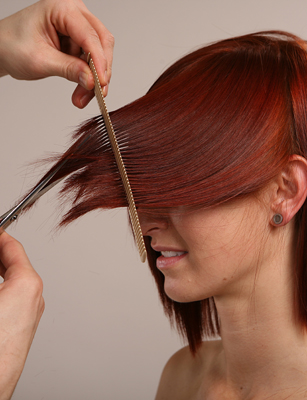
 1
1 -
 2
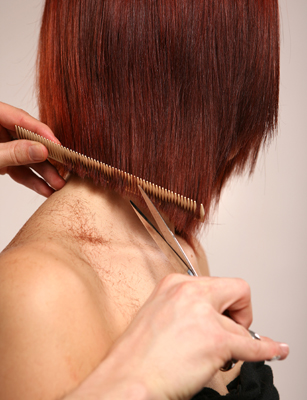
2Starting with clean, dry hair create the baseline at the nape to the desired lenth by softly point cutting.
-
 3
3Visualize the perimeter line you want to create using your comb. Gather the hair at a natural fall and gently sculpt.
-
 4
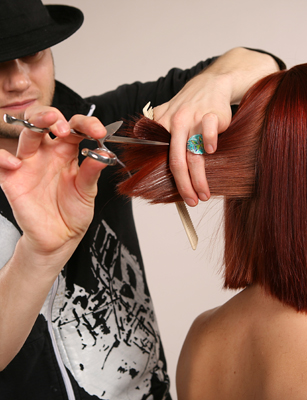
4Establish a vertical section in the center back and architect the perfect shape for you client by deeply carving a graduation in the nape that seamlessly transitions into a rounded layer above the occipital.
-
 5
5Continue by over directing the rest of the hair to create the desired transition of the shape.
-
 6
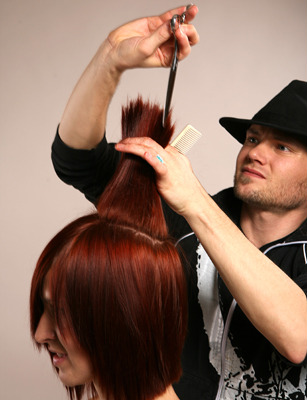
6Work a massive diamond shape section around the crown and generously relieve the weight from the interior.
-
 7
7Detail the front of your masterpiece using the comb, creating a personalized frame.
-
 8
8
YOU MIGHT LIKE THIS
-
Bobs
How-To: The Convertible Bob
-
Bobs
Denman Finishing How-To: Graduated Bob
-
Bobs
Stacked A-Line Bob With Texture
-
Bobs
Blunt, Graduated Bob
-
Hair
Tyson Daniel “Regina” Step-by-Step
TRENDING NOW!
-
BTC Hair Trend Report
The Biggest Haircut Trends of 2024
-
Blowouts
Bombshell Blowouts: 4 Ways To Create Lift With Longevity
-
Copper
What Is The "Cowboy Copper" Hair Trend? Here's What It Really Means...
-
Curly
Long Layers: 10 Pro Tips + Common Cutting Mistakes
-
Ask A BTC Expert
5 Foil Tips & Tricks From @the.blonde.chronicles
-
Hair Extensions
Clients With Hair Loss? Read This To Get Their Pre-Thinning Density Back
-
Haircuts
SHAG 101: The Dos And Don'ts
-
Frizz
Straighten & Smooth 2A, Fine-Medium Density Hair

