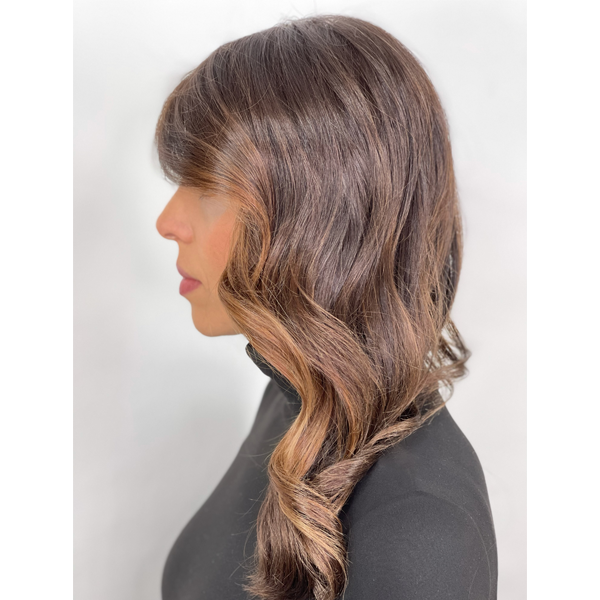
Watch: Brunette Balayage & Gray Coverage Tutorial
Here’s How To Give Brunettes Dimension In 15 Minutes
Have you ever over-highlighted your brunette clients to the point that they looked blonde? RUSK Artistic Director Laura Gibson (@lgibsoncolorist) shows how less is more when it comes to balayaging brunettes after a gray coverage service. Keep scrolling to get her expert tips on covering grays and applying highlights in one appointment, plus how to avoid your clients looking too blonde.
Watch the full tutorial above! Don’t forget to check out the finished look and grab the formulas below!
CLICK HERE To Purchase RUSK Ruskin10 Permanent Creme Color!
Check Out The Before & After!

Gray Coverage In 10 Minutes
Before Laura got started on the highlights, she covered the model’s grays using RUSK Ruskin10 Permanent Creme Color. The model was at least 55 percent gray with almost two years of new growth. She started by applying the color on the midlengths and ends first and then applied it at the root to achieve an even application. Ruskin10 provides gray coverage in 10 minutes, so Laura can immediately jump into the balayage application on the same day. The total service with base color and balayage should take around 35 minutes behind the chair.
Note: Laura stresses the importance of breaking up the base coverage and balayage service. Applying the base color and highlights at the same time could be a lot for the hair to process, so it’s safer for the client’s tresses to move in sections.
Balayage Vs. Hair Painting
“Balayage is more of a visual application. Where you paint it, it will go,” says Laura. There’s a difference between the balayage technique and classic hair painting. Hair painting is when you cover an entire panel with lightener leaving no points in between, so the lightener is feathered and blended out. Balayage is when points are created when painting to leave depth in between. This is when you see angled, v- or w-shaped panels of lightener, versus an entire painted section.
Tap The Beaker For The Formulas!


Do This To Make Fine Hair Look Fuller
If the client has fine hair, take larger sections when balayaging to help the hair look denser and avoid over-highlighting. Laura prefers to use two-inch sections if the clients ends look thin. If she applied lightener to a one-inch section on fine hair, it would be see-through and the client would turn out more blonde than brunette from too many highlights.
Remember this technique isn’t about blending, but keeping the brunette base and adding in highlights for dimension. Avoid placing highlights directly next to each other or you’ll lose the base color and end up with… You guessed it! More blonde.
Check Out The Toning Process For The Finished Look!
View this post on Instagram
Products Used
More from
RUSK
-
BTC Hair Trend Report
Layering Guide: How To Cut & Style With Confidence
-
Product Launches
The Last Product Launch Before Summer 2023
-
Buns
3 Tips To Create A Twisted, Snatched Updo
-
Texture
Dry Texture Spray
-
Serums
Anti-Frizz Serum
-
Mousse
Volumizing Mousse
-
Hairsprays
Brushable Hairspray
-
BTC Hair Trend Report
2023’s Biggest Haircut Trends
-
Business
Color Corrections: Why You Should Consider Charging Hourly
-
Foiling
3 Quick Color Cheats To Make More Money
-
Blonde
The Biggest Hair Color Trends Of Winter 2023
-
Business
4 Salon Policy Changes To Update ASAP
-
Color Depositing
XPress Gloss
-
Color Protecting
2 Minute Masque™
-
Business
Holiday Rush Survival Guide: 4 Ways Make More Money
-
Monthly Product Launch List
7 New Hair Products For Pro Stylists To Try This Season
-
#ONESHOT HAIR AWARDS
The BTC Show 2022: 10 Things We Saw
-
The BTC Show
#THEBTCSHOW 2022
-
#ONESHOT HAIR AWARDS
Breaking News: 2022 #ONESHOT Hair Awards Winners
-
Brunette
Less Foils, More Time: 3 Highlight Hacks From Gina Bianca
-
New Appointments
Gina Bianca Joins RUSK® as Color Director
-
Monthly Launch List: March 2022
-
Dry-Cutting
6 Tips For Dry Cutting & Styling Lived-In Layers
-
Best Of 2021
The 7 Best Gray Coverage & Color Tips Of 2021


