These 8 Steps Will Soften & Cover Grays In Just A Few Minutes
These Gray Coverage Tips Will Make Coarse, Unruly Grays A Thing Of The Past
If gray coverage color appointments are the bane of your existence because of how stubborn and wiry gray hairs can be, then we’ve got some tips for you. Below you will find the steps to take to ensure gray hair is 100 percent covered and softened so they feel as smooth as the rest of the hair. The best part? These hacks will also speed up the application time.
1. Follow this roadmap for easier gray coverage
New York-based hairstylist Ashley Smith (@paintedbyashleymarie) lists the steps to take for 100 percent gray coverage, and since the color is applied to the root, she starts with adding color block to the hairline so the client isn’t left with color on their skin after they leave your salon.

2. Opt for a nourishing, ammonia-free formula
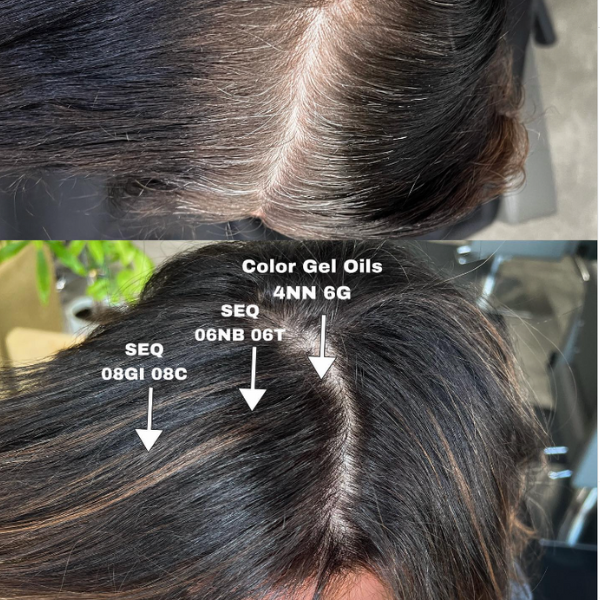
Gray coverage means applying the color directly to the scalp. To prevent irritation, opt for an ammonia-free formula like Redken’s Color Gels Oils. As gentle as the Gels Oils are, they’re just as nourishing as they’re made with two percent apricot oil to soften the mature strands to make them feel like the rest of the hair while also depositing color.

3. Ashley’s formulation secret for getting EVERY gray
Since permanent hair colors modify the structure of the hair, they are the best option for covering stubborn grays. All of the Gels Oils’ 30+ shades guarantee 100 percent, long-lasting gray coverage so you never have to worry about mixing in enough NN again!

4. Customize your formula
- Minimum lift: 10-volume
- Gray coverage: 20-volume
- Additional lift: 30-volume
- Maximum lift: 40-volume

Redken Color Gels Lacquers vs. Color Gels Oils: What’s The Difference?
Both Lacquers and Gels are permanent, long-lasting hair colors. The main difference? The Gels Lacquers are a great option for warm, vibrant colors; while the Gels Oils offer a more nourishing formula across all shades. What’s more is unlike the Gels Lacquers, the new Gels Oils don’t require their own specific developer and instead can be used with any from Redken.
5. Choose your applicator
Now that it’s time to apply the color, you can use a bottle for speed and large areas or a brush for precision.

6. Apply to the root
Starting at the front, section the hair and begin applying the color to both sides of the root before moving on to the next section. If you opt to use the Gels Oils, their hair adhesion technology means the formula doesn’t drip and can fully saturate the hair resulting in a faster development time.
Ashley shares how the Gels Oils’ texture have made patchy end results a thing of the past. “OK, but how many times have you missed a spot when doing gray coverage?!,” she asks. “Redken Color Gels Oils has made saturation a dream.”

7. Don’t be afraid to color over extensions
Have extensions? No worries—Ashley demonstrates how she used the Color Gels Oils on the root of already-installed weft hair extensions so the client’s natural hair and extensions matched seamlessly.

8. Rinse in designated time
The Gels Oils can develop in as little as 20 minutes depending on the developer you use. They can be used with 10, 20, 30 and 40-volume developers. Wash using a color-safe shampoo to ensure long-lasting results.
A look created by Ashley using Redken’s Color Gels Oils.

Want more info about Redken’s new Color Gels Oils? Click here!


