Articles > Social Media > How To Get Perfect Lighting In Every Photo
Last updated: January 19, 2021

How To Get Perfect Lighting In Every Photo

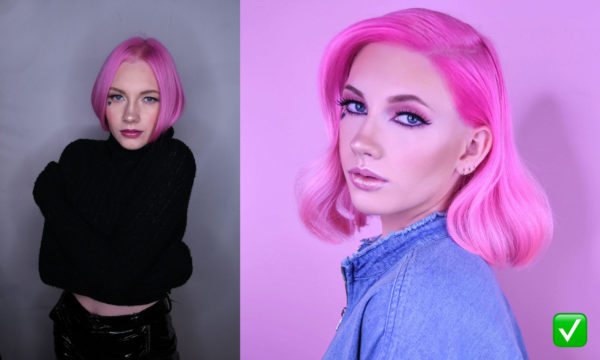
3 iPhone Lighting Tips You Never Knew You Needed

close formula

Photography: 3 Tips For Perfect Lighting

One of the biggest struggles of photographing hair is lighting. There is truly nothing more frustrating than spending hours creating a visual masterpiece only to not be able to capture it accurately in a photo. This struggle leads a lot of hairdressers to believe they need to invest in a professional camera, and while they have their pros, you don’t need a professional camera to take a great photo. We put together a few simple tricks that will take your lighting game to the next level.  


1.  Make sure the brightness on your phone is all the way up BEFORE taking a photo.

If the lighting on your screen is not all the way up,  your photo will appear darker than it actually is. If you try and up the brightness in your photo based on this inaccurate representation, this can lead to an overexposed photo. Always check your screen brightness.


Pro Tip: Make sure your screen is not in Night Mode. Night mode eliminates blue light and makes your screen appear a lot warmer than it is!


2. Tap the screen to adjust lighting focus.

While the iPhone camera auto adjusts your lighting automatically, sometimes, especially when it comes to photographing color, one size does not fit all. If you are struggling with certain areas of your photo looking overexposed, tap that area and your phone will auto adjust the lighting in that spot.


3. Use your finger to slide the brightness ticker up and down to adjust the overall lighting of your photo.

Keep in mind that while the iPhone camera is incredible, it is an automatic camera and the settings sometimes need to be adjusted. Certain factors like sunlight, light reflections, backgrounds, and even reflections from clothing can cause your lighting to be weird.


The iPhone has a manual adjustment feature that is a GAME CHANGER. Simply tap the screen. When you see the little sun icon appear, use your finger to slide up and down to adjust the brightness of your photo manually. 


To see all three of these tips in action, watch the video below!


For this full video tutorial and more photography tips from @shmeggsandbaconn, click HERE to purchase her 2-hr class on BTC University for $24.95!


Watch BTC’s digital Social Climbing show to get 10+ hours of education and learn everything you need to know to grow on Insta. Get 24/7 unlimited access AND receive a 50-page digital workbook to personalize your show experience—TAP HERE!