
Tressa Organic Transitions Short Hair How-To

Advertisement
Advertisement
Tressa Organic Transitions Short Hair How-To
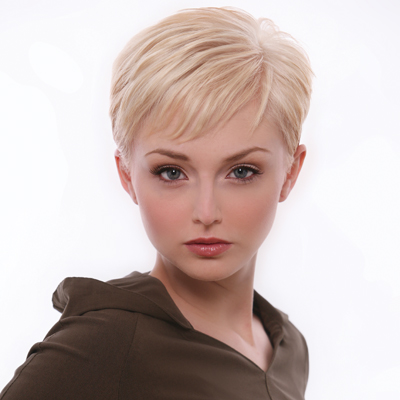
Some short-haired clients get stuck in a rut with their style. This look from the Tressa Organic Transitions Collection is taken from stale to stylish in just a few easy steps. It’s a look that can be worn smooth and sleek or ultra-textured. This is a style that ensures your client will never have to wear the same look twice!
To learn more, go to www.tressa.com and www.kishaircare.com

Subscribe to behindthechair.com “On Paper” Magazine–4 Issues Only $29.95!
Next Issue: COLOR with Beth Minardi!
HOW-TO STEPS 
-
 1
1Begin on side section. Cut each side 2-inches in length.
-
 2
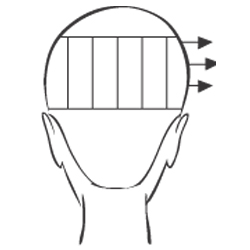
2Using your side sections as a guide, cut the back panel vertically 2-inches in length. Cut from one side section to center back. Repeat on opposite side.
-
 3
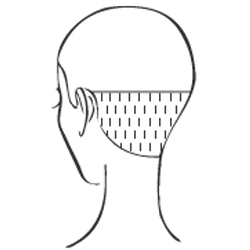
3Use a scissor-over-comb technique in this section.
-
 4
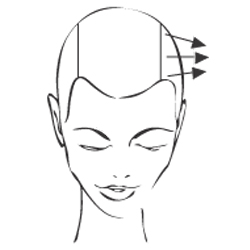
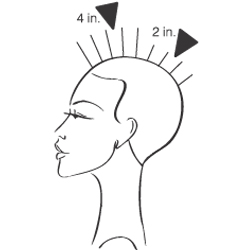
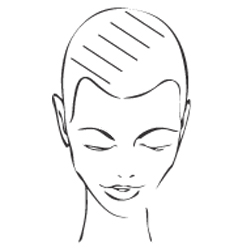
4Begin in the crown and razor cut from crown to front hair line. Razor hair from 2-inches in crown to 4-inches in front bang area. Texturize look to remove weight lines.
-
 5
5Color Formulas
Platinum Blonde-Using Tressa’s LITEnUP Dual Moisturizing Powder & Colourage Permanent Translucent Color
Formula: 2 scoops LITEnUP + 3oz. Colourage Developer 20/40 volume
Toner: 1oz. 11A Colourage Color + 1oz. Colourage Developer 10 volume -
 6
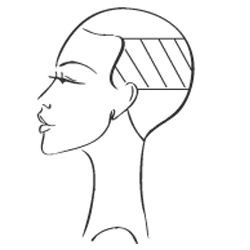
6Begin over the eye and place diagonal foil weaves, leaving natural hair between foils. Continue until you reach the top of the crown.
-
 7
7Start with diagonal weaves just in front of the ear to center back. Repeat on opposite side. Place Colourage Color on hair outside of foils.
-
 8
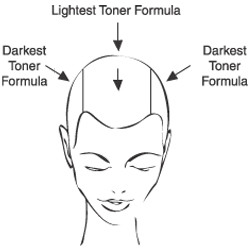
8Begin by pre-lightening entire head to a pale yellow. Section from the arch of the eyebrow back to the crown to create horseshoe shape section. Place your lightest toner on top section; place a darker toner on the sides and back.
Note: Lighter formulas add height and width, while darker formulas diminish height and width.
-
 9
91. Mist with KIS Leave-In Sealing Spray
2. Dry hair
3. Apply KIS GelWax to separate smooth and define
4. Lightly spray KIS Thermal Protecting Hairspray
5. Apply KIS Shine Serum -
 10
101. Mist with KIS Leave-In Sealing Spray
2. Apply KIS Root Lifter to the root area
3. Apply KIS Volumizing Foam
4. Blow dry and flat iron with KIS Thermal Protecting Hairspray
YOU MIGHT LIKE THIS
-
Hair
Tressa Organic Transitions Long Hair How-To
-
Hair
Tressa and KIS Cut and Color How-To
-
Hair Color

Caramelt Delight
-
Hair
Pivot Point International “Kitty” Mini-Tech
-
Hair
Organic Layered Cut from Surface
TRENDING NOW!
-
BTC Hair Trend Report
The Biggest Haircut Trends of 2024
-
Blonde
Conditioner Before Toner: Common Hair Myth Debunked
-
Monthly Product Launch List
11 New Game-Changing Hair Launches To Add To Your Arsenal
-
Copper
What Is The "Cowboy Copper" Hair Trend? Here's What It Really Means...
-
Copper
Muted Bronze
-
Haircuts
SHAG 101: The Dos And Don'ts
-
Frizz
Straighten & Smooth 2A, Fine-Medium Density Hair
-
Business
Don't Fall Victim To Hair Industry Greenwashing—Read This First

