
Modernized Classic Bob from Tom Brophy’s Rex Dador

Modernized Classic Bob from Tom Brophy’s Rex Dador
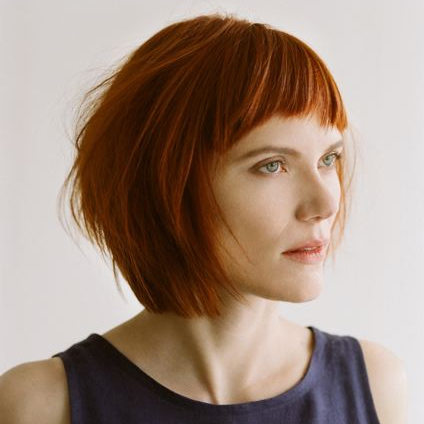
Stylist Rex Dador of Tom Brophy Salon looked to the past and recreated a bob that could be worn both classically or loose and fun. Dador says, “This bob cut is great because it is so timeless.” Adds Tom Brophy, “Given how tight the economy is, it’s very important to have a great cut that will last longer and wear well over time.”

Subscribe to behindthechair.com “On Paper” Magazine–4 Issues Only $29.95!
Next Issue: COLOR with Beth Minardi!
HOW-TO STEPS 
-
 1
1First, cut the exterior line blunt to give the style a more classic look. To render a modern look and allow the option of appearing more casual, create textured and choppy layers in the interior. Cut the fringe short and piecey to reveal the eyes.
Step 1. Begin the haircut at the nape area, cutting a perimeter line using ½-inch diagonal forward sections.
Step 2. Take a section that is parallel to the first, combing the hair down and cutting the line through both sides.
Step 3. Keep working to a point just above the top of the ears. Using fine sections, follow the guideline. Continue using previous sections as a guide, keeping tension consistent.
Step 4. When reaching the crown, begin incorporating the sides into the sections.
Step 5. When cutting the side sections, compensate for the protrusion of the ear, holding the hair against the skin with minimal tension to maintain the strength of the line. Repeat the same procedure for the other side.
Step 6. The same sectioning and cutting procedures are continued up to the original parting on both sides.
Step 7. Begin the internal layering by taking a vertical section through the center back. Comb the hair straight out and cut a square line. To keep the layers longer, allow some of the outline to drop away, helping to maintain the definition of the line.
Step 8. Pivot sections from the crown and over-direct each one back using the previous section as the guide. As the sections become parallel towards the front hairline, continue over-directing back to maintaining the length through the front. Repeat the same procedure for the other side.
Step 9. Blend the layering across the parting by taking horizontal sections starting at the crown.
Step 10. Texturize to remove the interior weight using a “deep point” cutting technique.
Step 11. To establish the fringe, take sections that curve around the hairline.
Step 12. Cut the fringe using a point cutting technique for a softer, youthful appearance. -
2
Apply Davines Momo Anti-Frizz Serum, working it throughout the hair with fingers and on the ends. Next, apply a volumizer at the roots, like Davines Texture Spray. Then blow dry with a flat brush, concentrating on the roots for volume. Finish with a styling paste such as Davines Invisible Paste on the ends to achieve texture, separating the ends for a modern feel. For a more classic look, apply a relaxing balm to towel dried hair and blow dry with a flat brush. Take a flat iron on the top and eliminate the styling paste at the end.
YOU MIGHT LIKE THIS
-
Bobs
Modernized 1960s Graduated Bob from Tom Brophy
-
Bobs
Full-Looking Bob On Fine, Thin Hair
-
Bobs
How-To: The Convertible Bob
-
Bobs
Shattered Bob
-
Blonde

Blunt Blonde Bob
TRENDING NOW!
-
BTC Hair Trend Report
The Biggest Haircut Trends of 2024
-
Blonde
Conditioner Before Toner: Common Hair Myth Debunked
-
Monthly Product Launch List
11 New Game-Changing Hair Launches To Add To Your Arsenal
-
Copper
What Is The "Cowboy Copper" Hair Trend? Here's What It Really Means...
-
Copper
Muted Bronze
-
Haircuts
SHAG 101: The Dos And Don'ts
-
Frizz
Straighten & Smooth 2A, Fine-Medium Density Hair
-
Business
Don't Fall Victim To Hair Industry Greenwashing—Read This First

