
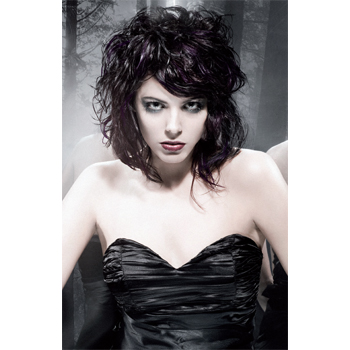
Alfaparf Velvet Effects Color Technical

Advertisement
Advertisement
Advertisement
Alfaparf Velvet Effects Color Technical
HOW-TO STEPS 
-
 1
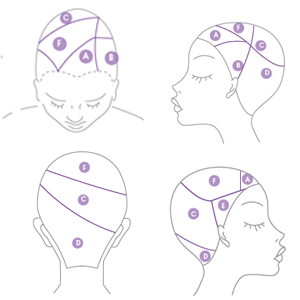
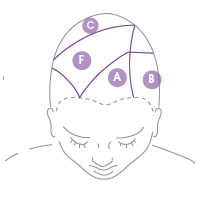
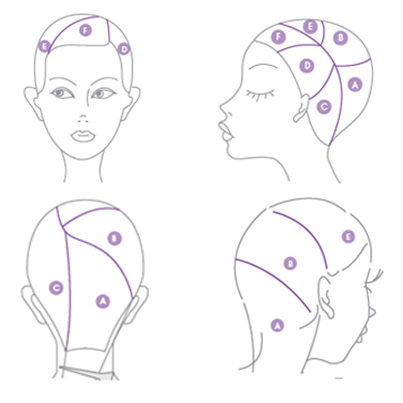
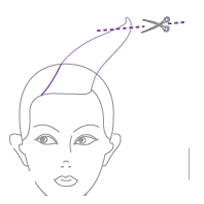
1Part the hair as shown in the picture: take a triangle section in the frontal area, part another section in the left area and draw a diagonal line starting from the crown and ending on the lower side of the right ear.
-
 2
2Color panel A, D, E with Formula A.
-
 3
3Apply Formula B to panel B and C.
-
 4
4Color panel F with Formula C.
-
 5
5Formula A: 1 part Evolution of Color Pure Violet 5.22 + 1.5 parts Oxid’o
Formula B: 1 part Evolution of Color Pure Violet 1.11 + 1.5 parts Oxid’o
Formula C: 1 part Evolution of Color Pure Violet 3.22 + 1.5 parts Oxid’oNatural Base: 4
-
 6
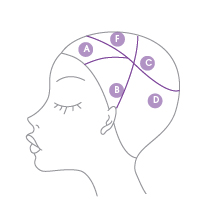
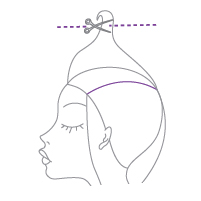
6Divide the hair as shown in the picture.
-
 7
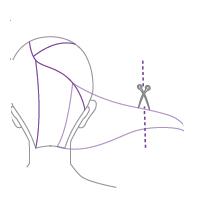
7Section A: start cutting in the right side of the nape; create a 20 cm-long (7.9 inches) line perpendicular to the ground. Go on overlapping each lock over the previous one keeping the cut line perpendicular to the ground. Create in this way an asymmetric perimeter.
-
 8
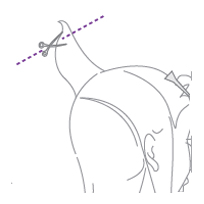
8Section B: cut a 10 cm-long (4 inches) line parallel to the skull and use it as guideline for the following sections. Go on shifting the parallel lines over the first cut line of the section. Finally, shift the whole section over the first line.
-
 9
9Section C: use the 10 cm-long (4 inches) line of the previous section as guideline. Cut a concave cut line over the ear over which we overlap the whole section.
-
 10
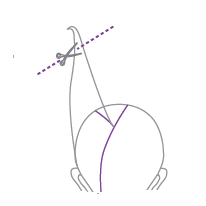
10Section D: again, take the 10 cm-long (4 inches) line as guideline and cut a line parallel to the ground in the high part of the section.
-
 11
11Section E: cut short to long keeping the 10 cm-long (4 inches) line as point of reference. Go on with the whole section rotating and cutting each line on its base.
-
 12
12Section F: with a concave cut line in the left side and overlapping the whole section over the first one, you’ll get a long and layered fringe.
-
13
YOU MIGHT LIKE THIS
-
Hair Color
Alfaparf Audacious Contrasts Color Technical
-
Blonde
3-D Blonde from Alfaparf
-
Hair Color
Sunkissed Pixie from Alfaparf Milano
-
Hair Color
Enveloped Color How-To from ALFAPARF
-
Hair
Asymmetrical, Funky Cut from Alfaparf
TRENDING NOW!
-
BTC Hair Trend Report
The Biggest Haircut Trends of 2024
-
Blonde
Conditioner Before Toner: Common Hair Myth Debunked
-
Monthly Product Launch List
11 New Game-Changing Hair Launches To Add To Your Arsenal
-
Copper
What Is The "Cowboy Copper" Hair Trend? Here's What It Really Means...
-
Copper
Muted Bronze
-
Haircuts
SHAG 101: The Dos And Don'ts
-
Frizz
Straighten & Smooth 2A, Fine-Medium Density Hair
-
Business
Don't Fall Victim To Hair Industry Greenwashing—Read This First

