
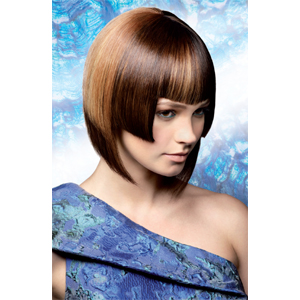
Alfaparf Acqua Trend Collection: Mermaid

Advertisement
Advertisement
Alfaparf Acqua Trend Collection: Mermaid
HOW-TO STEPS 
-
 1
1Once the hair is divided by the natural partition of the hair, create a triangular panel in the frontal part of the head to realize the fringe.
-
 2
2Then, from the natural partition, take a vertical section just behind the ears on both sides. Then separate the nape on both sides.
-
 3
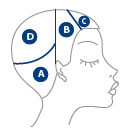
3In the back of the head, create a semicircle that, starting from the vertical section, goes to the center occipital bone (remember that this section must be adapted to the head shape). Let the rest of the hair fall down freely.
-
 4
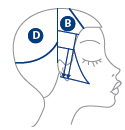
4Panel A: Start from the back side of the head below the semicircle working with a vertical section in the center of the head. Then create a shape having the same length. Make sure that the cut line re”ects the sections. Let the hair fall down naturally without elevating; cut all at the same line.
-
 5
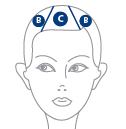
5Panel B: Take diagonal section on one side; let the hair fall naturally and cut at the same line without elevating. This will create a triangular section having the same length. Repeat this technique on the opposite side
-
 6
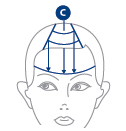
6Take curved sections for the fringe creating a rounded shape. Let the hair fall naturally so as to create a sole length. Each section must reflect the cut line. The fringe length must be decided according to the face type. Blow dry and refine panels A, B and C.
-
 7
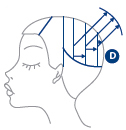
7Panel D: Take a vertical section in the center of the semicircle and elevate keeping the fingers parallel to the head curve. In this way you’ll create a rounded layer. Each section must be overlapped to the previous one. Dry and refine this panel.
-
 8
8Formula A: 1 part Evolution of the Color 4 + 1.5 parts Oxid’o Peroxide
Formula B: 1 part Evolution of the Color 6.1 + 1.5 parts Oxid’o Peroxide
Formula C: 1 part Evolution of the Color 8.21 + 1.5 parts Oxid’o Peroxide
Formula D: 1 part Evolution of the Color 10.1 + 1.5 parts Oxid’o Peroxide -
 9
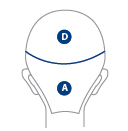
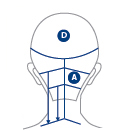
9Panel A: Take a diamond-shaped panel in the high part of the head. The top of the diamond must be positioned towards the left side in the back of the neck.
-
 10
10Panels B and C: Using the diamond sides as guidelines, create two more diamond-shaped panels next to the first one.
-
 11
11Panels D, E and F: Using panels B and C as guidelines, take 3 more aligned diamond-shaped panels next to the first one.
Color panels A and E using Formula C.
Color panels B and F using Formula D.
Color panels C and D using Formula B.
Color the rest of the hair with Formula A. -
12
YOU MIGHT LIKE THIS
-
Hair
Alfaparf Acqua Trend Collection: Sea Breeze
-
Hair
Alfaparf Acqua Trend Collection: Watercolor
-
Hair
Alfaparf Acqua Trend Collection: Vapor
-
Hair
Tramonto Twist from Alfaparf Milano
-
Hair
1970s-Inspired Voluminous, Textured Cut from Alfaparf
TRENDING NOW!
-
BTC Hair Trend Report
The Biggest Haircut Trends of 2024
-
Copper
What Is The "Cowboy Copper" Hair Trend? Here's What It Really Means...
-
Bobs
How to Avoid a Bulky Bob: 4 Techniques To Try
-
Uncategorized
TikTok's Viral "Scandinavian Hairline" Is Actually Not New...
-
Hair Color
WWYD: How To Stop Your 6N From Turning Orange
-
Glossing/ Toning
How To Achieve "Glass Hair": Smart Hacks From Hairdressers
-
BTC Hair Trend Report
Quiet Luxury Blonde: The "Old Money" Trend Explained
-
Celebrity
10 BIPOC Celebrity Hairstylists Who Are Making Major Waves In The Industry Right Now

