
Toning: 5 Timesaving Tricks + Techniques

Try This Toning Technique To Pick Up The Pace
Real talk. Time is money behind the chair. 💸 So, why not maximize your toning services? That’s why we’re sharing a technique that will help you create a root shadow, highlights and lowlights at the SAME time 🙌 that we learned at the Redken Artist Connection (RAC) 2020 in Miami—a bi-annual gathering where 900+ artists learn new techniques, trends and facilitation skills. Plus, some juicy timesavers and toning tips from Redken Master Artist Sean Godard (@seangodard) using NEW Shades EQ colors (omg!), so read on and get glossy with it.
Products Used
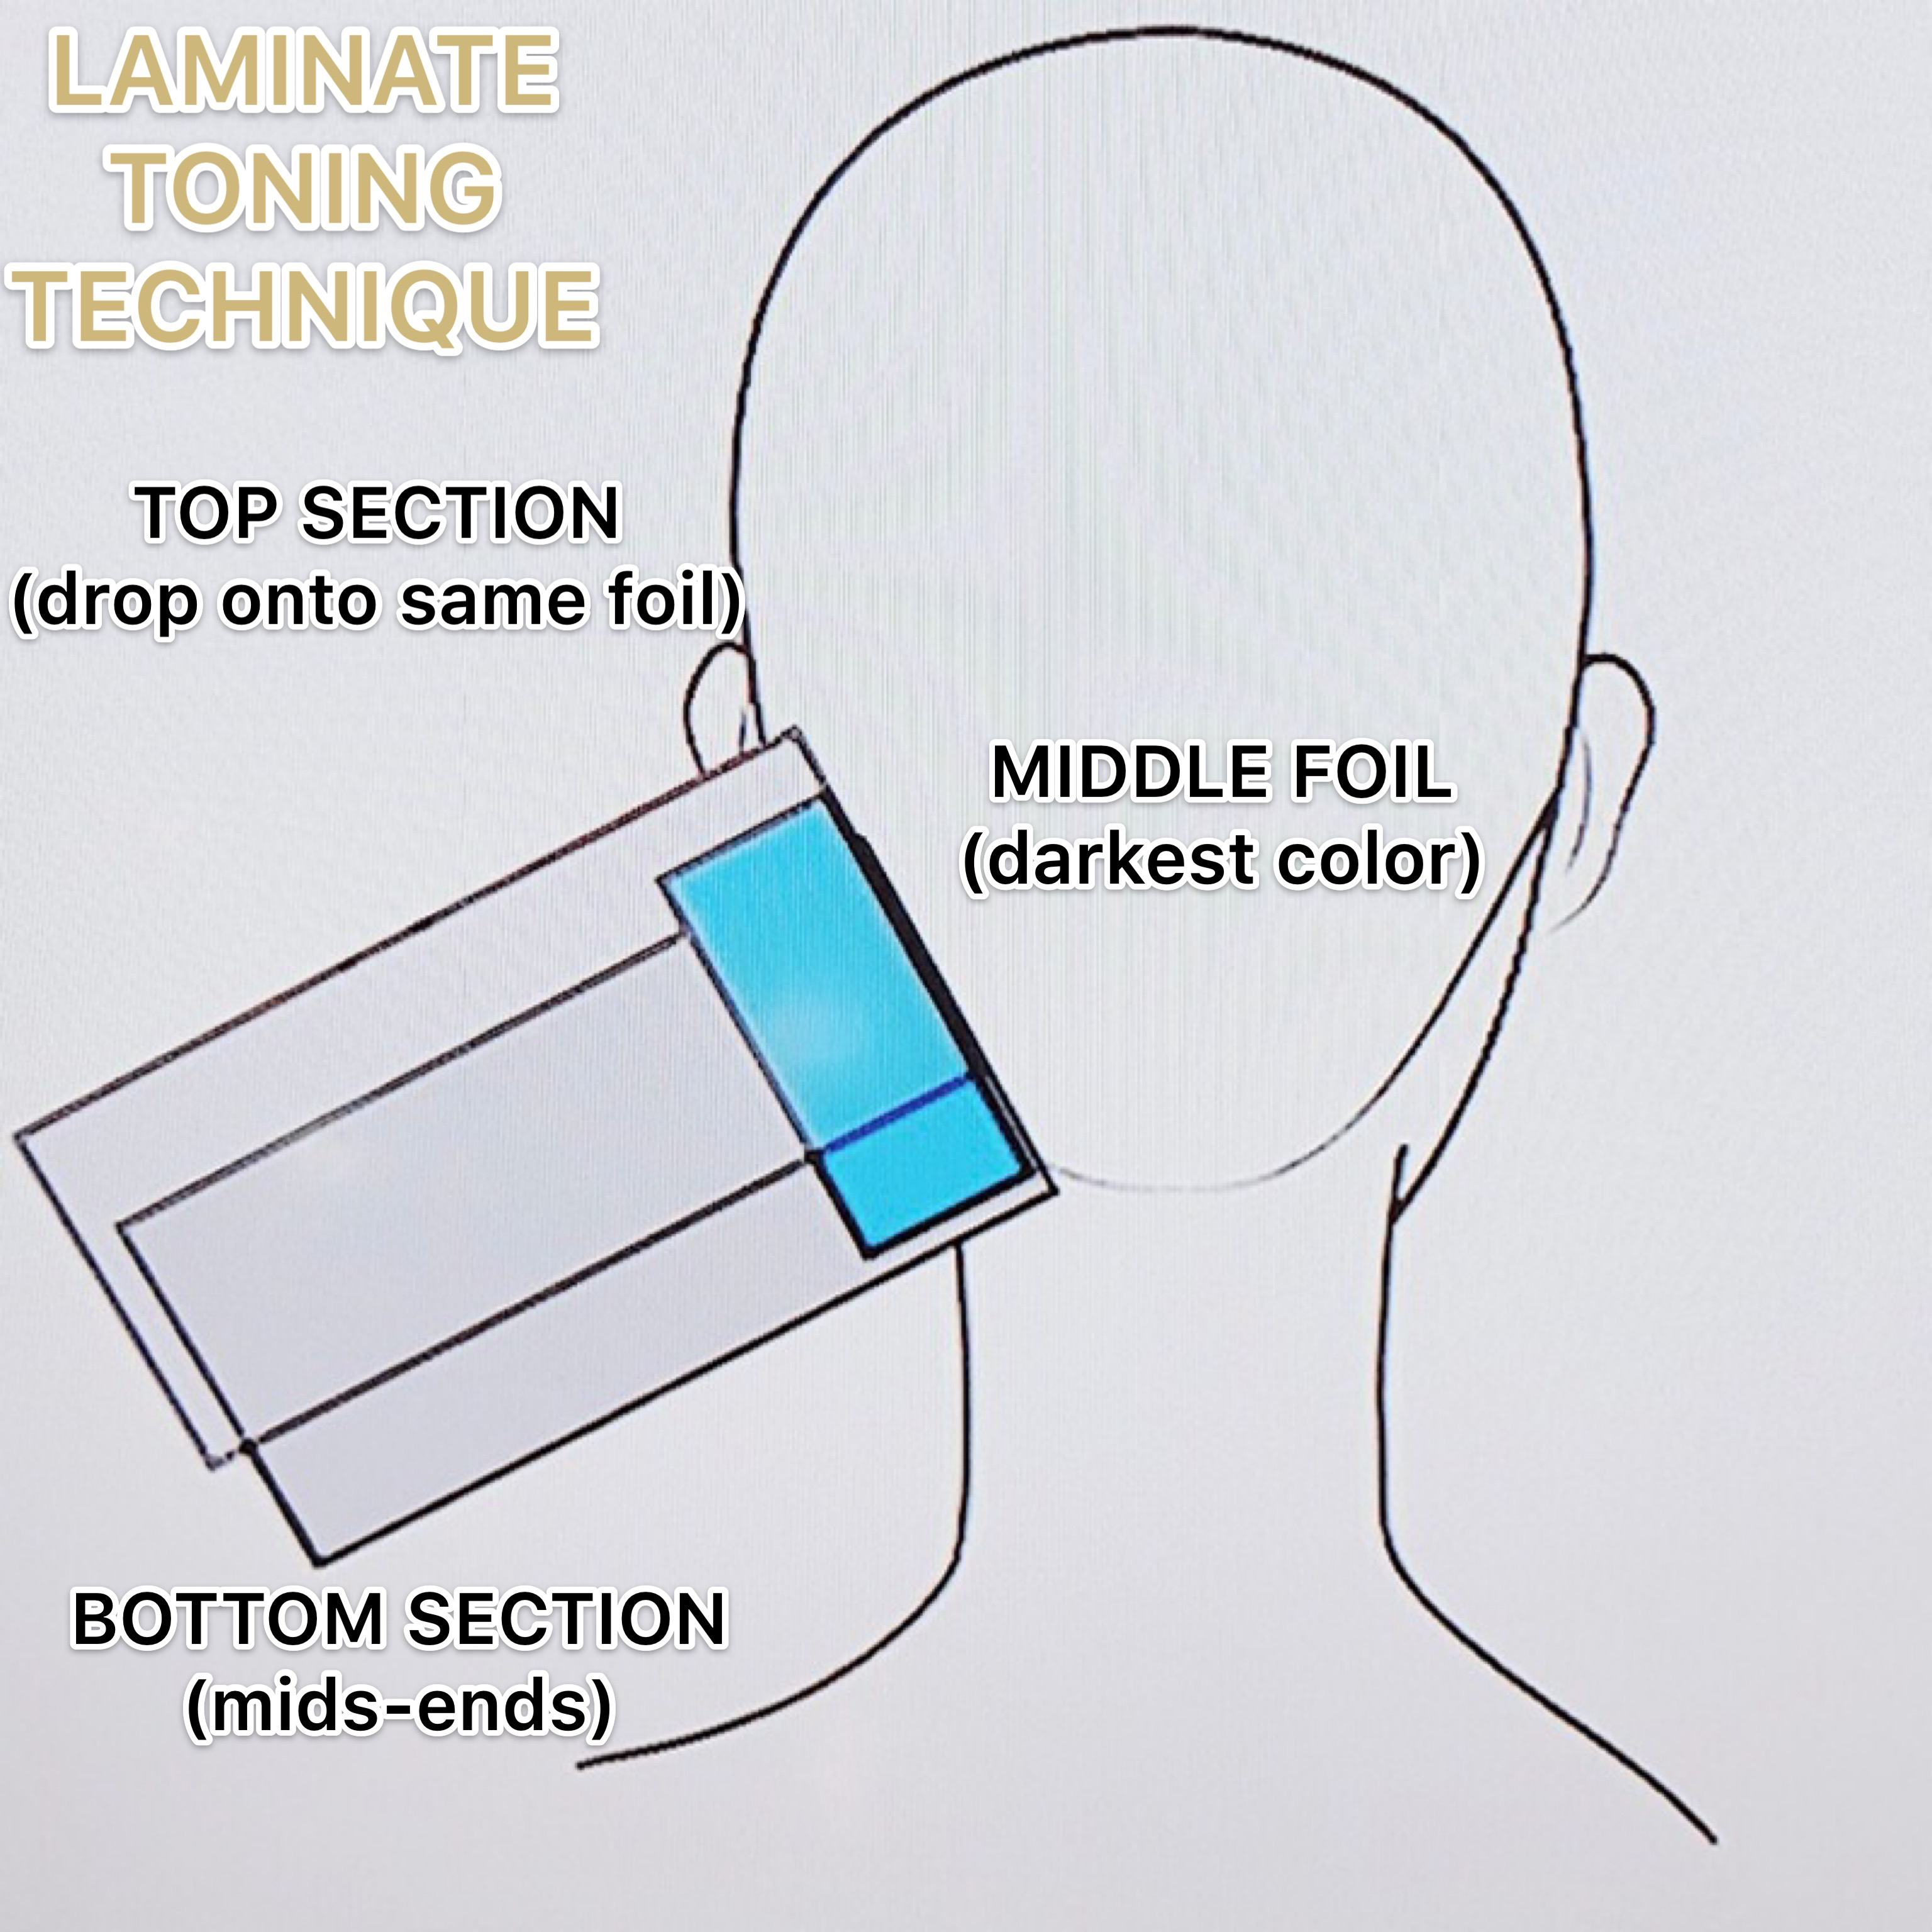
1. Laminate Toning Technique
The laminate technique is a super fast way to create soft dimension by ‘laminating’ the hair—aka sandwiching darker sections of hair between panels of gloss to create depth.
- Here’s Why It’s Fast: This technique allows you to work quickly in large sections, plus you can root shadow, highlight and lowlight in one service.
- Sectioning: Working in large, diagonal-back sections will create softness AND help you pick up the pace. That’s why Sean reaches for his Redken Shades EQ—the consistency will be able to saturate thicker panels.
2. Learn The The Step-By-Step Breakdown
- Start in the center-back, move two inches up and take your first thick section.
- Split the large section into three subsections. Start by clipping the top away, then take a slice and weave–so the top is the weave and the bottom is the slice.
- Take the middle section and lay it on a foil. Apply the darkest color, then fold the foil into a ‘taquito’ shape.
- Then, take the bottom subsection and apply the next color, starting at the mids and ends then blurring for softness.
- Drop the top section onto the same foil (this creates overdirection) and apply the same color as the bottom to the mids and ends and blur.
Pro Tip: In the top section, leaving some extra space between the retouch area and laminate toning area will create a little reflective glimmer at the base.
3. Apply Root Shadow + Toner At The Same Time 👏
Tone AND root shadow at the same time? Why not! Just apply the root shadow formula first, then go in with the laminate technique and blend the roots and mids. Process to perfection and BOOM, you’ve accomplished two services ASAP.
Pro Color Tip: Looking to create a matte finish on natural tones? Redken just dropped news that they are launching Redken Matte Shades EQ colors and here’s the tea:
- Brown to tan background color with a blue/green tone.
- Available in Levels 2, 4, 7 and 9.
- Matte doesn’t mean no shine. It creates a natural matte finish of the color tone.

4. How To Avoid Lines Of Demarcation
Major 🔑: Hold the brush vertically to soften at the top, or blend the root together on that seam. This will help blur out any harsh lines that can sometimes happen with thick sections.

5. Use This Technique To Lift, Cover Gray & Tone Curls
Same steps, different tools! Here’s three ways to use this technique for multiple services.
- Lift: Apply the base color to the roots, lowlights to the mids and lightener for brightness on the ends.
- Gray Coverage: Apply gray coverage to the retouch area first, then continue with the classic laminate method on the mids and ends.
- Tone Curls: Apply the base color (or leave their natural base), highlift color to the ends and Shades EQ in between. Instead of over-foiling, less is more with curly textured hair. Instead, paint bigger and bolder pieces for higher impact.
More from
Redken
-
Celebrity
11 Questions With Celebrity Colorist Tracey Cunningham
-
Blonde
Lived-In Blonde With Warm Vivid Pops
-
Glossing/ Toning
How To Achieve “Glass Hair”: Smart Hacks From Hairdressers
-
Monthly Product Launch List
The Best Hair Launches Of March 2024
-
Blonde
The Biggest Hair Color Trends of 2024
-
Brunette
Caramel Chocolate Brunette With Gray Coverage
-
Awards Shows
The Best Celebrity Hair Colors & Formulas From The 2024 Golden Globes
-
Blonde
Guide To Gray: 5 Tips To Blend or Cover Stubborn Grays
-
News
How Maui Hairdressers Are Rebuilding Post-Lahaina Fires
-
Blonde
Blonde Ribboned Root Smudge
-
Balayage
Warm Glow Lived-In Blonde Balayage
-
BTC Hair Trend Report
Quiet Luxury Blonde: The “Old Money” Trend Explained
-
Blonde
Dear Colorists, Do You Enforce A Healthy Hair Policy?
-
BTC Hair Trend Report
Your Guide To Fall & Winter 2023’s Hair Color Trends
-
Blonde
Muted Honey Blonde
-
Industry News
Redken’s Safe Space Course Creates A More Inclusive Salon Experience
-
Haircare
ACIDIC BONDING CONCENTRATE 5-MINUTE LIQUID MASK
-
BTC Events
AI, Mental Health & Social Media: 7 Business Tips You Can’t Live Without
-
Copper
What Is The “Cowboy Copper” Hair Trend? Here’s What It Really Means…
-
Celebrity
Margot Robbie’s ’60s-Inspired Ponytail at the “Barbie” Premiere
-
Additive
4 Tricky Hair Color Scenarios & What You Should Do!
-
Gray Coverage
These 8 Steps Will Soften & Cover Grays In Just A Few Minutes
-
Hair Color
WWYD: How To Stop Your 6N From Turning Orange
-
Glossing/ Toning
Coral Crush

