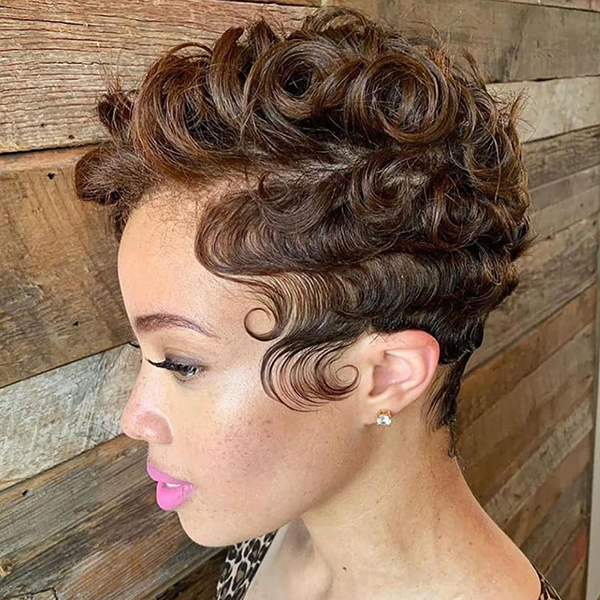
Pixie Styling For Textured Hair: Marcel Curls, Flat Irons & Finger Waves
Pixie Hairstyling Tips & Techniques For Highly Textured Hair
Nothing gets a double tap faster than a chic, short pixie cut. The foundation of the technique is simple, but what really brings the haircut to life is the styling! So we spoke to a few experts on how to get the look and what tools they prefer when styling gorgeous curls or sleek finger waves. Grab the deets below!
The Prep
While every stylist has their own unique way of styling a classic pixie cut, the overall prep is universally the same.
- A relaxer is applied first if needed, then the hair is shampooed and conditioned.
- If it’s the client’s first haircut, the hair is blown out straight, cut short, molded down dry using foam wrap and left to set under the dryer. “The mold is the most important part of the styling process,” says Stephanie Anderson (livingstephanie1025). “[It determines} how the hair will lay and the styling outcome.”
- If the client already has a short cut, the stylist will simply mold the hair down wet after conditioning and let sit under the dryer.
- Drying time can take between 30 minutes to an hour depending on the hair’s density.
Once the hair is prepped, the styling can begin using the stylist’s choice of a Marcel or flat iron to finish the look. Finger waves would be applied during the molding process.
Scroll Through To See The Different Looks That Can Be Created!
Learn how to cut curly textures from #ONESHOT Winner & Rëzo Academy Founder Nubia Rëzo—click for access!
What Hair Tool Is Best? 3 Options To Consider
The short answer is that it depends on what the stylist is comfortable with. Here’s a breakdown of each hot tool:
1. Flat Iron
Not every stylist likes to use a Marcel iron, but thankfully tiny pencil flat irons work just as well for getting detailed curls. “I’ll be honest I’m not a Marcel girl,” says Tynisha Barnes (@t.techniques). “The best invention and the best investment I’ve ever made was the 3/4-inch H2PRO irons. They are small like the Marcel, so I can get into the shortest places.”
The smaller the flat iron, the tighter the curl you can achieve. “I prefer to always use the 3/10-inch pencils, ½-inch or 1-inch electric flat irons. I use Marcel irons upon request,” says Stephanie. “The electric flat irons also give a smoother pass and sheen for me when used with serums.”
Derickus Crawford (@derickuscrawford) adds, “Ninety percent of the time I use flat irons. [Mostly] because they offer indirect heat and because they produce a trendier and edgier look. I would however use a Marcel to achieve a more defined look.”
Watch Tynisha Create Tiny Curls Using A Flat Iron!
View this post on Instagram
2. Classic Marcel Iron & Stove
When it comes to pixies, nothing is better than the classic Marcel iron and a hot stove. “Marcel irons are bae for me. The style lasts way longer, [plus] it gives a more polished and clean look over flat irons in my opinion,” says Angel Robinson (@crazyaboutangel). “Flat irons come in so many different types of materials and each material releases a different type of heat. If you’re not educated on the differences, you could really do damage to the hair shaft.”
So what’s the key difference in the styling results from a flat iron versus a Marcel? “The most important difference is the look they create,” says E’lan Simmons (@essenceofelan). “Marcel irons produce a tighter looking curl versus flat irons with a smoother, more relaxed looking curl. Marcel irons give the style more of a dated look, [while] flatiron curls give the style a more modern look.”
- Beginner Pro Tip: Newbies using a classic Marcel iron and stove should carry a towel over their shoulder when working to test the iron’s heat. “If the iron burns the towel, blow and spin the iron for about 30 seconds and try the towel test again. Repeat those steps as many times as needed to make sure the iron is not too hot to cause heat damage,” says E’lan.
Thinking about using an electric Marcel iron? Go for it! The tools used come down to the stylist’s preference at the end. “The Marcel irons aren’t for everybody and the electric irons aren’t for everyone either. My suggestion would be to let the hair tell you what to use,” remarks Angel.
3. Finger Waves
The only tools needed to create finger waves are a rattail comb and foam wrap. “When creating finger waves on a relaxed client, I use the Inflúance Hair Care It’s Natural Honey Almond Styling Foam and my rattail comb,” says Tynisha. “The waves look so beautiful! You’re really able to create magic around the hair line with the end of the rattail comb!”
Some stylists use two rattail combs, by using the second comb in place of the finger when waving to get tighter waves. To put it simply, think of it like this: “For well-defined waves, I use two rattail combs. [And] for looser wave patterns, I use one rattail comb,” says Derickus. After the waves are finished, clients are left to sit under the dryer for 45 minutes to an hour to set the hair.
Tynisha Designing Finger Waves On Her Client!
View this post on Instagram
Want More Styling? Click Here For 5 Cutting & Blowout Tips On Textured Hair!