
Dip Teasylights: How It Works + Why You Should Try It

Another New Way Of Blonding—DIP Teasylights?!
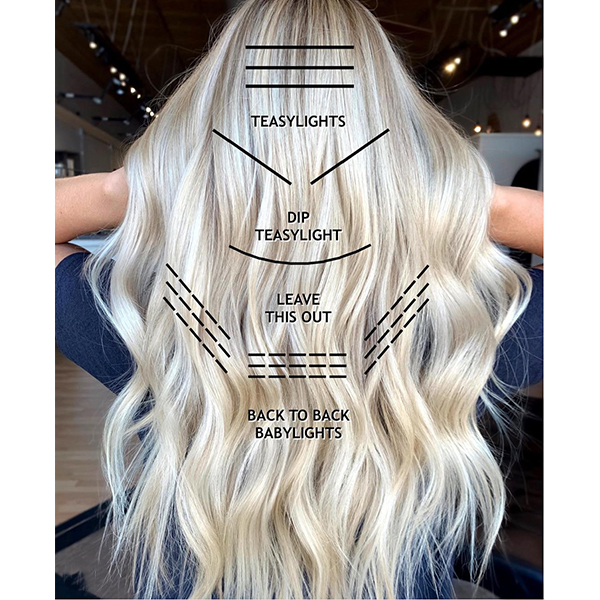
Looking for the secret to faster foiling on those rooty clients with lots of blonde maintenance? Check out this technique from BTC Team Member Samantha Harman (@samanthasbeautyconfessions) using a unique, half-moon-shaped parting for her teasylights to create a seamless blend from root to tip!
Why Is It Called “Dip” Teasylights?
“When I take my section, I do a dip (half moon shape) versus just a straight, horizontal subsection,” Samantha explains.
Adding a dip-shaped parting within a foil pattern helps the teasylights to blend seamlessly from the root into the rest of the hair. This technique can suit any client, but it is especially helpful for rooty clients with heavy blonde maintenance!
Dip Teasylights benefits:
- Creates bulk in the middle of sections for bold lightening
- LESS foiling (!!!)
- Blends hairline into the interior of hair
- Simple weave-and-tease application
How To Section & Formulate
Dip teasylights can be easily added into any foil pattern!
Check out Samantha’s sectioning below! Notice how she uses Joico Blonde Life Lightening Powder to lighten diagonal sections on either side of the dip teasylights—this creates a flawless veil for huge dimension.
Pro Tip: Do NOT foil the area near the nape that is between the hairline foils and the dip teasylights. Samantha says, “Leaving this depth is going to make the blonde look so much brighter!”
View this post on Instagram
Formula Breakdown:
Formula A (lightener)
Blonde Life Lightening Powder + 10-volume developer (working up to 25-volume developer throughout application)
Formula B (roots)
Joico LumiShine Demi Permanent Liquid Color 7N + 5-volume developer
Formula C (gloss)
Joico Blonde Life Quick Tone Liqui-Creme Toner Violet + Clear + 5-volume developer
Give It A Try—Get A Blonde Life Lightening Powder Sample HERE!
Dip Teasylights Application
- Within the dip parted sections, create a standard weave and tease
- Place a board underneath the weaved out section before applying lightener
- Paint the lightener on the middle of the section and through the ends, feathering upward to the root
Pro Tip: Brushing out a tease on wet hair can be tricky. Samantha says, “I do it at the shampoo bowl with a wide-tooth comb! Make sure you aren’t teasing too much—just one-two teases so that too much time is not spent combing it out.”
Watch her full application demo here:
View this post on Instagram
Products Used
More from
Joico
-
Balayage
One Step, Three-Layer Multidimensional Balayage
-
Balayage
Sunset Copper Balayage
-
Monthly Product Launch List
The Best Hair Launches Of March 2024
-
Hair Color
Blonde Life® SilverLight™ Lightening Powder
-
Bond Building
Defy Damage® IN A FLASH™
-
Da’Vine Joy Randolph’s Glamour Waves
-
Celebrity
Zendaya’s Classic Volume Bob
-
Celebrity
The Best Beauty Looks At The 2024 Oscars
-
Blonde
Building The Perfect “Summer Blonde”
-
Gray
Make Gray Hair Look & Feel Younger: 3 Tips Every Stylist Should Try
-
Haircare
KBOND20 Defy Damage Power Masque
-
BTC Events
BTC “On Tour” Nashville Recap: Everything You Missed
-
Monthly Product Launch List
The Best Hair & Beauty Launches Of November 2023
-
Haircare
Inner Joi™ Strengthen Shampoo
-
Conditioners
Inner Joi™ Strengthen Conditioner
-
Haircare
Inner Joi™ Strengthen Masque
-
Haircare
Joico Launches Vegan, Naturally-Derived Haircare Line, Inner Joi™
-
Blonde
How To Create A Natural Shadow Root Through Teasing
-
Blonde
“Fake” A Full Foil In 3 Steps: Here’s How
-
BTC Hair Trend Report
Your Guide To Fall & Winter 2023’s Hair Color Trends
-
Blonde
Honey Blonde Curls: 3 Strategic Placement Tips To Create Brightness
-
Hair Color
Bold Color Trends You Need To Know For 2024
-
BTC Events
AI, Mental Health & Social Media: 7 Business Tips You Can’t Live Without
-
Manufacturer
Joico Announces Jeannetta Walker-Rodgers as Global Technical Director

