
TIGI Colour “Glamour” Step-by-Step

TIGI Colour “Glamour” Step-by-Step
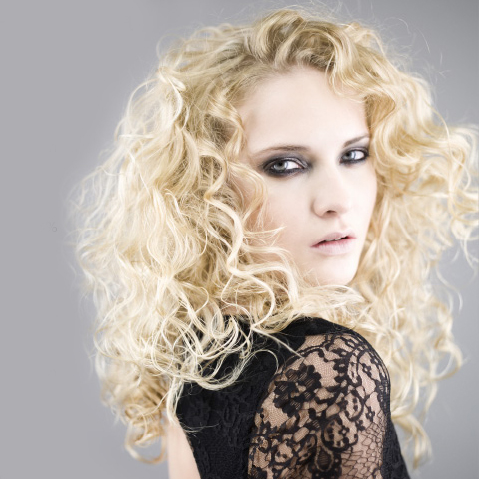
Try the “Glamour” step-by-step courtesy of TIGI Colour. This light-as-fizz champagne blonde hue is perfect for clients looking to lighten up.
To learn more, go to www.tigihaircare.com
Get TIGI PRO Tools:
TIGI Pro Neck Shield
TIGI Pro Sectioning Clips
TIGI Pro Trimmer

Subscribe to behindthechair.com “On Paper” Magazine–5 Issues Only $29.95!
HOW-TO STEPS 
-
 1
1 Colour Section 1
Roots to mid-lengths: TIGI Colour Creative plus 3 inches TIGI Colour Mix Master
 with TIGI Colour Activator 20 volume/6%
Mid-lengths to ends: TIGI Colour True Light with TIGI Colour Activator 8.5 volume/2.55% Colour Section 2
Roots to mid-lengths: TIGI Colour True Light with TIGI Colour Activator 8.5 volume/2.55%
Mid-lengths to ends: TIGI Colour Creativeplus 3 inches TIGI Colour Mix Masterwith TIGI Colour Activator 20 volume/6% Colour Section 3:
Roots to ends: TIGI Colour True Light with TIGI Colour Activator 8.5 volume/2.55% -
2
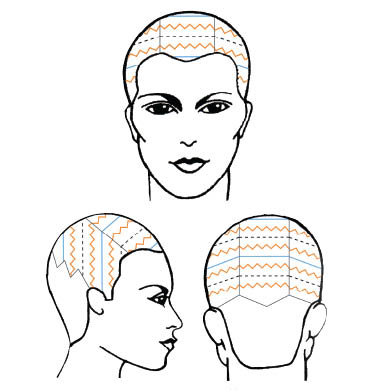
Step 1. Take a zig-zag parting from above the ear through the crown on both sides and isolate.
Step 2. Take parallel partings from high recession to the zig-zag parting and isolate. This creates three sub-sections.
Step 3. Starting on either side of the headshape, take a diagonal forward parting using a placement weave, apply Colour Selection 1 and isolate with TIGI® Colour™ Meche Strips.
Step 4. Next, take a zig-zag diagonal forward parting, isolate only the tips of the zig-zag parting and apply Colour Selection 2. Isolate with TIGI® Colour™ Meche Strips.
Step 5. Lastly, take a diagonal forward parting using a textured weave and apply Colour Selection 3. Isolate with TIGI® Colour™ Meche Strips.
Step 6. Continue alternating the different weaves and partings until the entire section is complete.
Step 7. Repeat this technique in all three sub-sections. -
 3
3
YOU MIGHT LIKE THIS
-
Hair Color
TIGI® Colour™ “Glamour” Step-by-Step
-
Hair Color
TIGI® Colour Lights Technicals
-
Hair Color
TIGI Urban Detailing Colour Step-by-Step
-
Hair
TIGI CATWALK® Collective: Rock ‘n’ Roll Glamour/ Missoni
-
Hair
TIGI Urban Detailing Cut Step-by-Step
TRENDING NOW!
-
Curly
Long Layers: 10 Pro Tips + Common Cutting Mistakes
-
BTC Hair Trend Report
The Biggest Haircut Trends of 2024
-
Copper
What Is The "Cowboy Copper" Hair Trend? Here's What It Really Means...
-
Haircuts
SHAG 101: The Dos And Don'ts
-
Bobs
The '90s Bob: How To Cut & Style This Trending Haircut
-
BTC Hair Trend Report
Quiet Luxury Blonde: The "Old Money" Trend Explained
-
Balayage
How To Turn A Brassy Lift Into A Brunette Balayage
-
Blonde
Dear Clients, Read This Before Going Blonde!

