
How-To: Perfectly Undone Braid

Advertisement
Advertisement
How-To: Perfectly Undone Braid
HOW-TO STEPS 
-
1
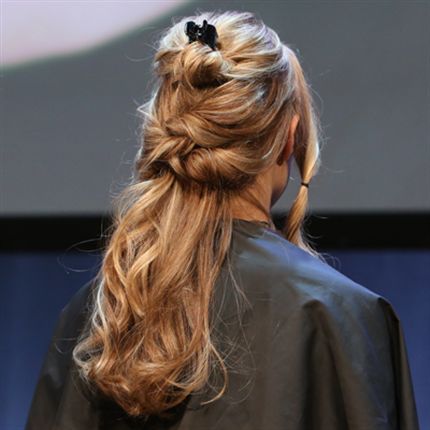
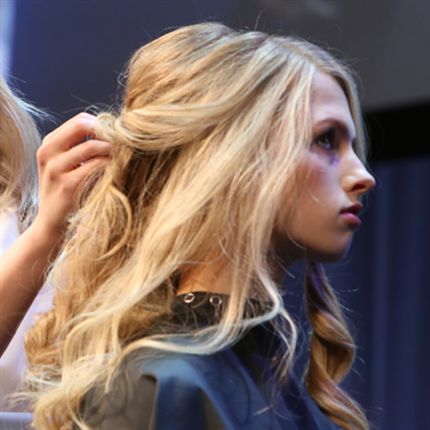
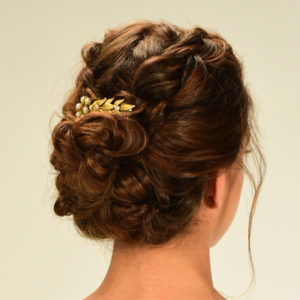
Section the top of the hair by the crown and pin, then section face-framing, vertical sections for later use.
-
 2
2To anchor this style, take two-inch vertical sections from either side of the head from behind the ears, and secure below the crown with an elastic. Then take two more two-inch vertical sections from either side of the head and twist, joining both sections together at the back of the head with an elastic.
-
3
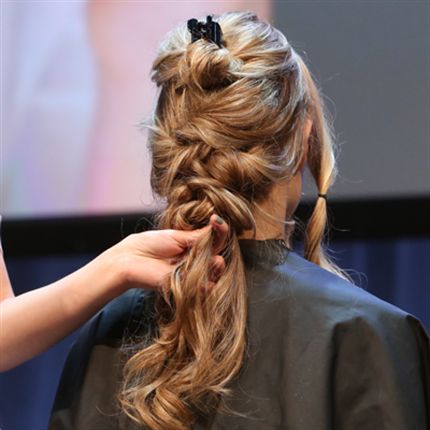
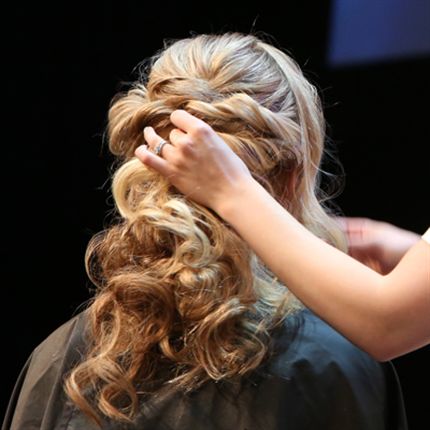
Pull the small ponytail under the elastic forward and over the elastic, pulling the remaining hair down to blend seamlessly with the rest of the hair for future styling. Liberally pancake the twists to cover the elastic.
-
 4
4Continue this technique, working down to just above the shoulder blades. Pancake through the braid, making sure it goes from full at the crown to a smaller point between the shoulder blades.
Pro Tip: To create a looser, fuller look, take a medium-sized twist and join to the opposite side with a smaller twist and secure with an elastic before pancaking as you work down the head. -
 5
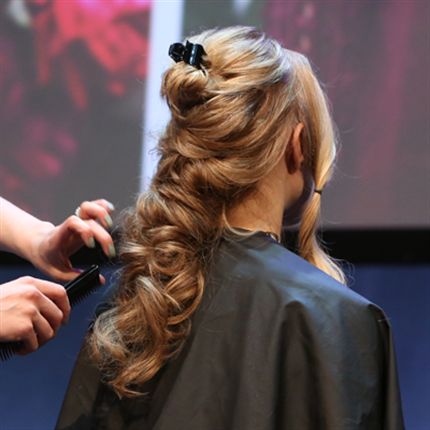
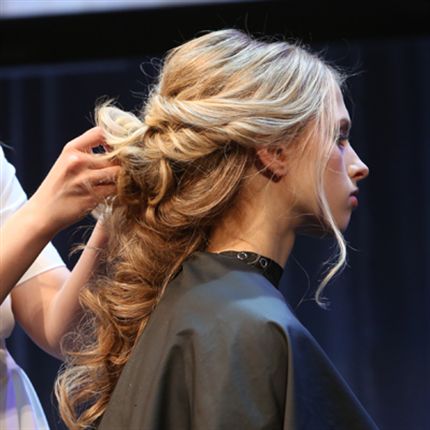
5Backcomb the remaining hair, starting at the bottom of the ponytail, to create a shape that’s wide to skinny to wide again. Spray texturizing spray through the ends to give fullness and eliminate frizz.
-
 6
6Secure with bobby pins, placing the pins straight up into the twists.
Pro Tip: There’s definitely a difference between good frizz and bad frizz—to clean up the bottom, backcombed portion, comb through the rough section for a more finished texture. -
 7
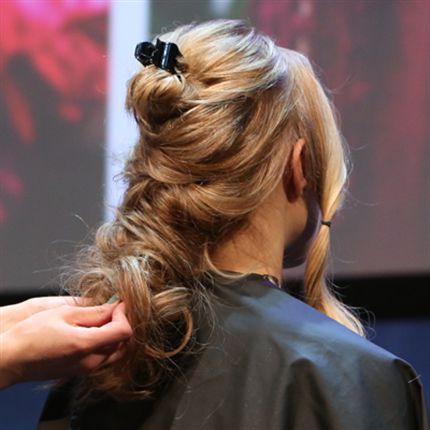
7Unclip the section at the crown as well as the pinned sections at the hairline. Considering the shape of the hair, you can twist, braid or knot the side sections depending on the desired shape. Pin these twists and/or braids back at the crown.
-
 8
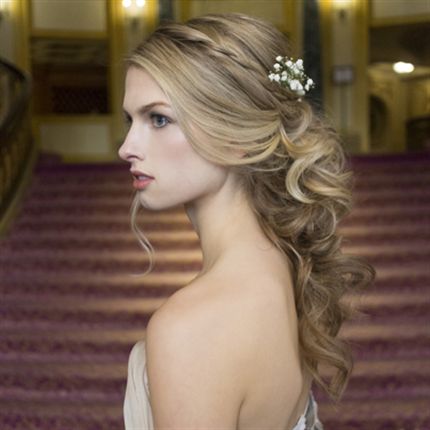
8To secure the style and give it texture, use spray wax . Use bobby pins to loosely secure the fringe area, which creates the face-framing shape that will best suit your bride.
-
 9
9Move back to the crown where your side sections have joined. Unpin your remaining section and scrunch the hair up toward the crown, inserting bobby pins to secure.
Pro Tip: Detail the look with subtle decoration—like baby’s-breath! -
 10
10
See Steph’s Other Looks!
See the Rest of the looks from Steph’s “Bridal Upstyling”
Class on Facebook!
More from
Stephanie Brinkerhoff
-
Bridal
4 Bridal Styling Mistakes & How To Solve Them
-
BTC University
Bridal Client Struggles? How To Book, Schedule and Handle Brides
-
Beachwaves
Boho Bridal Crown Braid
-
Bridal
8 Bridal Styles You Can Learn Right Now
-
Bridal
Bridal Stylists: 5 Tips For Working During A Pandemic
-
Beachwaves
7 Articles That’ll Take Your Styling Game To The Next Level In 2019
-
Bridal
5 Photography Tips That’ll Elevate Your Bridal Styles
-
Bridal
7 Tips For Perfectly Imperfect Bridal Styles
-
Bridal
Bridal Stylists: This Chart Will Make Consultations So Much Easier
-
Braids
@hairandmakeupbysteph’s Crown Braid
-
#thebtcshow Austin 2017
Want To Keep Your Blondes Blonde and Your Upstyles Solid? Read This…
-
#thebtcshow Austin 2017
The Behind The Chair Show 2017: Day 3
-
#thebtcshow Austin 2017
TRUMATCH by Daniel Alain at #thebtcshow
-
#thebtcshow Austin 2017
The Behind The Chair Show 2017: Day 2
-
#thebtcshow Austin 2017
Kenra Professional at #thebtcshow
-
Bridal
3 Bridal Style Issues: Solved
-
Bridal
5 Bridal Styling Tricks You Should Be Using
-
Bridal
Every Upstyle Should Start With This…
-
Braids
Beachy, Five-Strand Braid
-
News
The BTC #Squad Spills It All: Color Melts, Balayage & Going Platinum
-
BTC COLOR, Cut & Style Show
COLOR, Cut & Style 2016
-
Hair Extensions
BTC Exclusive! TRUMATCH Hair Extensions
-
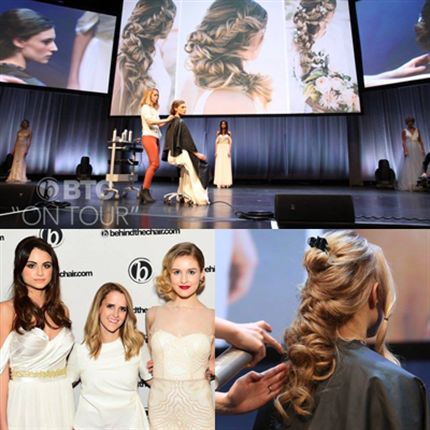
BTC "On Tour"
BTC “On Tour” LA 2017
-
Bridal
How-To: 4 Upstyles For Wedding Season
YOU MIGHT LIKE THIS
-
Hair
Speedy Bridal Side Braid
-
Hair
Soft Twisted Chignon from Peter Gray
-
Hair
The Bridal Chignon from Kenra Professional
-
Hair
Bridal Style: The Half-Up ‘Do
-
Hair
The Top Half Technique from Stephanie Brinkerhoff
TRENDING NOW!
-
Hair Color
WWYD: How To Stop Your 6N From Turning Orange
-
BTC Hair Trend Report
The Biggest Haircut Trends of 2024
-
Bobs
How to Avoid a Bulky Bob: 4 Techniques To Try
-
Glossing/ Toning
How To Achieve "Glass Hair": Smart Hacks From Hairdressers
-
Copper
What Is The "Cowboy Copper" Hair Trend? Here's What It Really Means...
-
Celebrity
10 BIPOC Celebrity Hairstylists Who Are Making Major Waves In The Industry Right Now
-
Curly
Long Layers: 10 Pro Tips + Common Cutting Mistakes
-
BTC Hair Trend Report
WWYD: How Hairstylists Are Navigating Inflation

