
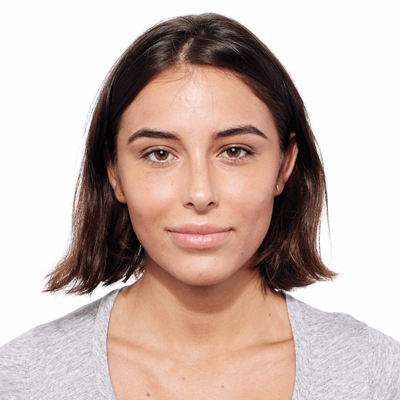
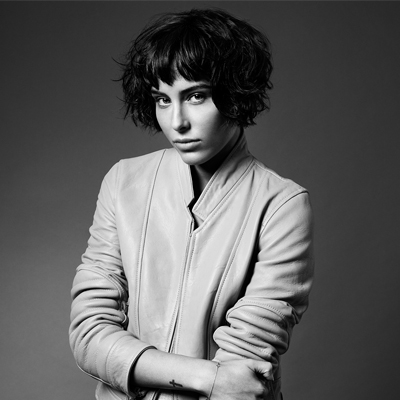
The Dutch Bob

Advertisement
Advertisement
Advertisement
The Dutch Bob
Products Used
HOW-TO STEPS 
-
 1
1Cleanse and condition based on client’s hair type with a Living Proof shampoo & conditioner. Follow with Prime Style Extender on damp hair to prep style and use as a cutting lotion. Comb though. For additional slip, layer Perfect hair Day (PhD) Night Cap Overnight Perfector.
-
 2
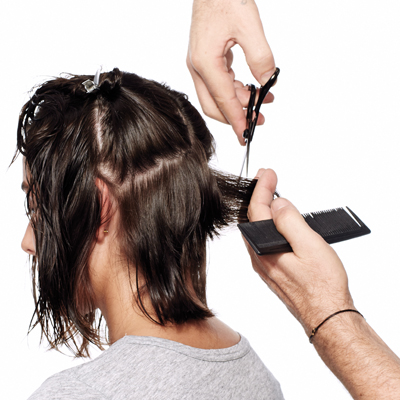
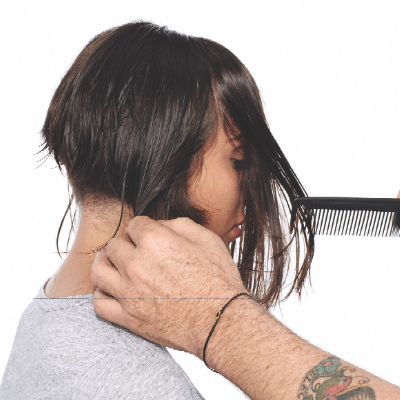
2Section the hair from the middle of the occipital to the top of the ears, following the round of the head.
-
 3
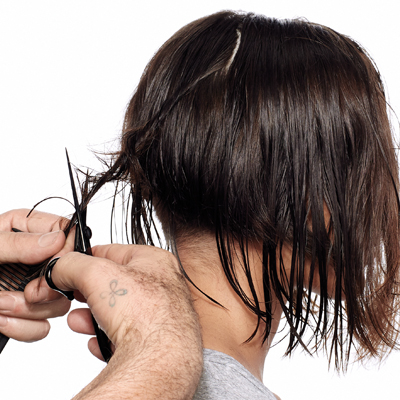
3Starting in the center back, pull section straight out from the head and remove length by refracting. Continue removing length following the traveling guide.
-
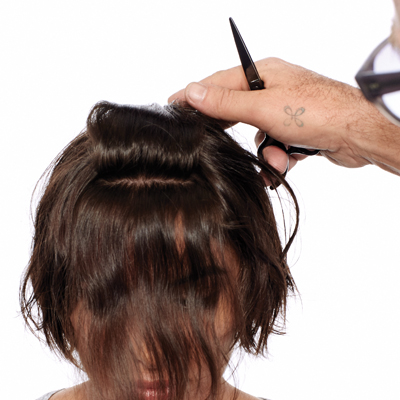
 4
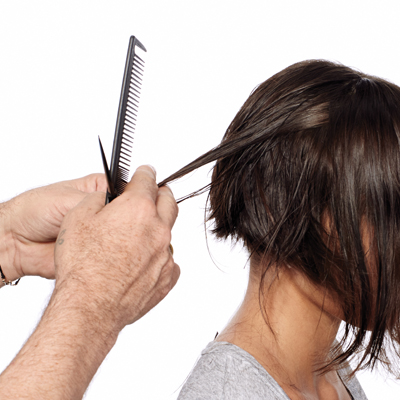
4Scissor-over-comb to blend hair, starting in the hairline and following the round of the head.
-
 5
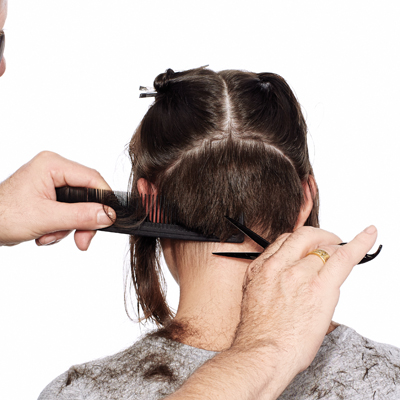
5Create a fast section from the top of the head to the second recession, holding the hair without tension, removing length with the point of your shears.
-
 6
6Connect front to back sections by overdirecting section over ear to the back perimeter line, then cutting. Repeat on both sides.
-
 7
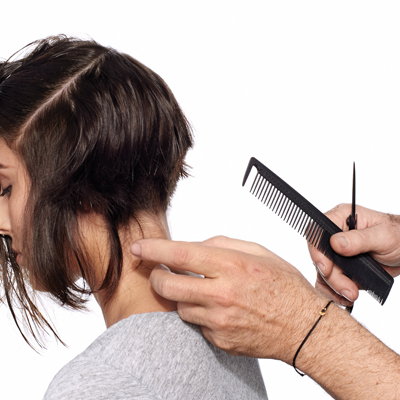
7Drop the remaining hair to natural fall.
-
 8
8Starting in the back, create ½-inch twisted sections, and remove the length by gently twisting away from the face with no tension. Downward refract using a visual guideline to create a soft interior line.
-
 9
9In the crown, twist ½-inch sections without tension (alternate clockwise/counter-clockwise directions) and overdirect back to the interior perimeter to create length in the front.
-
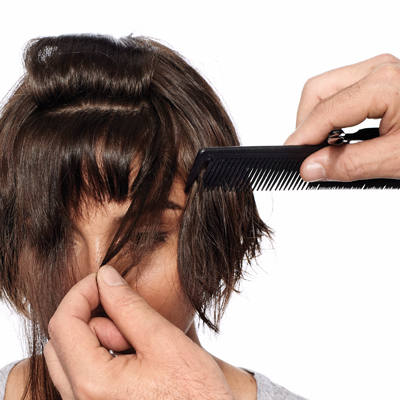
 10
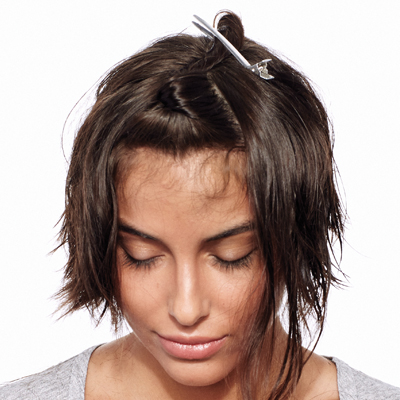
10Section out a narrow triangle with point in apex to the arch of the eyebrows.
-
 11
11Divide the triangle horizontally in the middle.
-
 12
12Gently twist small sections in alternating directions with no tension and remove to desired length by visually finding a guide that is appealing to the face.
-
 13
13Incorporate additional hair from the hairline into the corner of the triangle section to create a stronger visual impact. Cut the hair by picking up with your comb, creating slight elevation and point.
-
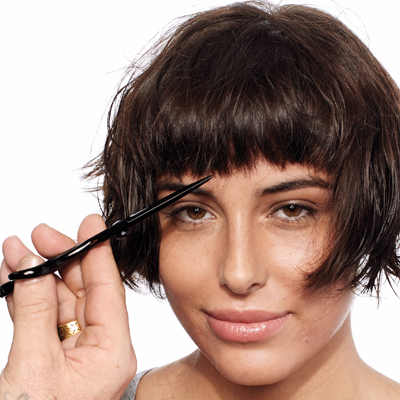 14
14Drop the rest of the triangle section and point-cut into the fringe perimeter.
-
 15
15Styling Option 1
1. Take excess water out of the hair by rough-drying with your hands.
2. Apply a few pumps of Restore Instant Repair Cream to your hands, and evenly distribute through the hair, focusing on frizzy, dry or damaged areas.
3. For hair types that lack texture and body, add a few pumps of Instant Texture Mist to add volume and grip.
4. Continue to dry the hair using your hands, focusing on the roots first. Flatten and smooth the roots by lifting and smoothing with your fingers as you dry.
5. Next, dry midlengths and ends. Still using your hands, twist 1- to 2-inch sections away from the face to create movement and shape. Continue until twists are created throughout the hair and are dried.
6. Rub a dab of Amp2 Instant Texture Volumizer through your hands and deconstruct the twists. Lift and tousle until end look is achieved. For drier or frizzier hair types, add a half pump of Satin Hair Serum to Amp2 Instant Texture Volumizer to keep hair polished and smooth.
-
 16
16Styling Option 2 (for naturally curly-haired clients)
1. Apply a dollop of Curl Defining Styling Cream to your hands and evenly distribute through hair, focusing on midlengths and ends, and then roots. Comb through with a wide-tooth comb.
For hair types that lack a natural wave or body:
1. Apply Instant Texture Mist and scrunch through to distribute. Blot away excess water with a towel.2. Dry the roots first. Flatten and smooth 1-inch of the root area first by lifting and smoothing with fingers as you dry.
3. Next, take water out of the midlengths and ends. Still using your hands, twist 1- to 2-inch sections away from the face to create movement and shape. Continue until twists are created throughout the hair and are dried.
4. Diffuse or place client under dryer until completely dry.
5. Once hair is dry, rub a dab of Amp2 Instant Texture Volumizer and a drop of Satin Hair Serum through your hands and deconstruct the twists. Lift and tousle until end look is achieved. Tip: Have client flip head over and deconstruct to achieve more volume.
More from
Living Proof
-
Awards Shows
The Best Hair & Beauty At The 2024 Emmy Awards
-
Awards Shows
2024 Golden Globes Best Hair & Beauty Looks
-
Gifts
10 Hair Gift Sets Sure To Spread Joy This Holiday Season
-
BTC Hair Trend Report
KARLIE KLOSS’ SLICKED-BACK PONYTAIL AT THE 2023 MET GALA
-
Industry News
Living Proof.® Launches Virtual Storefront
-
Celebrity
Daisy Jones & The Six: Behind the Scenes with Lead Hairstylist MaryAnn Hennings
-
BTC Hair Trend Report
2023 Hairstyling: 11 Trends You Need To Know
-
Blonde
4 Foil, Toning & Maintenance Tips for Winter Blondes
-
Product Launches
8 Just-Launched Hair Products Stylists Need To Try
-
Blonde
4 Ways To Avoid Dull & Damaged Blondes
-
Frizz
Healthy Hair Perfector
-
Manufacturer
Living Proof Appoints Katie Glowski As Chief Sales Officer
-
Celebrity
2022 Met Gala: Your Insider Beauty Recap
-
Celebrity
The Best Hair & Beauty Looks From The Oscars 2022
-
Awards Shows
2022 SAG Awards: The Best Celebrity Hair + Beauty Looks
-
Celebrity
Met Gala 2021: See The Best Celebrity Hair & Beauty Looks!
-
Celebrity
2021 MTV Video Music Awards: The Best Celebrity Hair + Beauty Looks
-
Curls
Wig Wearing Secrets: Caring For The Hair Underneath
-
Manufacturer
Living Proof Appoints New Chief Executive Officer
-
Conditioners
Color Care Shampoo & Conditioner
-
Blonde
Color Care Whipped Glaze for Blondes & Highlights
-
Color Depositing
Color Care Whipped Glaze for Darker Tones
-
Clarifying
Perfect hair Day™ Triple Detox Shampoo
-
Balayage
High-Contrast Babylights + Textured Bob
YOU MIGHT LIKE THIS
-
Braids
Double Dutch Braid Upstyle from @theconfessionsofahairstylist
-
Braids
Ethereal Dutch Halo Braid
-
Bobs
How-To: Cut a Simple, Modern Bob with Fringe
-
Braids
BOHO BRAID
-
Bobs
How-To: The Convertible Bob
TRENDING NOW!
-
BTC Hair Trend Report
The Biggest Haircut Trends of 2024
-
Copper
What Is The "Cowboy Copper" Hair Trend? Here's What It Really Means...
-
Curly
Long Layers: 10 Pro Tips + Common Cutting Mistakes
-
Blowouts
Bombshell Blowouts: 4 Ways To Create Lift With Longevity
-
Frizz
Straighten & Smooth 2A, Fine-Medium Density Hair
-
Ask A BTC Expert
5 Foil Tips & Tricks From @the.blonde.chronicles
-
Copper
Muted Bronze
-
Haircuts
SHAG 101: The Dos And Don'ts

